AxisField
User Manual
Field service, work orders and maintenance operations.
A complete step-by-step guide for every role.
Contents
- About AxisField and who uses it
- Getting started
- Setting up your company
- Technicians and applications
- Clients, sites and assets
- Service requests
- Work orders (jobs)
- Dispatch board and schedule
- The technician mobile app
- Timesheets and overtime
- Inventory
- Quotes and additional work
- Maintenance contracts
- Costing, billing and reports
- The client portal
- Troubleshooting and FAQ
- Appendix
1About AxisField and who uses it
AxisField runs the whole life of a maintenance job: a request comes in, the office schedules a technician, the technician works from a phone (even without signal), the client signs off, and the job is costed and ready to invoice.
1.1 The roles
Everyone signs in with an email and password at /login and lands on the screen made for their role.
| Role | What they do | Where they land |
|---|---|---|
| Administrator | Sets up the company (settings, skills, job types, users) and can do everything the office does. | Dashboard |
| Dispatcher | Logs requests, creates and assigns jobs, manages the schedule, clients, quotes and stock. | Dashboard |
| Supervisor | Everything a dispatcher does, plus reviews finished jobs, approves timesheets and records sign-off. | Dashboard |
| Technician | Works from the mobile app: jobs, checklists, photos, parts, time, client signature. | Technician app (Today) |
| Client | Sends requests, follows jobs, approves quotes, signs off work, downloads reports. | Client portal |
1.2 What you need
- Office staff: any modern browser (Chrome, Edge, Safari, Firefox) on a computer or tablet.
- Technicians: an Android phone or iPhone. The site must use HTTPS so the app can work offline and ask for permissions.
- Clients: any phone or computer. Nothing to install.
1.3 How a job flows
If the technician finds extra work that was not planned, the job goes on hold, a change authorization (a small quote) is sent to the client, and the work continues once the client approves it.
2Getting started
Everyone2.1 Sign in and sign out
- Open your company's address in the browser, for example
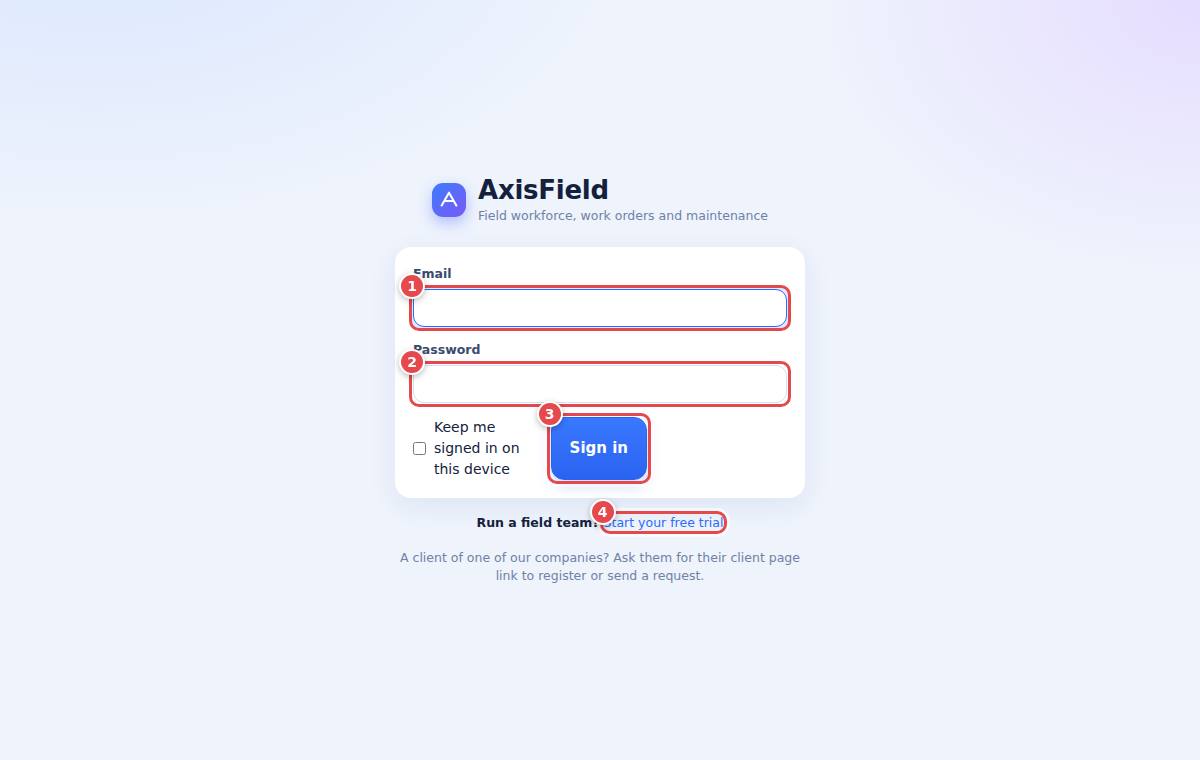
https://your-site/login. - Type your email (1) and password (2), then press Sign in (3). Tick Keep me signed in on this device on your own phone or computer.
- To leave, press the sign-out icon next to your name at the bottom of the left menu (staff) or Sign out (clients).
2.2 Finding your way around (office staff)
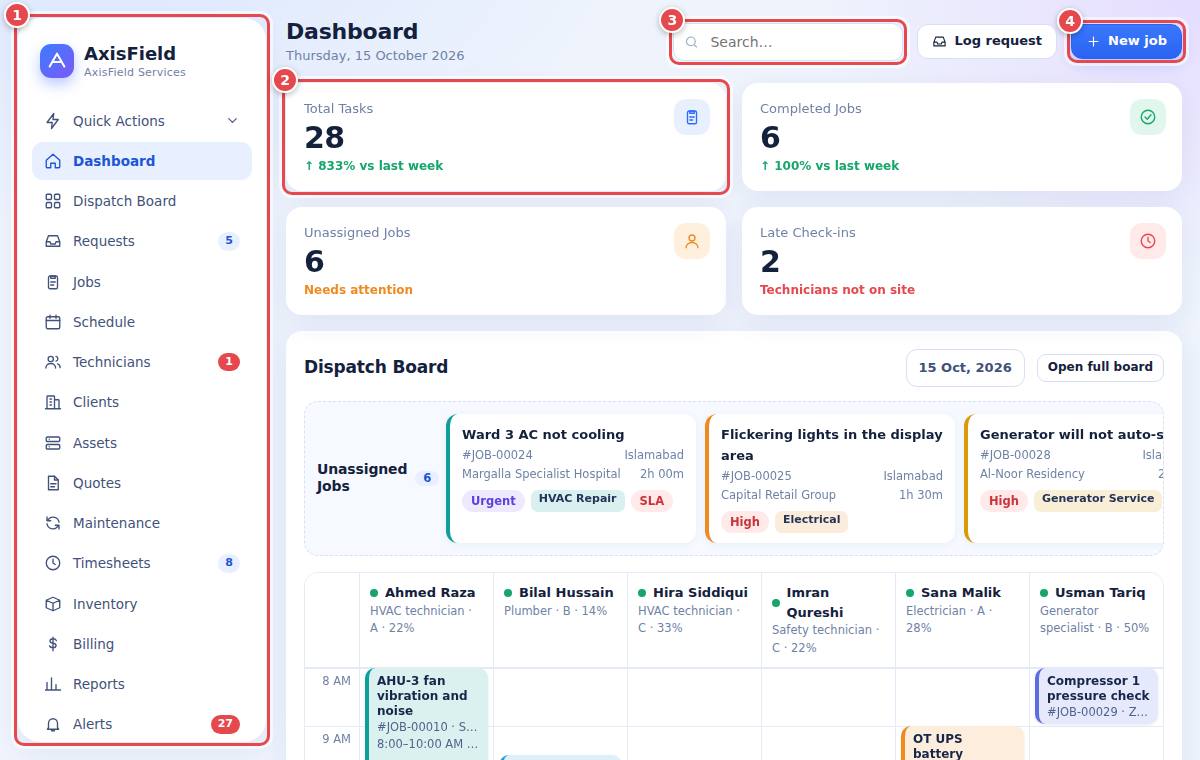
- The left menu (1) holds every area: Dashboard, Dispatch Board, Requests, Jobs, Schedule, Technicians, Clients, Assets, Quotes, Maintenance, Timesheets, Inventory, Billing, Reports and Alerts. Administrators also see Configuration and Settings. Small coloured numbers show things waiting for you (new requests, timesheets to approve, alerts, technician applications).
- The cards (2) at the top of the dashboard show total jobs, completed jobs, unassigned jobs and late check-ins. Click a card to open the matching list.
- The search box (3) finds jobs, clients, assets and requests by number or name.
- New job (4) starts a new work order from anywhere.
Quick Actions
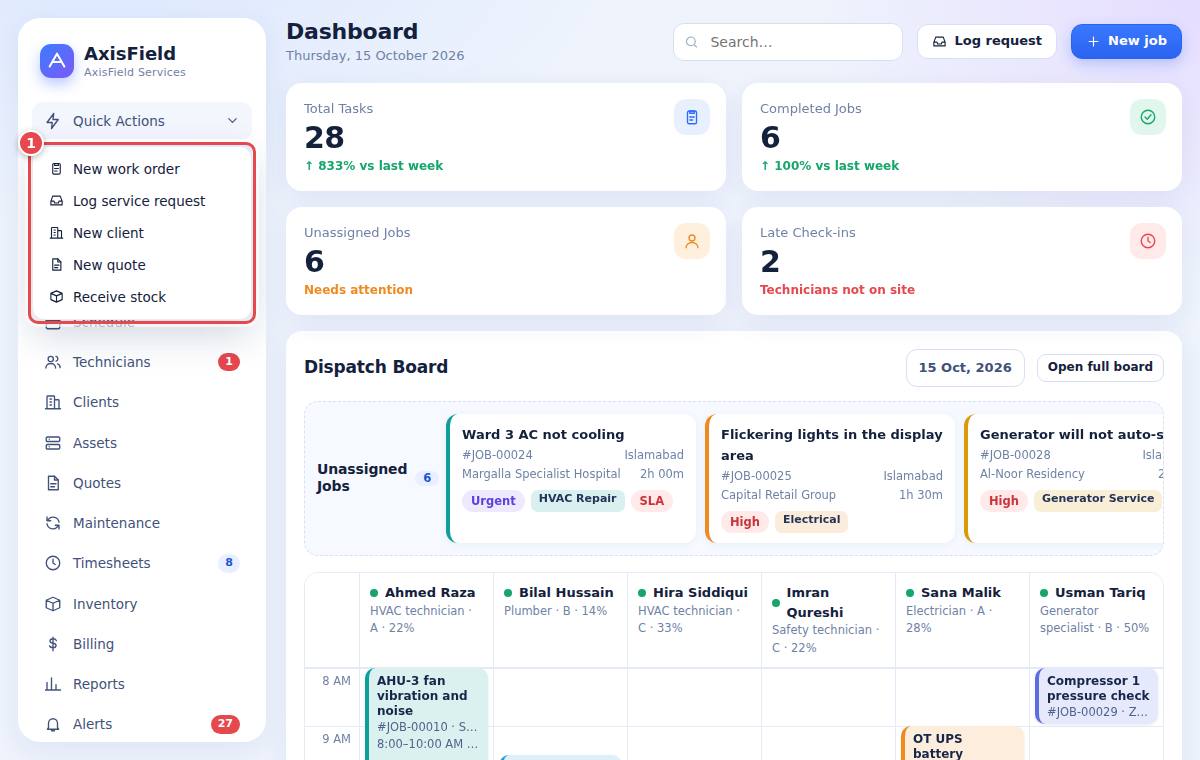
The Quick Actions menu at the top of the left menu (1) creates the things you add most often: a work order, a service request, a client, a quote, or a stock receipt.
Search
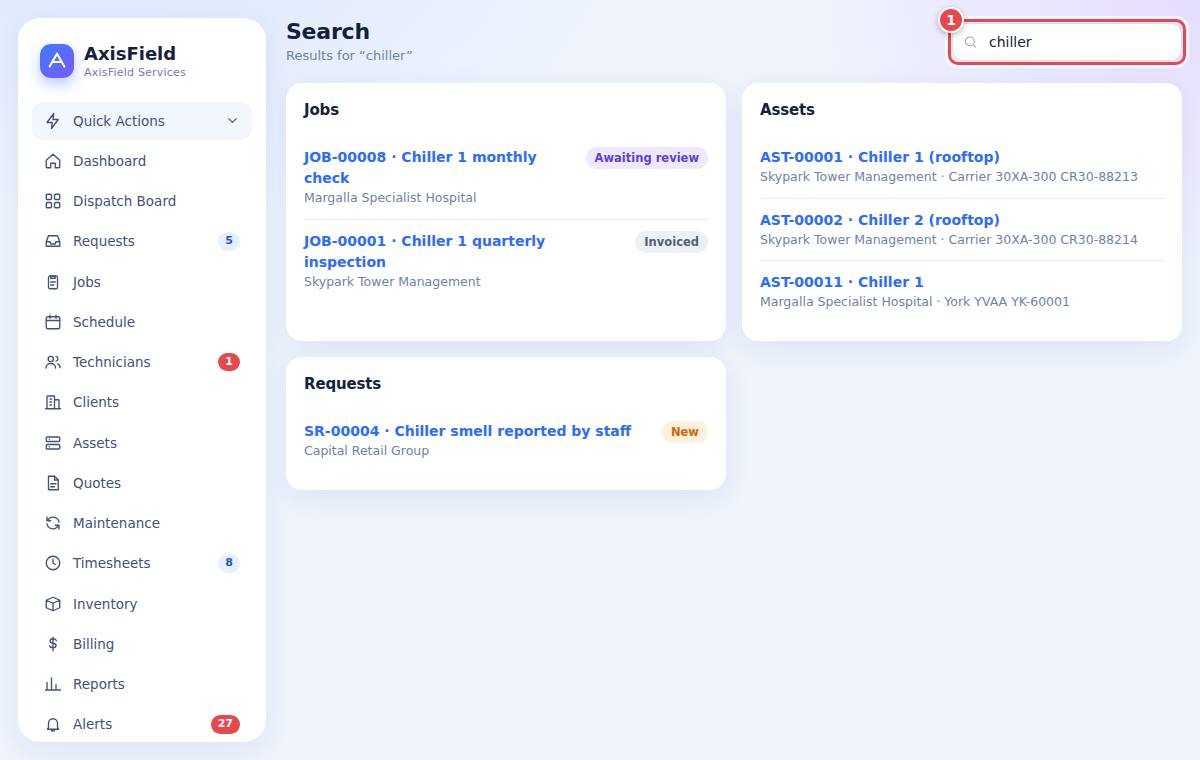
Type at least two letters in the search box and press Enter. Results are grouped by jobs, clients, assets and requests.
2.3 Help
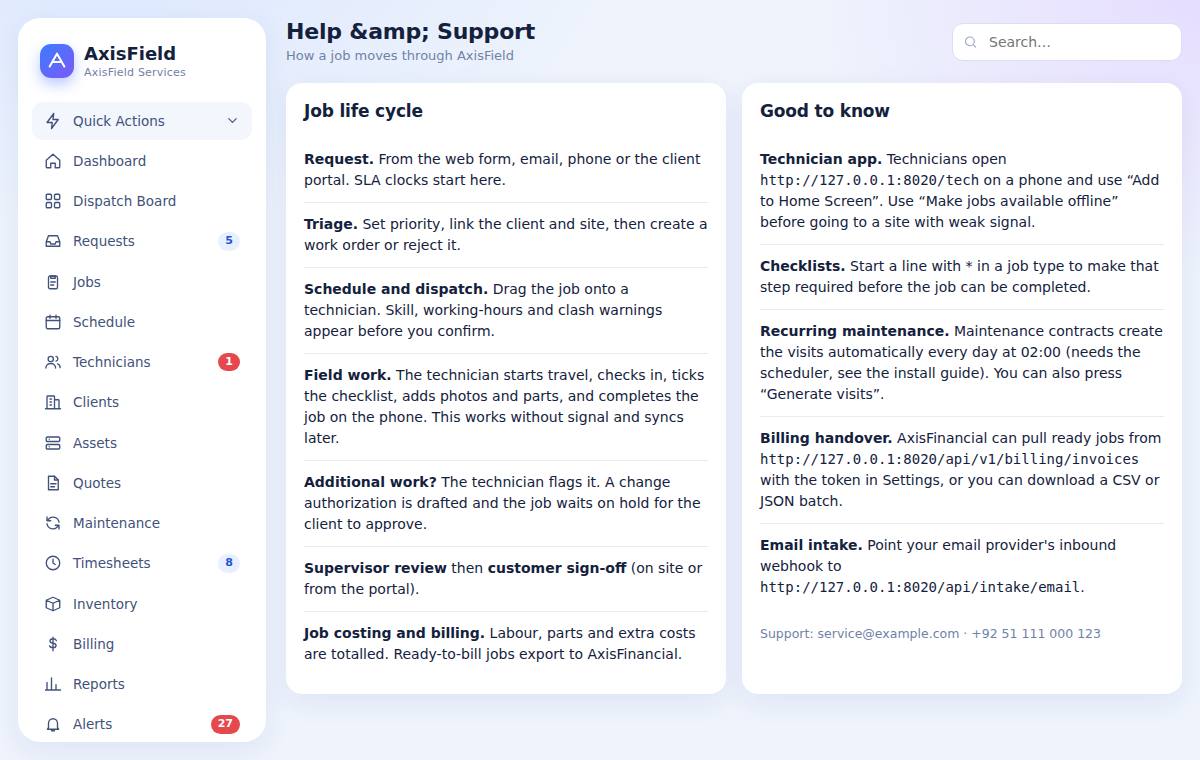
Help & Support in the menu lists the main links and addresses (technician app, billing API, email intake) for your company, and links to this manual.
3Setting up your company
AdministratorDo this once when you start. Everything here is under Settings and the Configuration group in the left menu.
3.1 Company settings
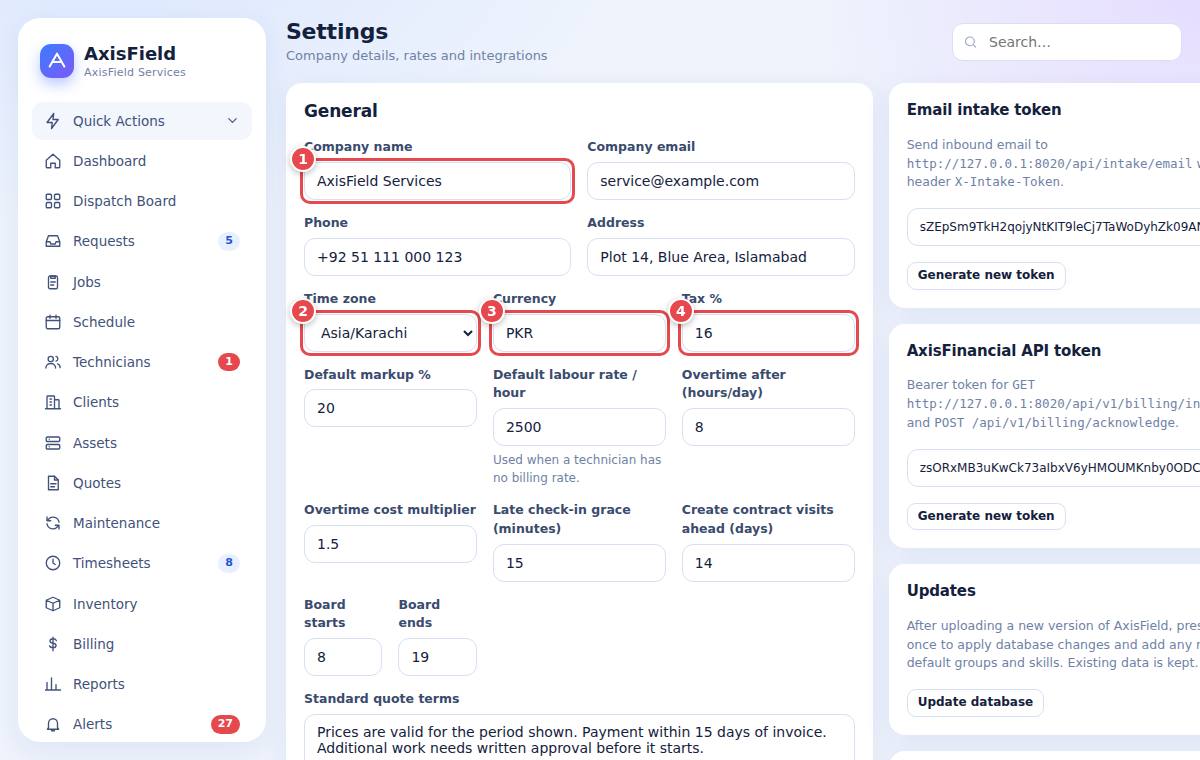
- Open Settings. Under General check the company name (1). It appears on quotes, reports and the public pages.
- Choose your time zone (2) and currency (3). All times and prices follow them.
- Type your default Tax % (4). It is added to quotes.
- Press Save settings at the bottom of the form.
Rates and rules
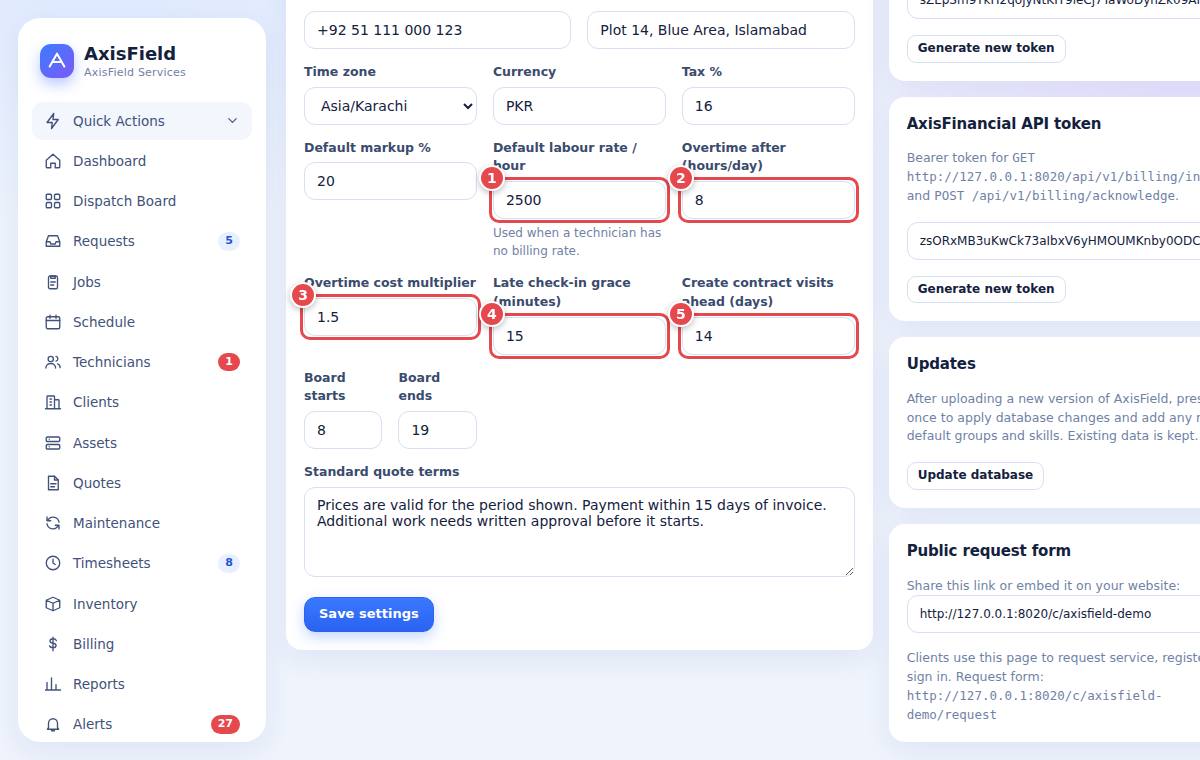
| Setting | What it does |
|---|---|
| Default markup % | Added to part prices on quotes. |
| Default labour rate / hour | Billed per hour when a technician has no personal billing rate. |
| Overtime after (hours/day) and multiplier | Hours beyond the daily limit are costed at the multiplier (for example 8 hours, 1.5 times). |
| Late check-in grace (minutes) | How long after the planned start a technician may stay "Scheduled" before the job shows as a late check-in alert. |
| Create contract visits ahead (days) | How far ahead maintenance contracts create their jobs. |
| Board starts / ends | Hours shown on the dispatch board. |
| Standard quote terms | Text printed on every new quote. |
Integration tokens
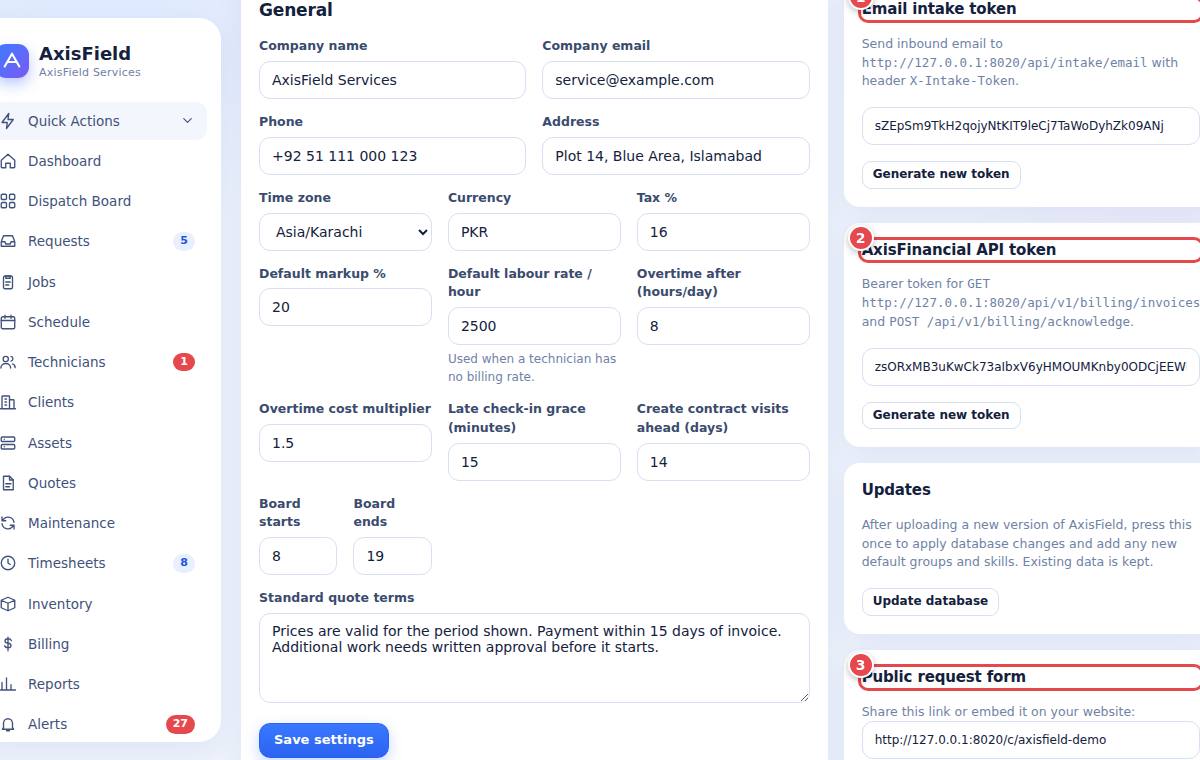
On the right of Settings you find the Email intake token and the AxisFinancial API token, and the address of your public pages. Press Generate new token to replace a token (the old one stops working immediately). See chapters 6 and 14.
3.2 Skills and services
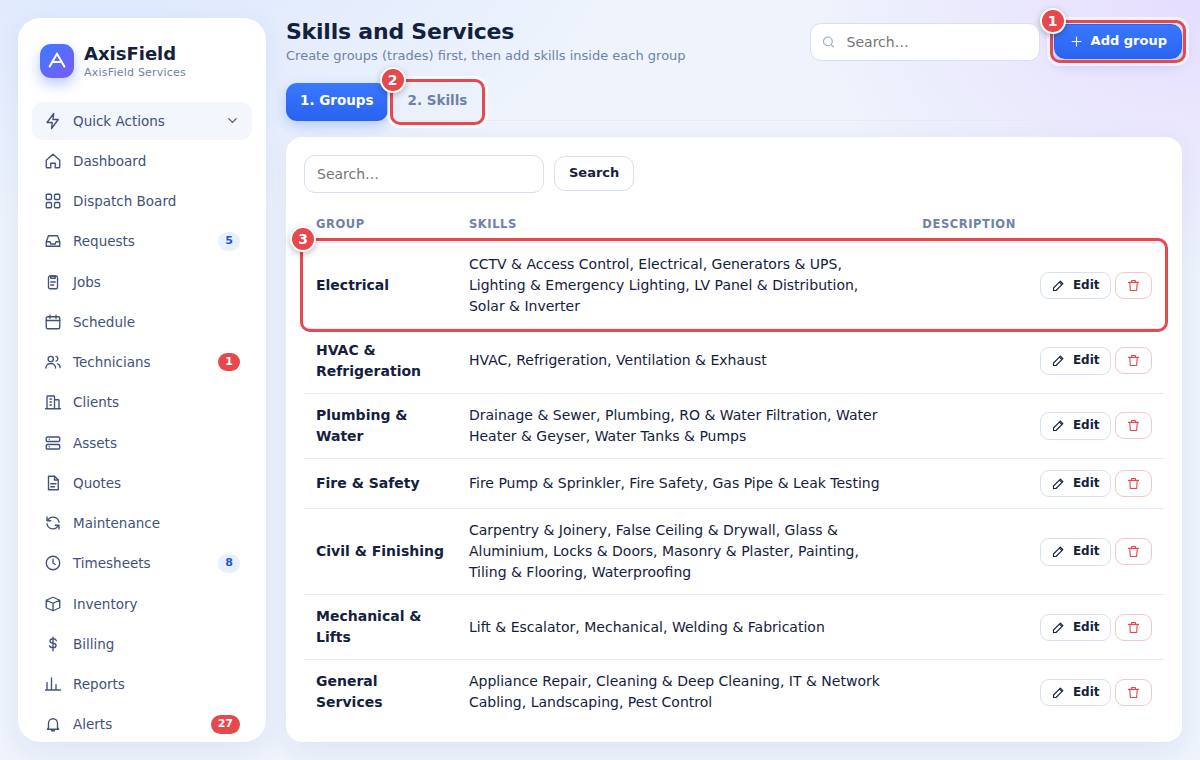
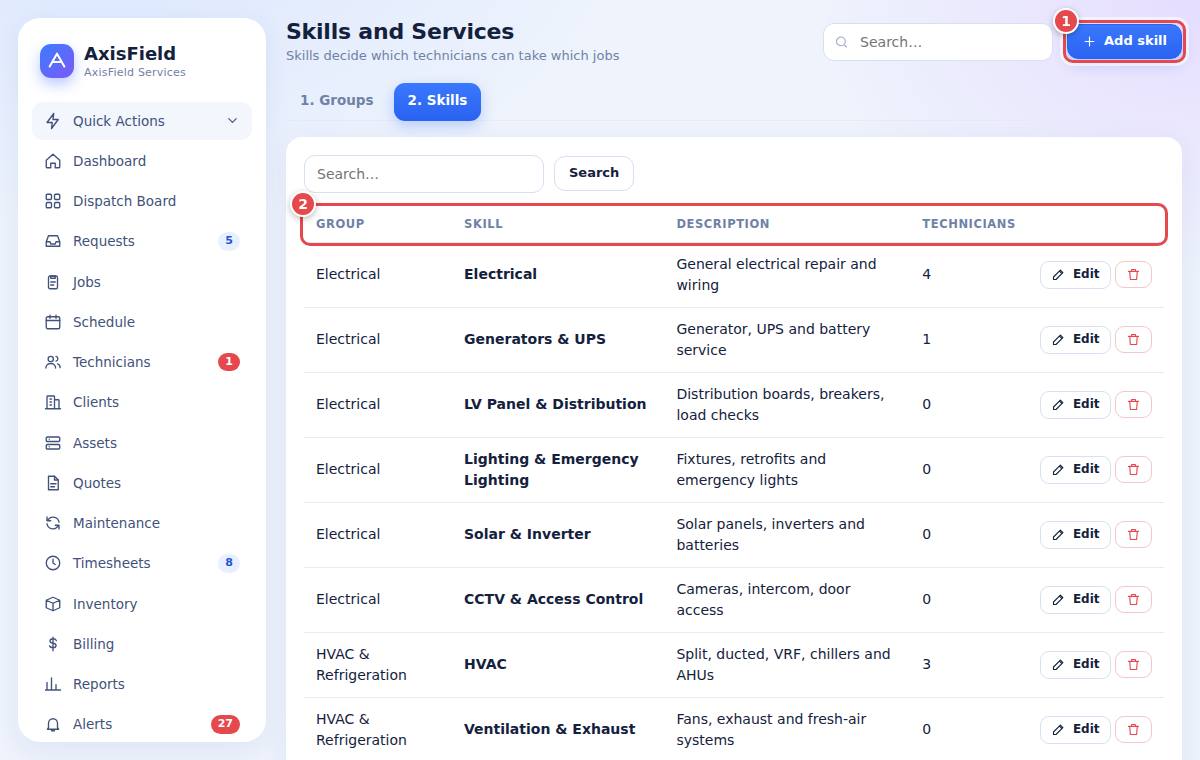
Skills decide which technician can take which job. They are arranged in groups (trades), for example Plumbing & Water contains Plumbing, Water Tanks & Pumps and Drainage & Sewer. The page has two tabs: 1. Groups then 2. Skills.
- Open Skills & Services. The Groups tab shows each group with its skills (3). Press Add group (1) to create a trade group.
- Type the group name and an optional sort order, then Save.
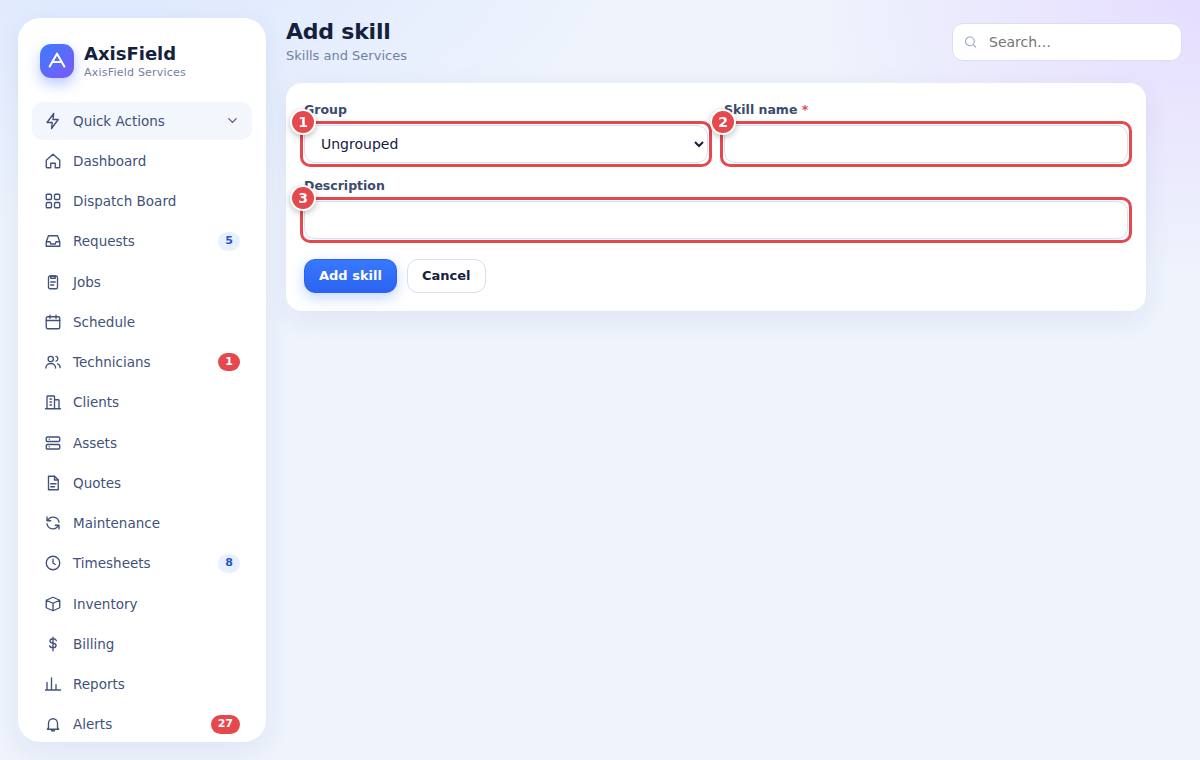
- Open the Skills tab (2) and press Add skill. Choose the Group (1), type the skill name (2) and a description (3), then Save.
3.3 Job types and checklists
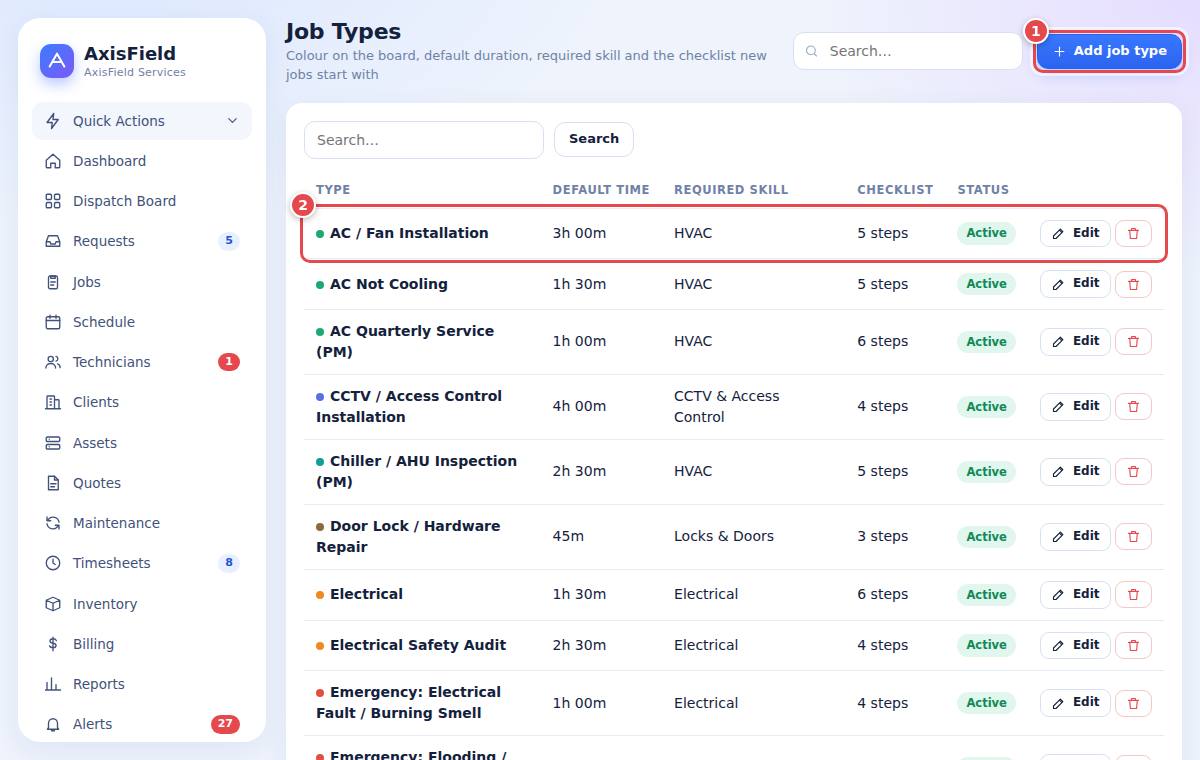
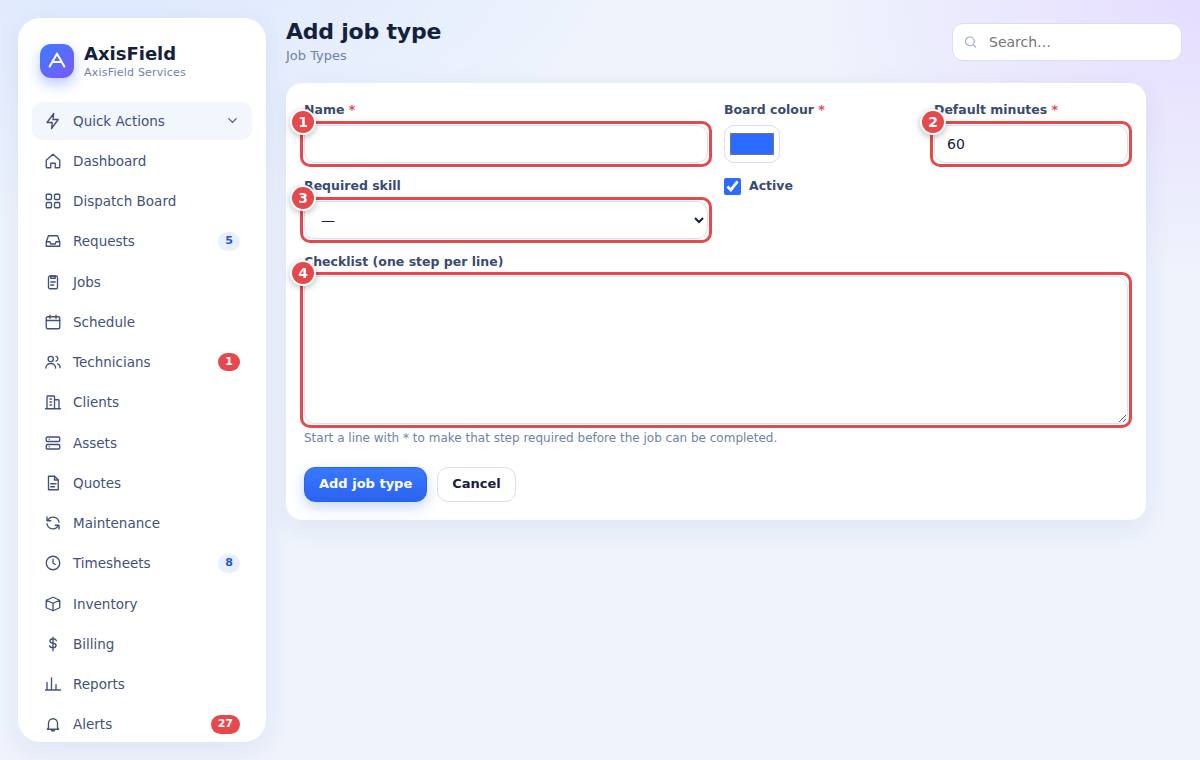
A job type is a kind of work (AC Quarterly Service, Water Leak, Electrical Safety Audit). It sets the default duration, the skill needed and the checklist the technician follows on the phone.
- Open Job Types and press Add job type.
- Type the name (1), the default minutes (2) and the required skill (3).
- In Checklist (4) write one step per line. Start a line with
*to make the step required: the technician cannot complete the job until required steps are ticked. - Save. New jobs of this type copy the checklist automatically.
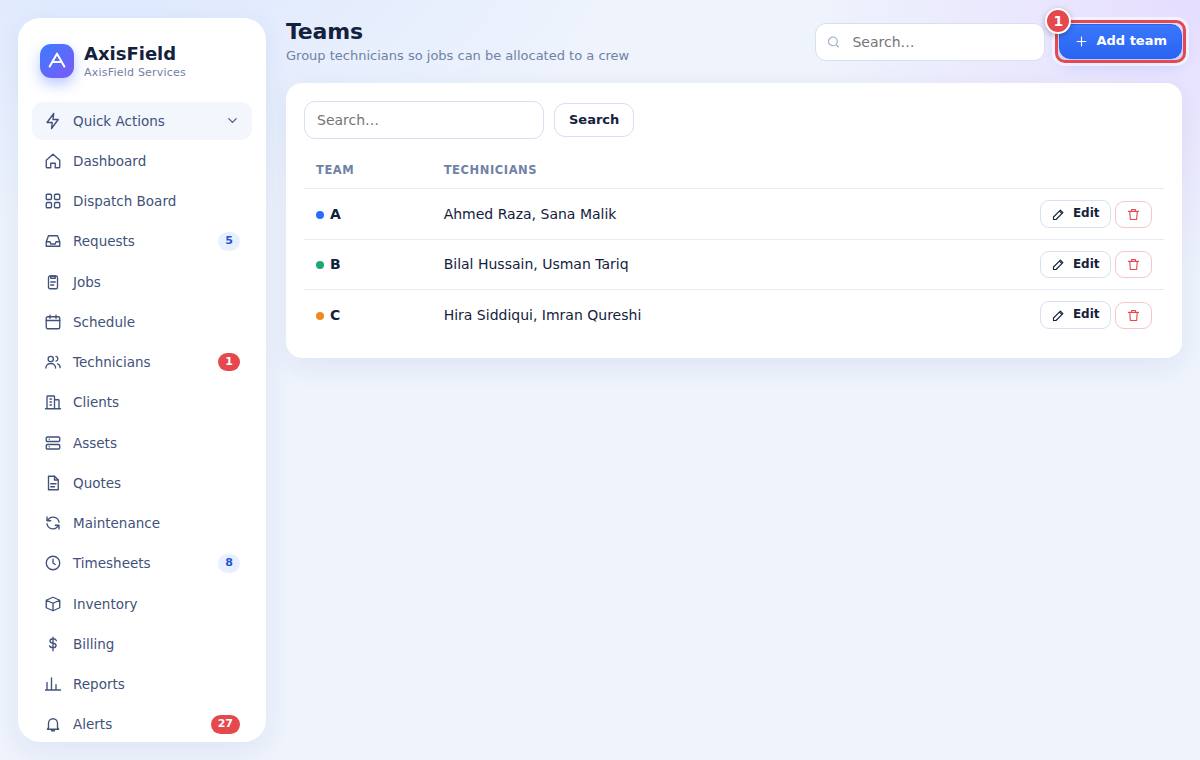
3.4 Teams and SLA policies
Teams group technicians (for example by area or crew). They colour the dispatch board and can be used as a filter.
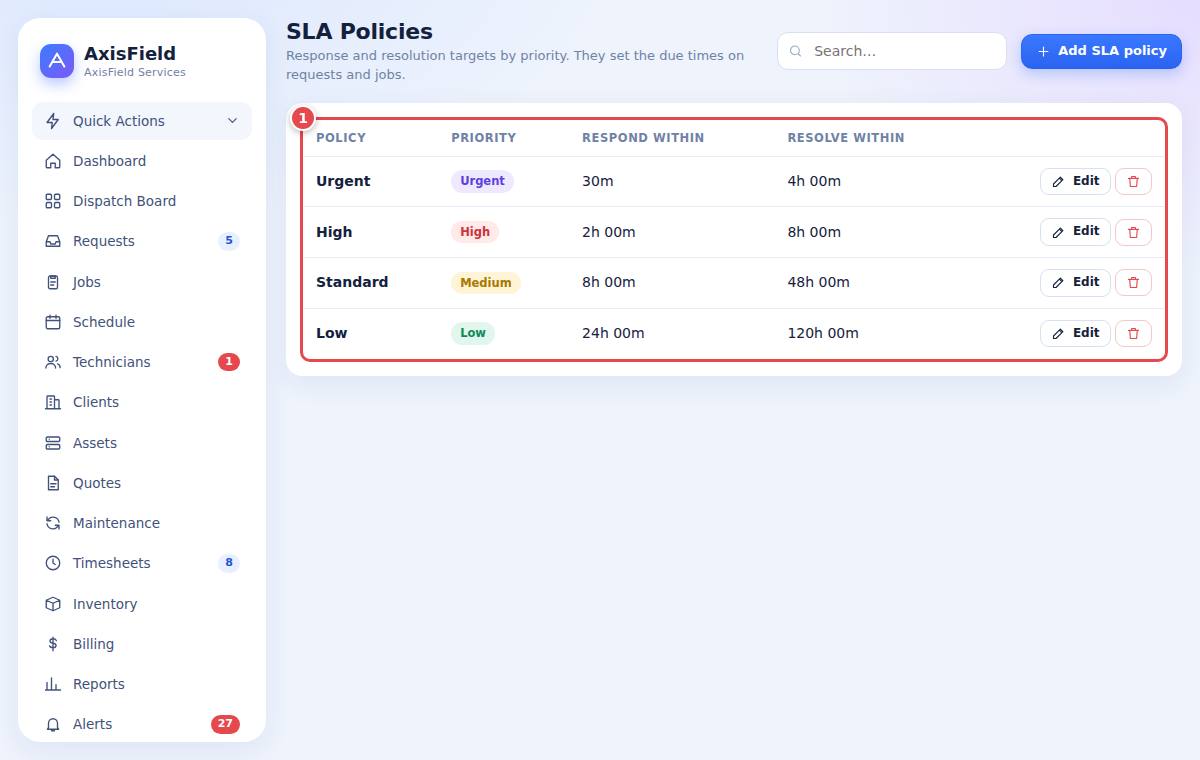
SLA Policies set how fast you promise to respond and to finish for each priority (Urgent, High, Standard, Low). Edit the minutes to match your promises. New requests and jobs get their due times from this table.
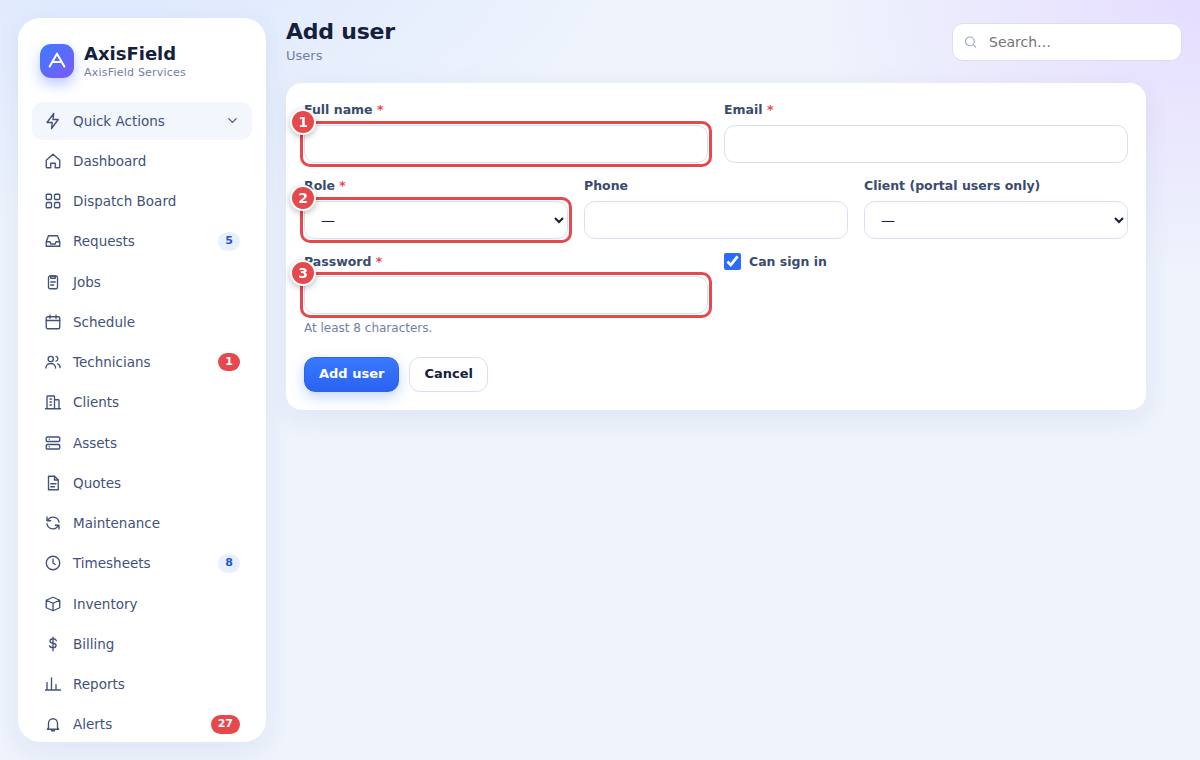
3.5 Users and roles
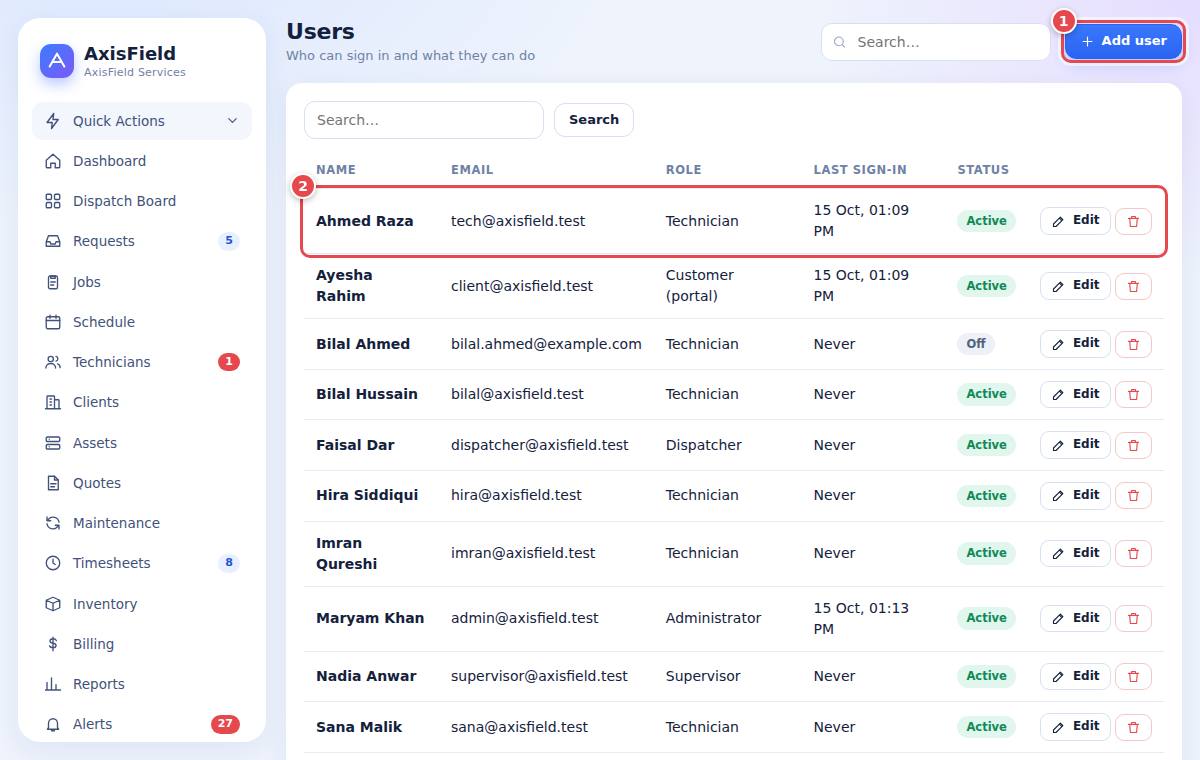
- Open Users and press Add user (1).
- Type name and email, choose the role (2), set a password of at least 8 characters (3) and keep Can sign in ticked.
- For a client login choose role Client and pick the client company. For a technician choose Technician: a technician profile is created for you.
- To stop someone signing in, edit the user and untick Can sign in.
4Technicians and applications
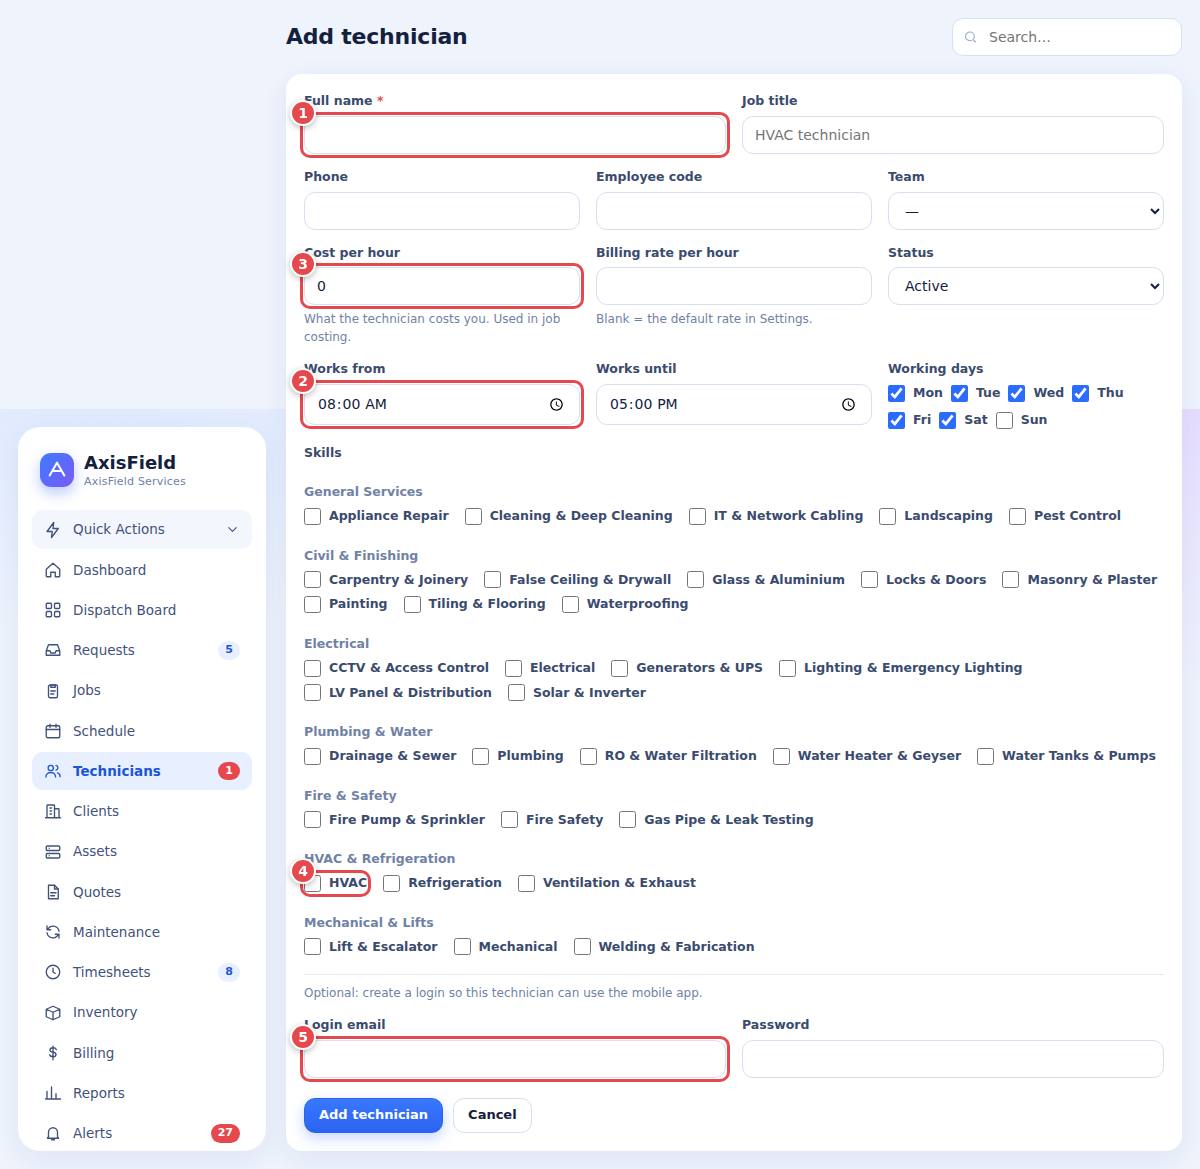
AdministratorDispatcherSupervisor4.1 Add a technician yourself
- Open Technicians and press Add technician.
- Fill name (1), job title and phone. Choose a team.
- Set working hours (2) and the working days. The dispatch board warns when a job falls outside them.
- Set cost per hour (3). This is what the technician costs you; it feeds job costing. A bill rate is optional.
- Tick their skills (4), grouped by trade.
- To let them use the phone app, type a login email (5) and a password (minimum 8 characters) now.
- Press Save.
4.2 Technician applications (self sign-up)
Technicians can apply themselves, so you do not have to type their details.
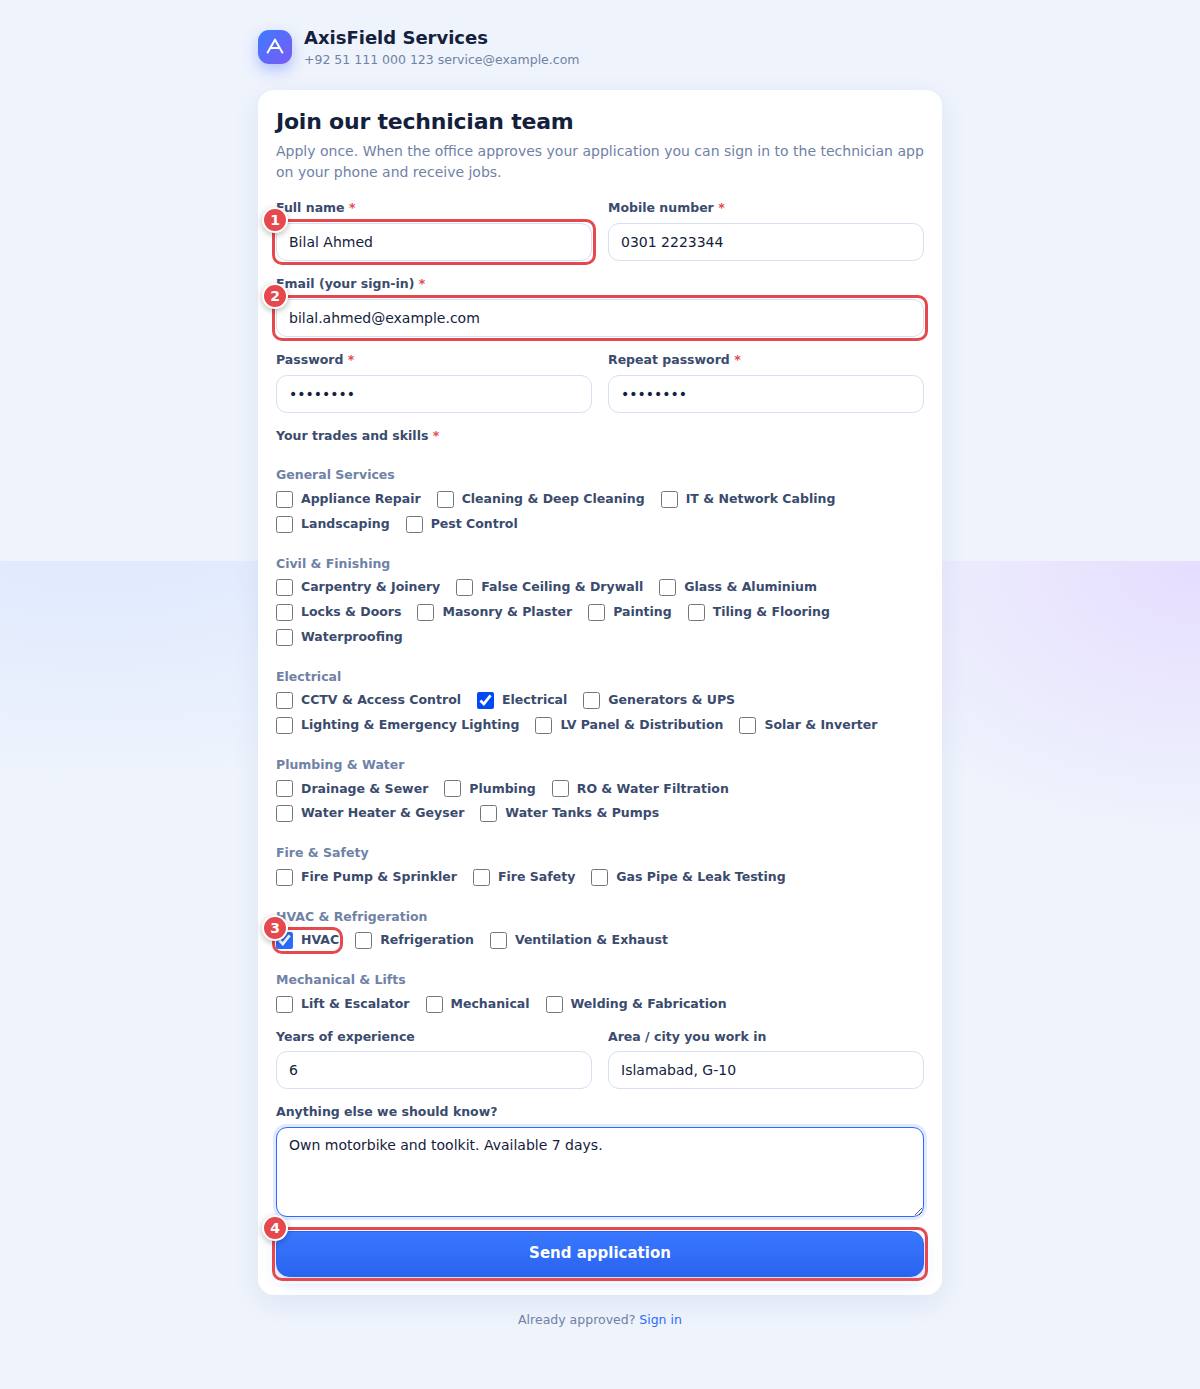
What the technician does
- The technician opens
/technician/joinon their phone (also linked as Technician? Apply to join or Join as technician on the public pages). - They enter name (1), mobile, email (2) and a password, tick their trades and skills (3), add years of experience, area and a short note, and press Send application (4).
- They see "Application received". Their login stays switched off until you approve.
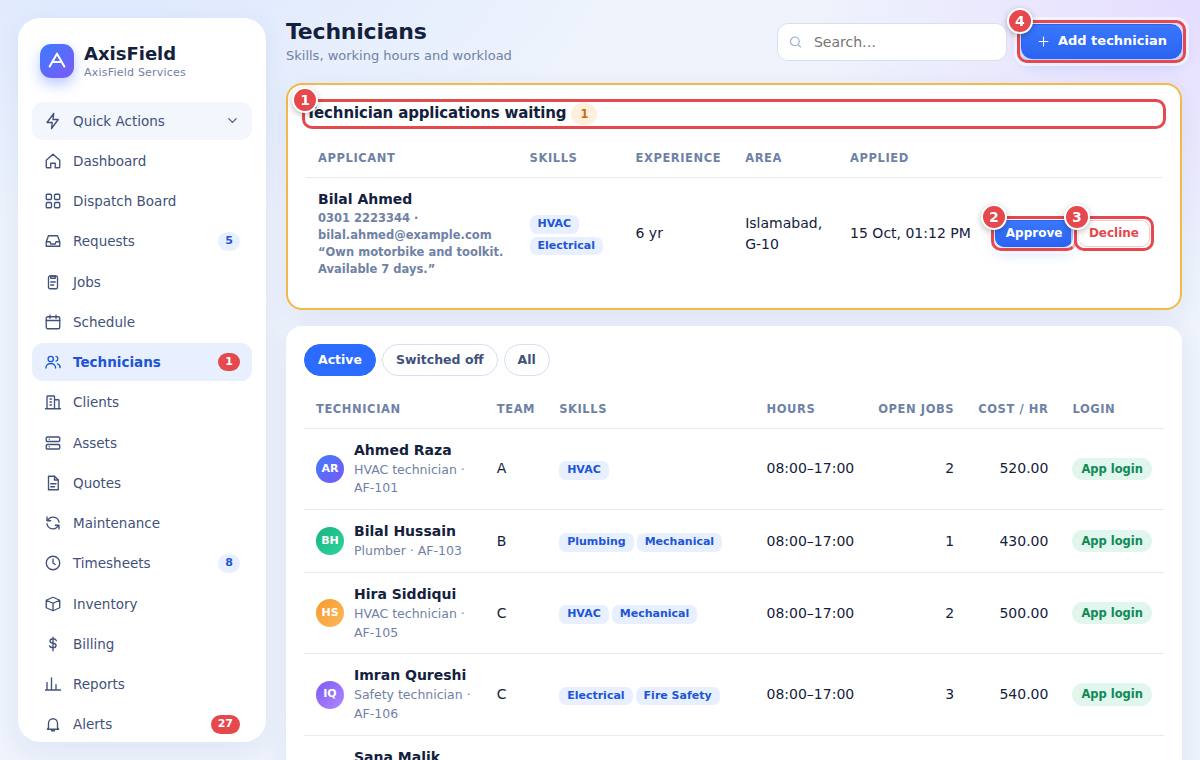
What you do
- A number appears next to Technicians in the menu. Open the page: a box Technician applications waiting (1) lists each applicant with skills, experience, area and note.
- Press Approve (2) to switch the login on. The technician form opens so you can set their team, working hours and cost per hour. Press Decline (3) to refuse.
- Tell the technician they can sign in. Until approved, signing in shows "waiting for approval".
4.3 Time off and availability
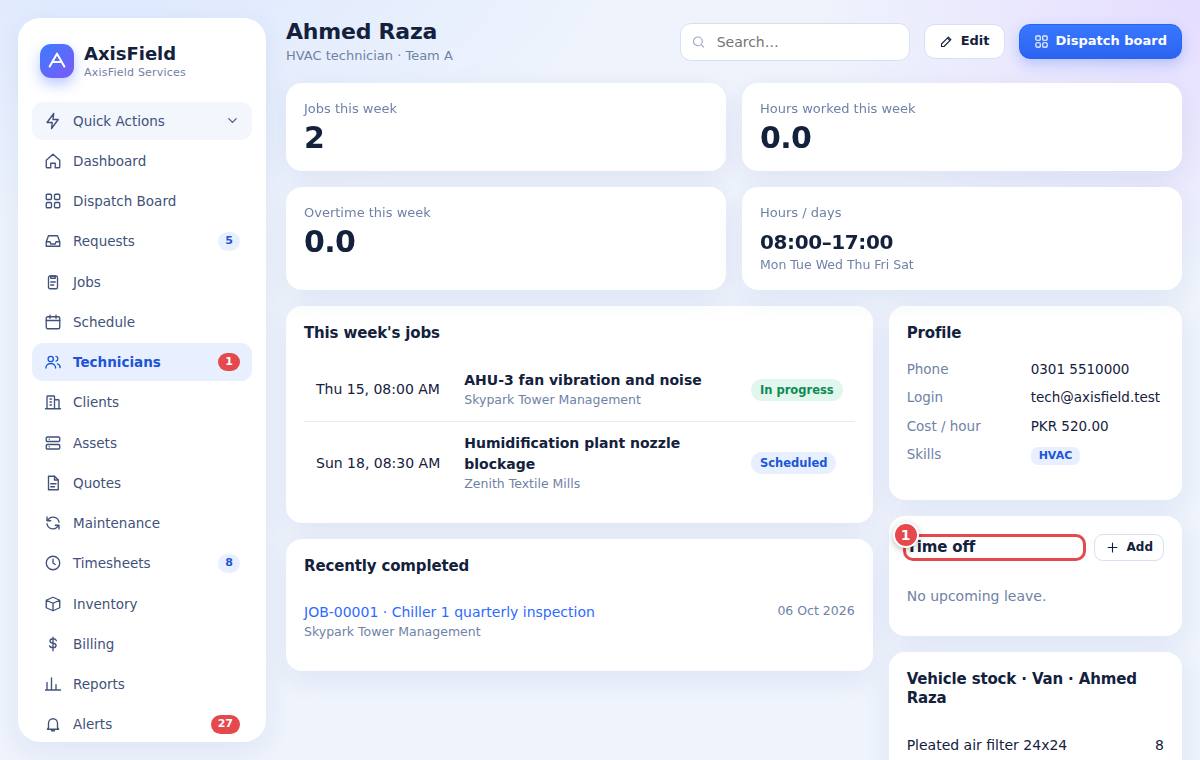
Open a technician and use Time off to add leave (dates and reason). Dispatch warns if you assign a job during leave.
4.4 Stopping a technician
Edit the technician and set Status to Switched off. They disappear from assignment lists and cannot sign in, but their history is kept.
5Clients, sites and assets
AdministratorDispatcherSupervisor5.1 Add a client
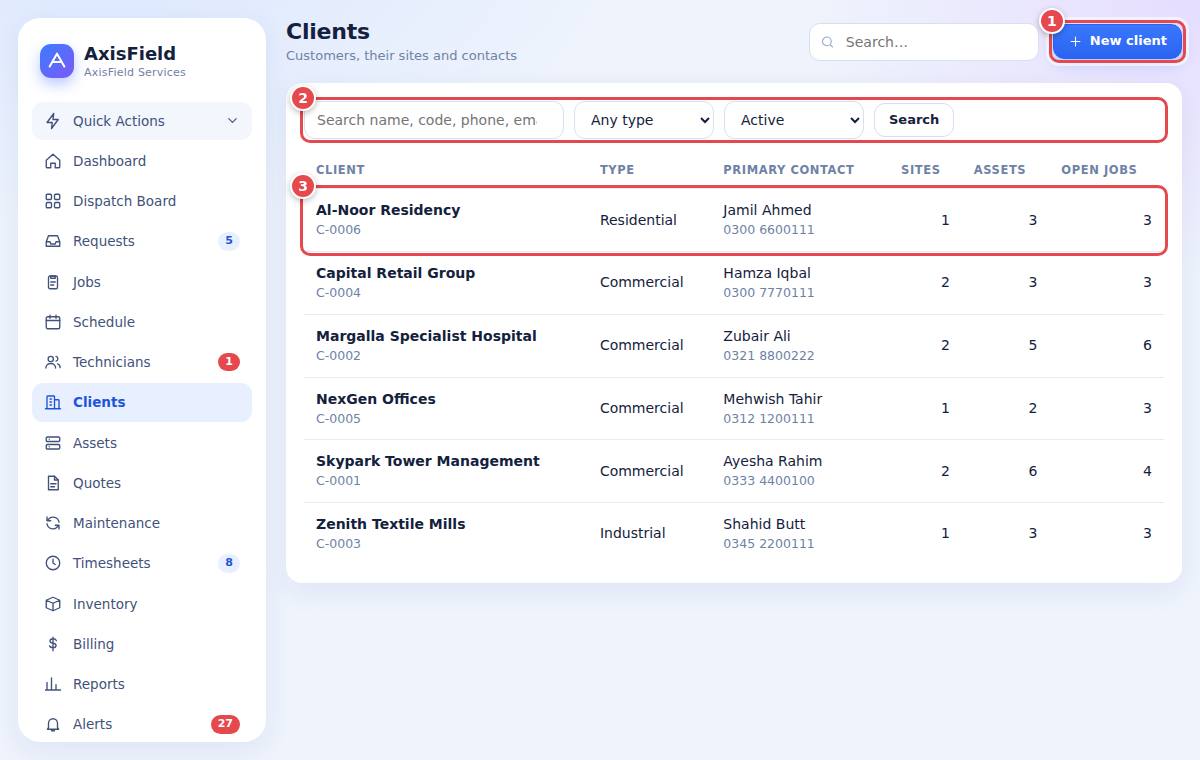
- Open Clients and press New client (or use Quick Actions).
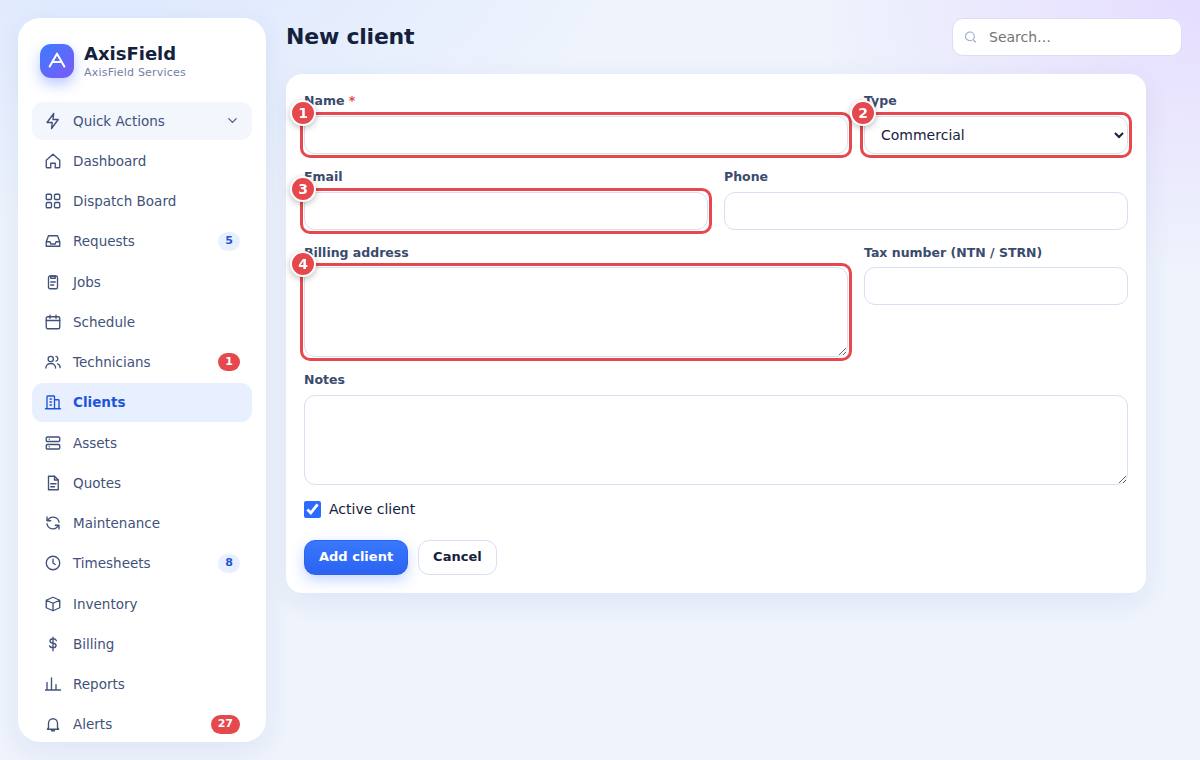
- Type the name (1) and choose the type (2): commercial, residential, government or industrial.
- Add email (3), phone and the billing address (4).
- Save. The email is used to match future requests to this client automatically.
5.2 Sites, contacts and portal login
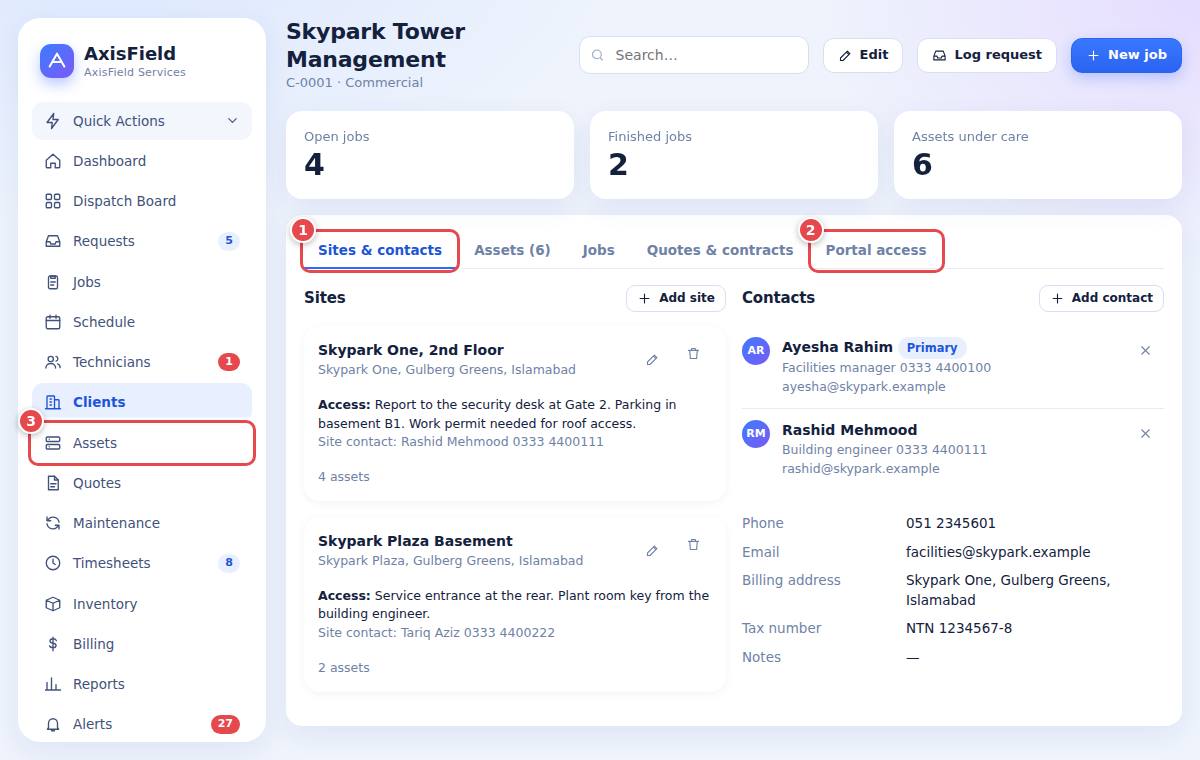
Open a client to see its page. A client can have several sites (buildings or addresses), several contacts, their assets and history.
- Under Sites (1) press Add site: name, address, city and access instructions (for example "report to security desk at Gate 2"). Technicians see these on their phone.
- Under Contacts add the people to call. Mark one as primary.
- Near the bottom of the client page, in the box about the client portal (2), type a name and email and press the create-login button. A temporary password is shown once: copy it and send it to the client. They can then sign in to the client portal.
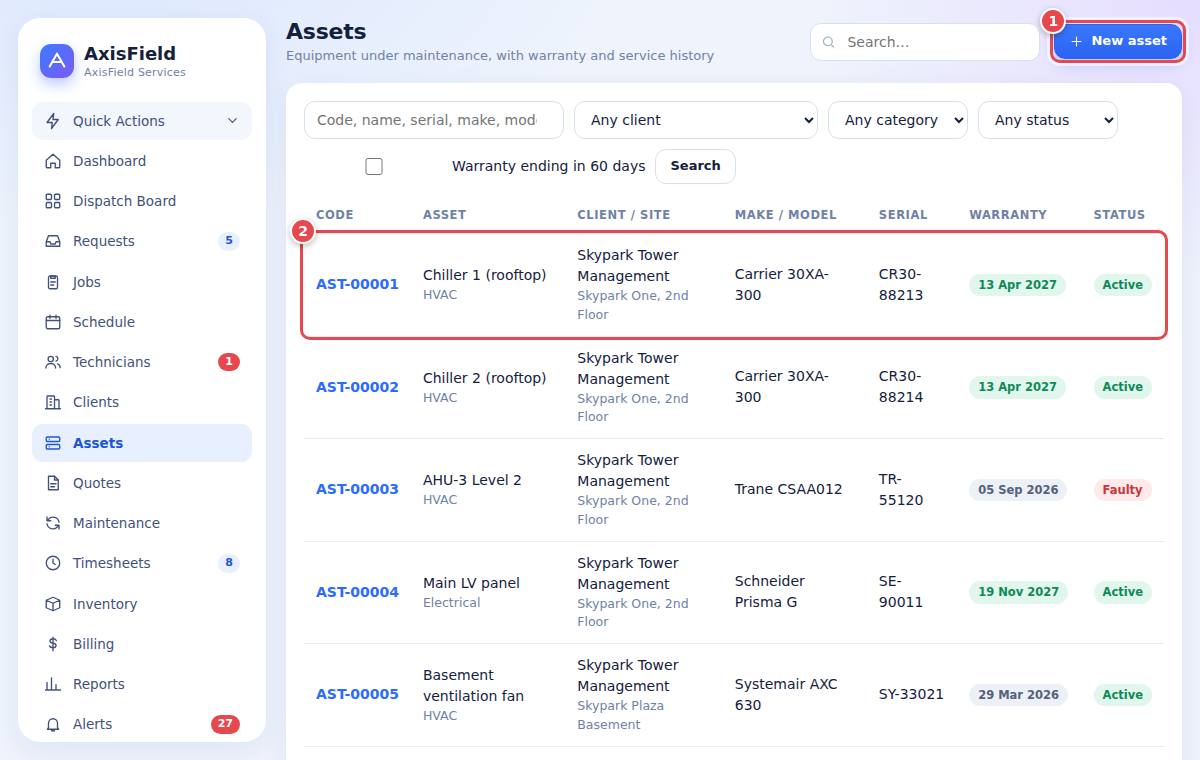
5.3 Assets
An asset is a piece of equipment you maintain: a chiller, a generator, a lift. Linking jobs to assets builds a history per machine.
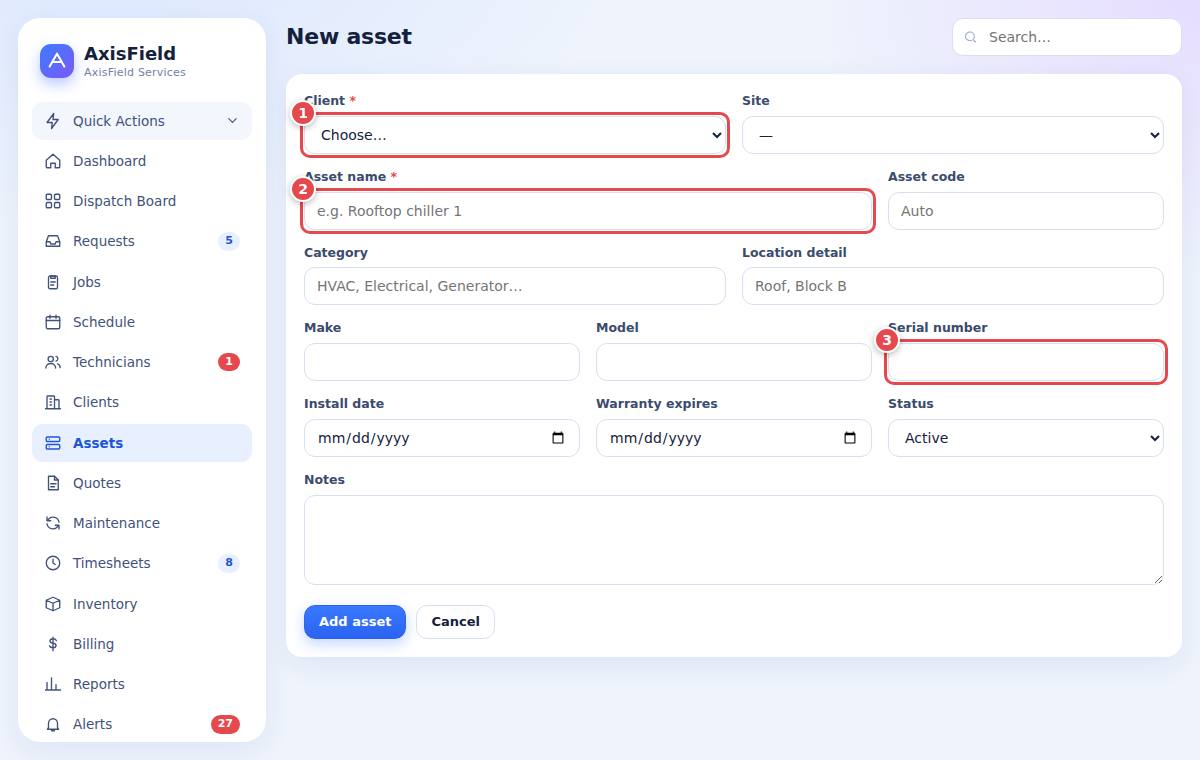
- Open Assets and press Add asset.
- Choose the client (1) and site, type the name (2), serial number (3), make and model, install and warranty dates.
- Save. On the asset page you see every job done on it and any contracts covering it.
6Service requests
DispatcherSupervisorAdministratorClientA service request is a customer's message that something needs doing. It is not a job yet: you triage it first, then turn it into a work order.
6.1 Where requests come from
| Source | How |
|---|---|
| Web form | Anyone opens /request, no account needed. Add this link to your website. |
| Client portal | A signed-in client presses Request service; their details are filled in. |
| Your email provider forwards inbound mail to the email intake address with your intake token (Settings). The subject becomes the title; words like urgent or leak raise the priority. | |
| Phone or walk-in | You log it yourself with Log request. |
6.2 Log a request yourself
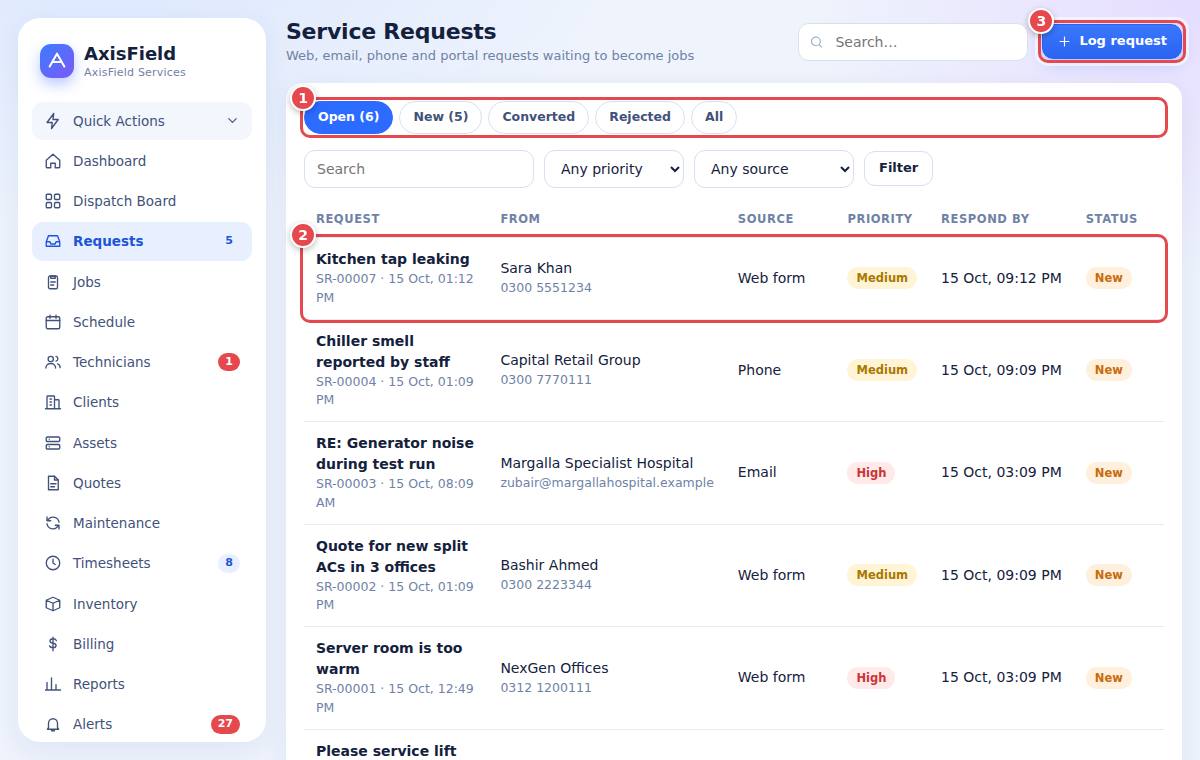
- Open Requests and press Log request (or Quick Actions, Log service request).
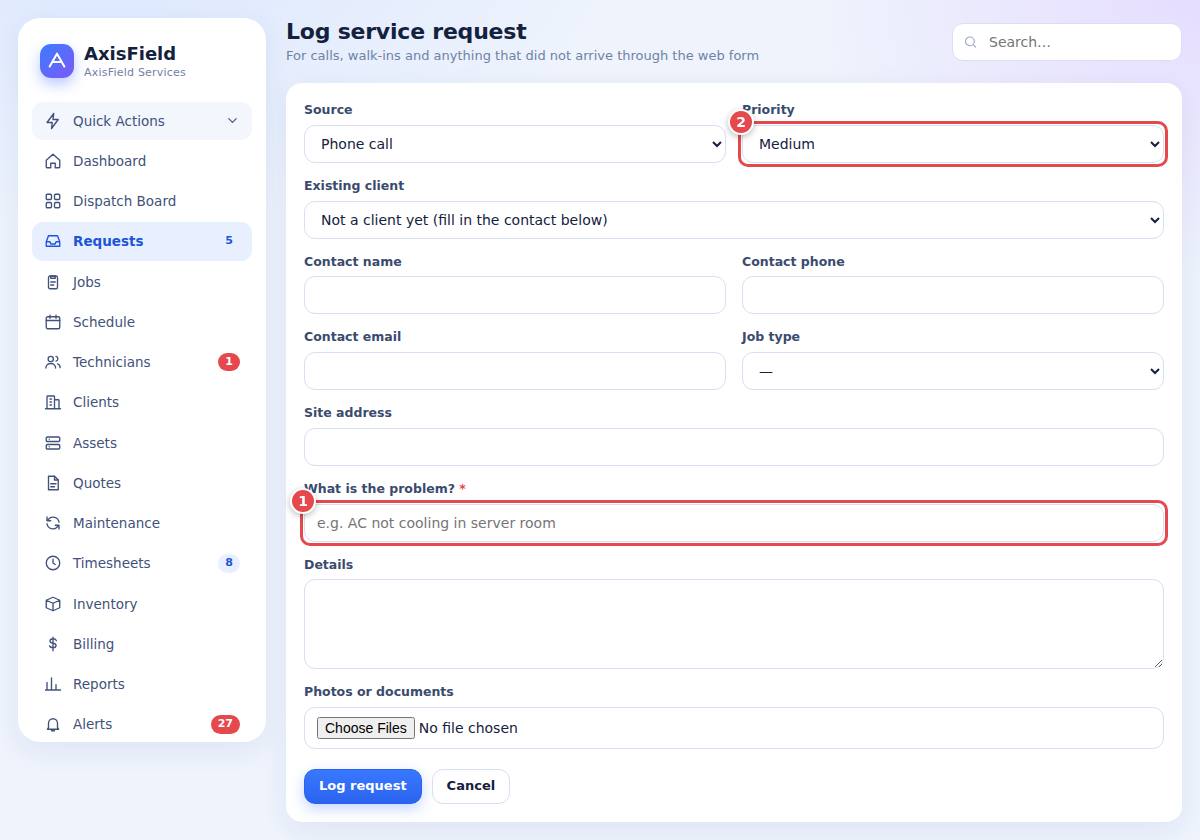
- Type what is wrong in title (1) and choose the priority (2). Add client details or pick the client and site.
- Save. The response and resolution due times are set from your SLA policy.
6.3 Requests sent from a phone include the customer's location
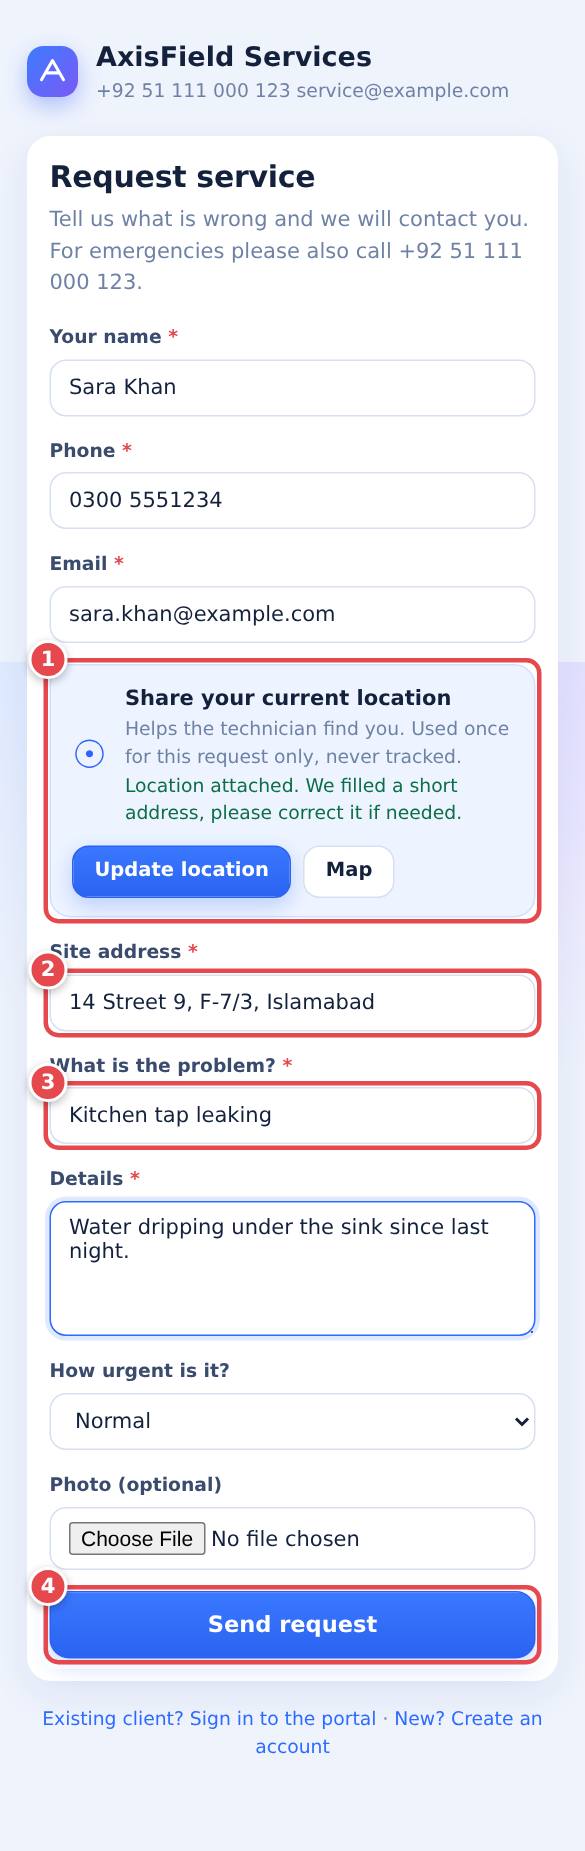
When a customer opens the request form on a mobile phone, the form offers to attach their current location and asks for a short address.
What the customer sees
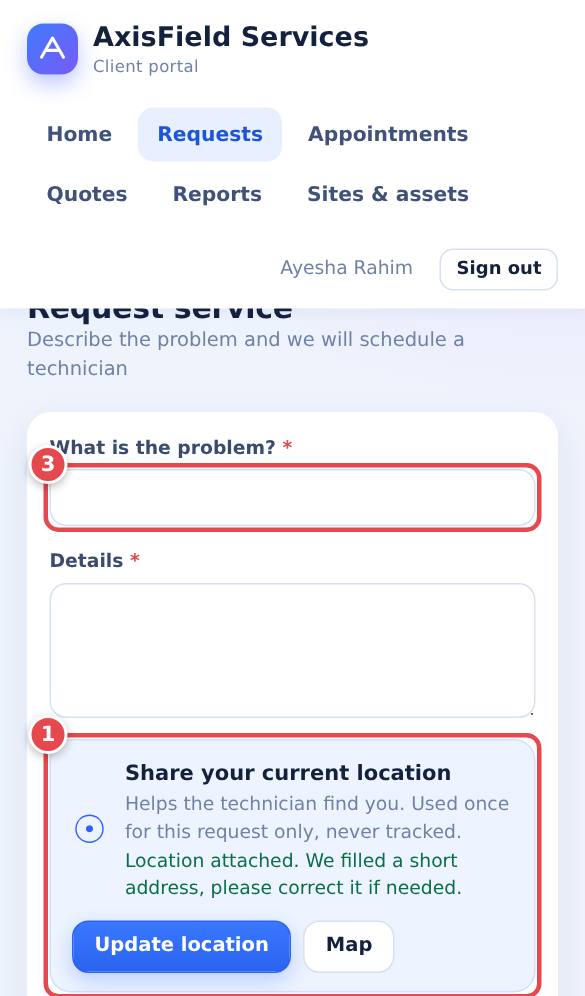
- A blue box Share your current location (1) appears. The customer taps Use my location and allows location in the phone's pop-up.
- The phone finds them and the form fills in a short address (2) such as "14 Street 9, F-7/3, Islamabad". The customer corrects it if needed. On phones this field is required.
- They describe the problem (3) and press Send request (4).
What you see
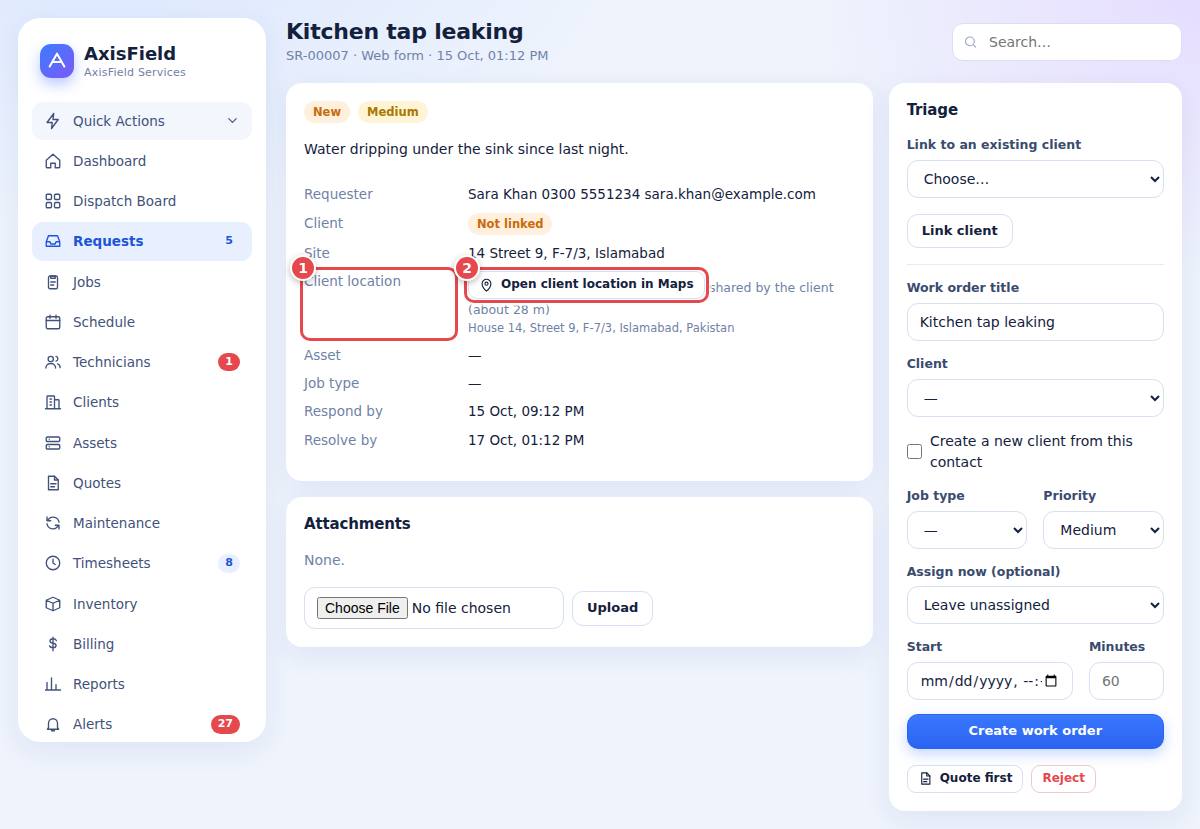
On the request (and later on the job and the technician's phone) a line Client location with Open client location in Maps shows the accuracy and the address the phone resolved. One tap opens the map for navigation.
6.4 Triage: turn a request into a job
- Open the request. Check the description, photos under Attachments and the location.
- If the client is not linked, use Link to an existing client, or tick Create a new client from this contact when converting.
- In Triage check the work order title, job type, priority, site and (optionally) the technician and start time.
- Press Create work order. The request becomes Converted and links to the new job. The first response time is recorded.
- If it is not valid (spam, duplicate) press Reject and give a note.
7Work orders (jobs)
DispatcherSupervisorAdministratorA work order (shown as Jobs) is the heart of the system. Everything about one piece of work lives on its page: schedule, checklist, photos, parts, time, costs, sign-off.
7.1 The life of a job
| Status | Meaning | Who moves it |
|---|---|---|
| Unassigned | Created, nobody booked yet | Dispatcher assigns |
| Scheduled | Technician and time set | Technician starts travel |
| En route / On site | Technician travelling / arrived | Technician (phone) |
| In progress | Working. Time is recorded. | Technician |
| On hold | Waiting (for example client approval of extra work) | Technician or office |
| Awaiting review | Technician marked complete | Supervisor reviews |
| Awaiting sign-off | Reviewed, waiting for the client | Client signs |
| Ready to bill | Signed off and costed | Billing exports |
| Invoiced | Handed to accounts | Billing |
7.2 Create a job
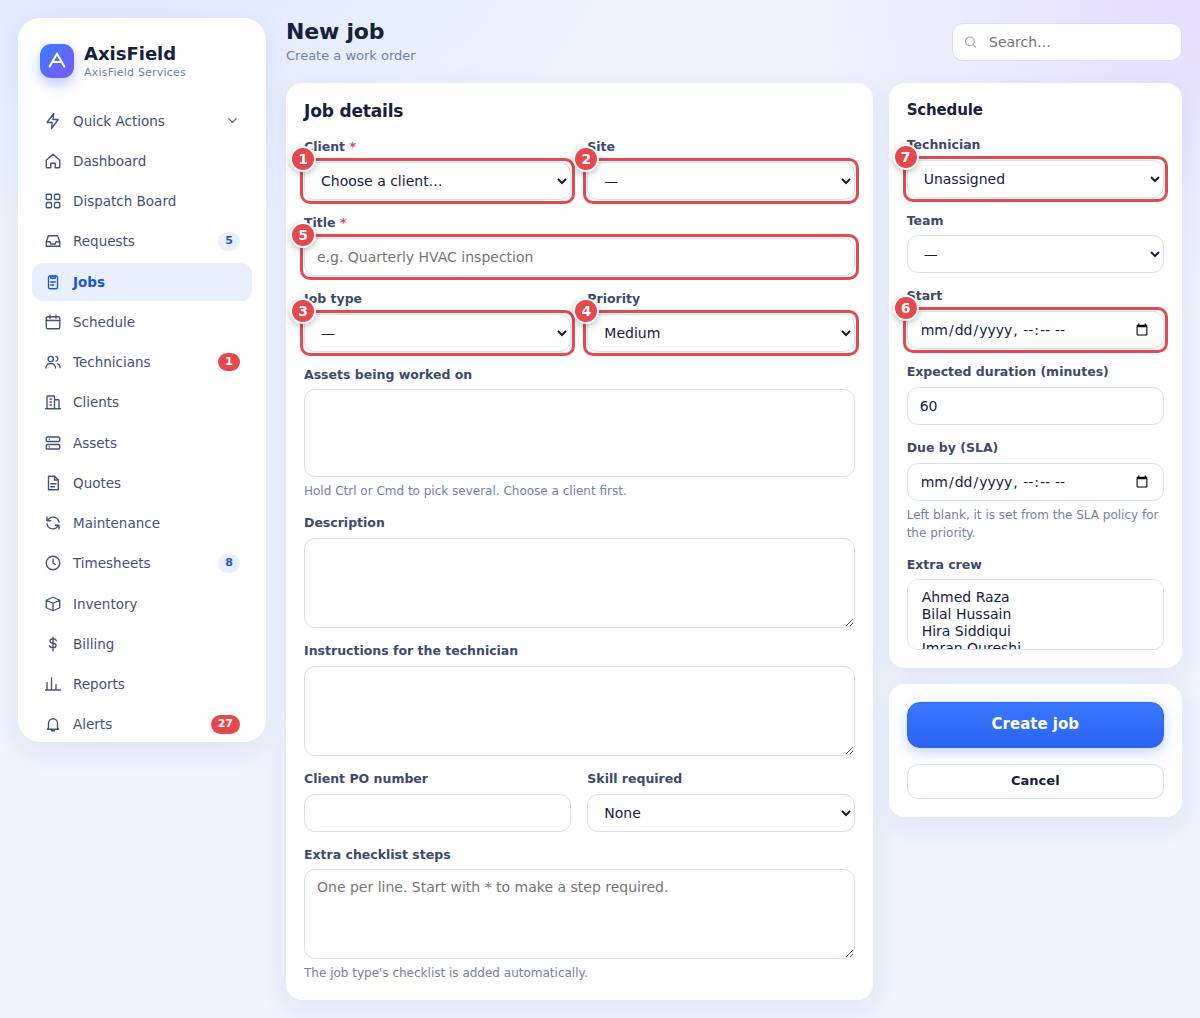
- Press New job. Choose the client (1), then the site (2) and equipment.
- Choose the job type (3). The duration, required skill and checklist are filled in for you.
- Set priority (4) and write a clear title (5) and details. Add instructions for the technician.
- Optional: choose the start time (6) and the technician (7) now. If you leave them empty the job stays Unassigned and waits on the dispatch board.
- Save. You land on the job page.
7.3 Find jobs
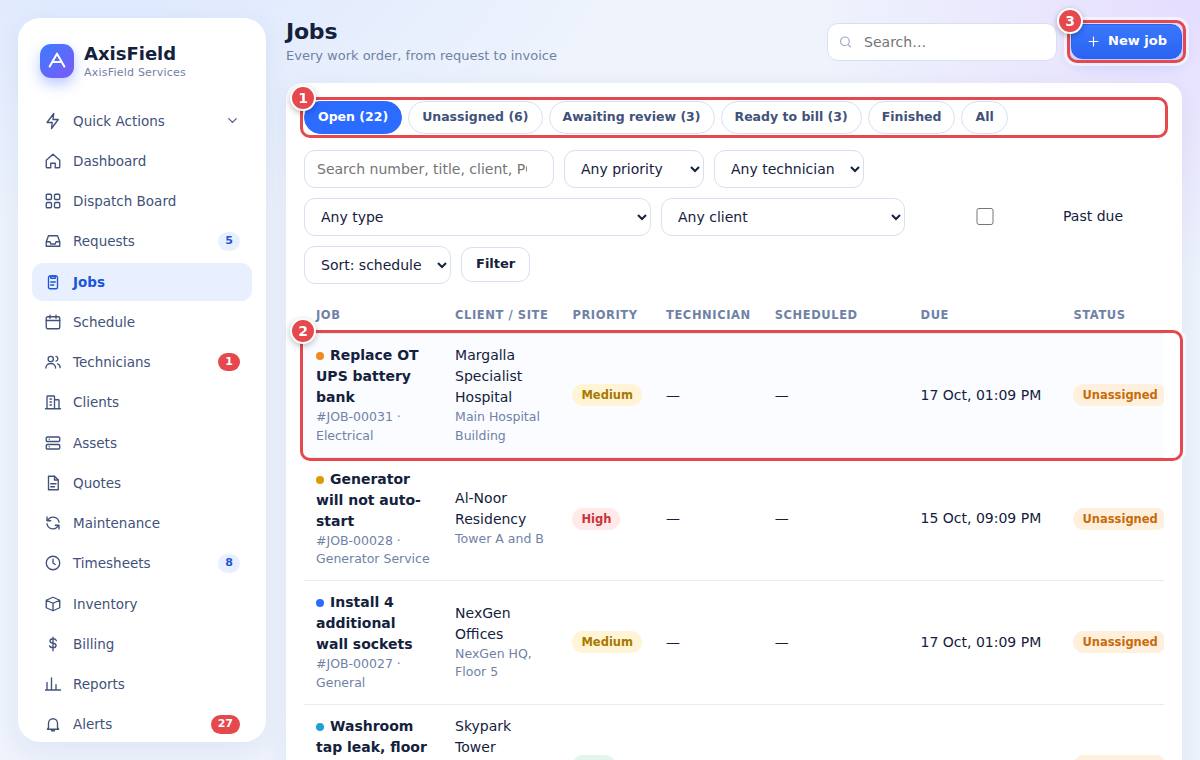
The Jobs list has filters for status, technician, client and priority and a search box. Click a row to open the job.
7.4 Assign, reschedule and add crew
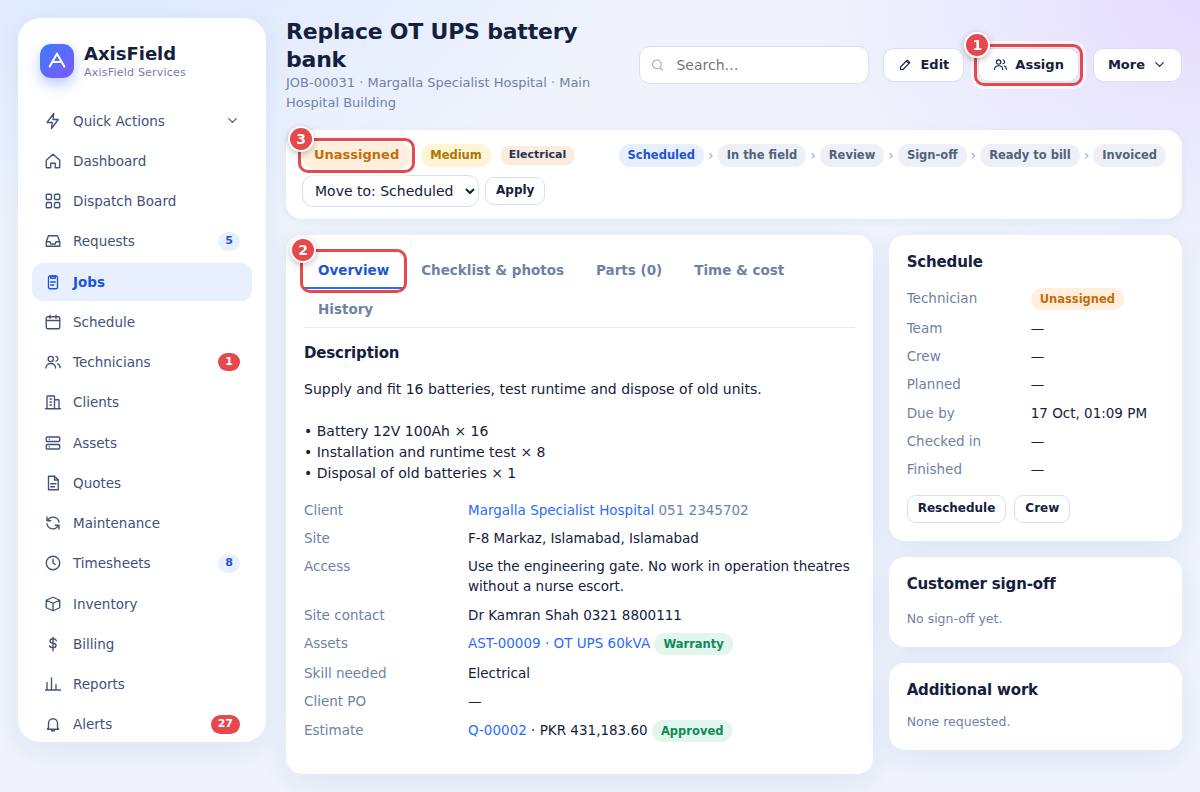
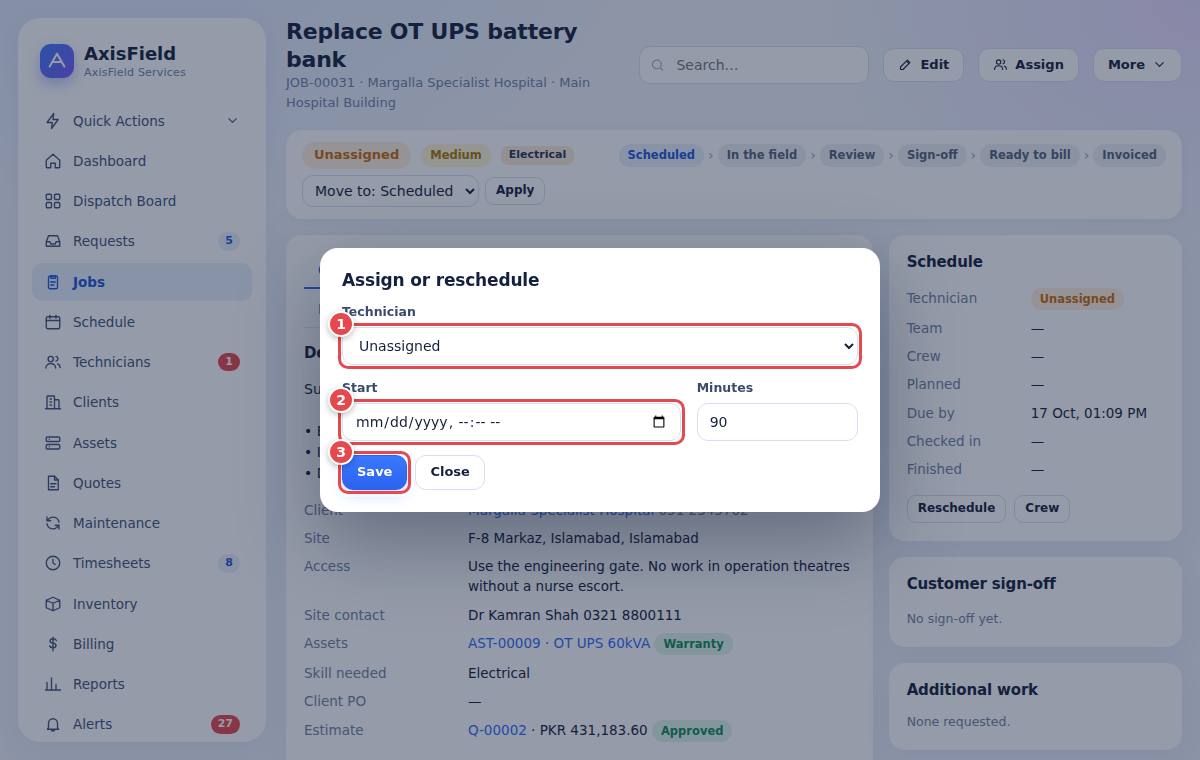
- Open the job and press Assign (or Reschedule).
- Choose the technician (1), the start date and time (2) and the length in minutes, then Save (3).
- The system checks skill, working hours and leave and clashes with other jobs. If it finds a problem it lists the warnings and asks you to confirm. You can still go ahead when you know better.
- Use Crew on the right of the page to add extra technicians. The first technician is the lead: only the lead moves the job status on the phone. Crew members see the job on their phone, but only the lead records time and moves the status.
7.5 Follow the work
The job page has tabs and side cards:
- Overview (2): instructions, client, site, access, assets, required skill.
- Checklist & photos (3): the steps with who ticked them, and before/during/after photos.
- Parts: stock reserved and used. Time & cost: timesheet lines and extra costs. History: everything that happened, with times.
- Schedule card: technician, team, planned and actual times, SLA due time. Customer sign-off and Additional work cards.
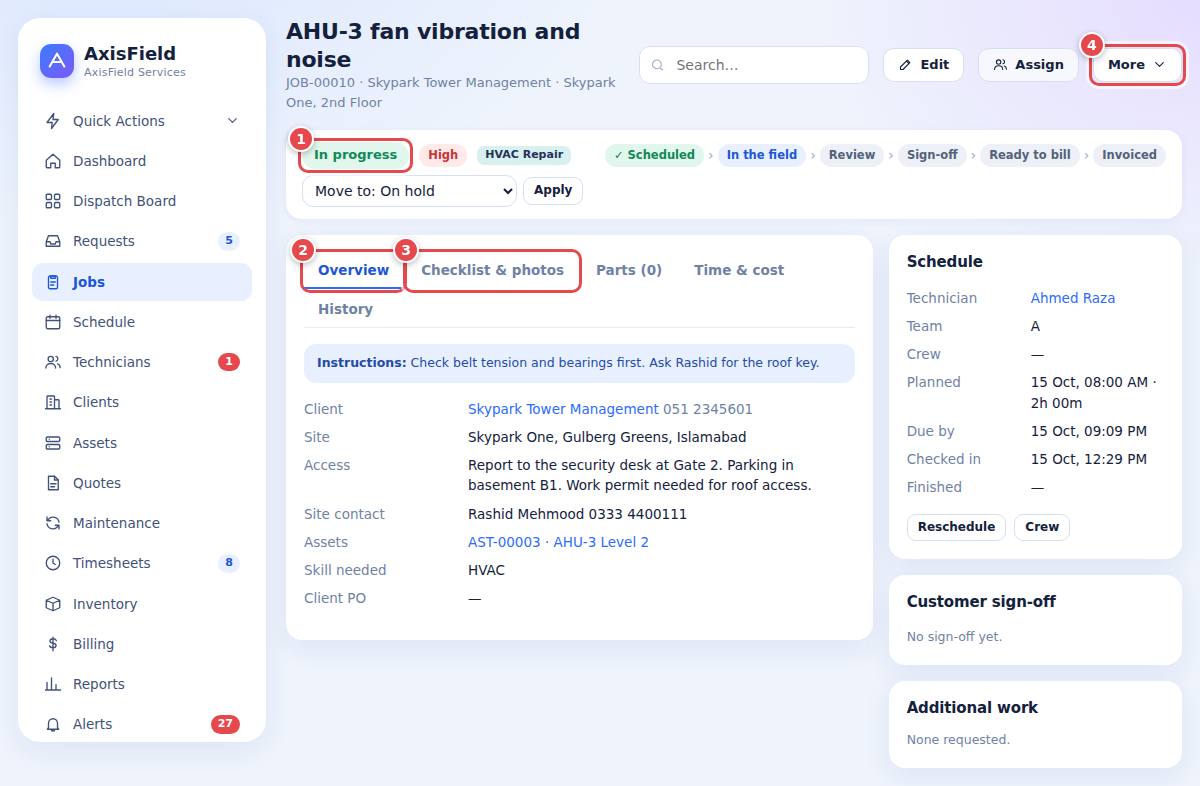
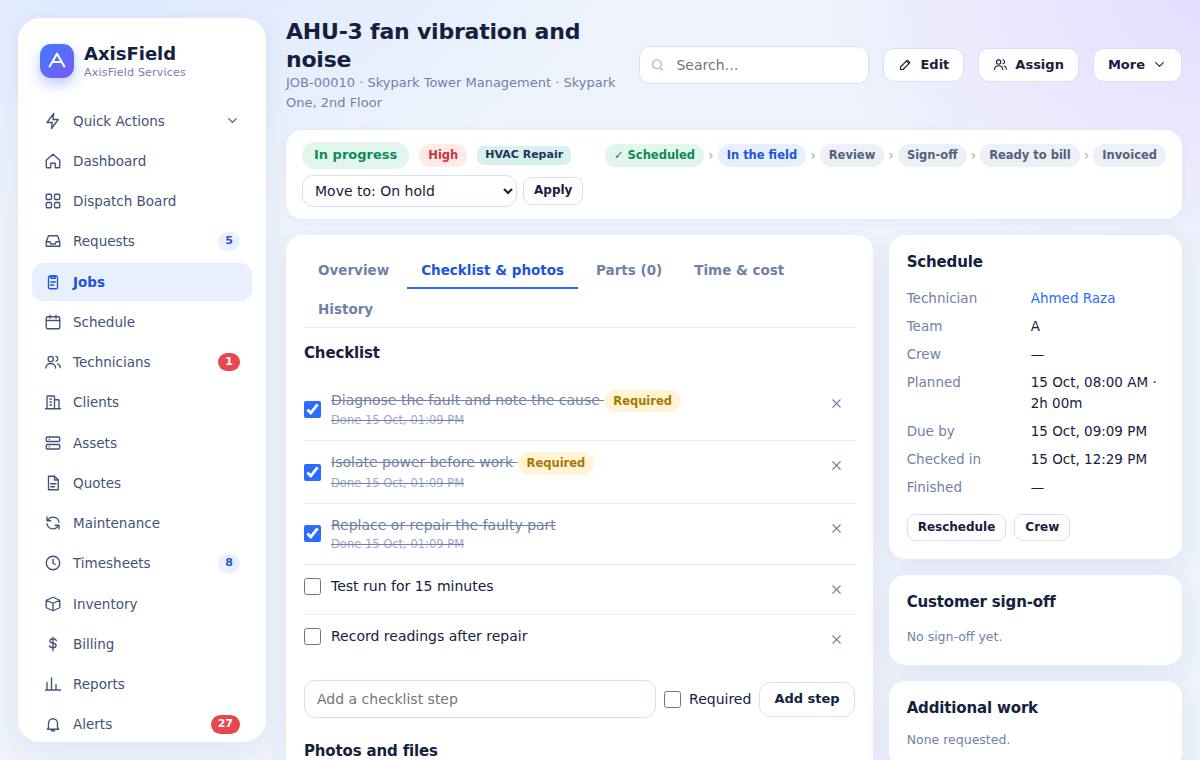
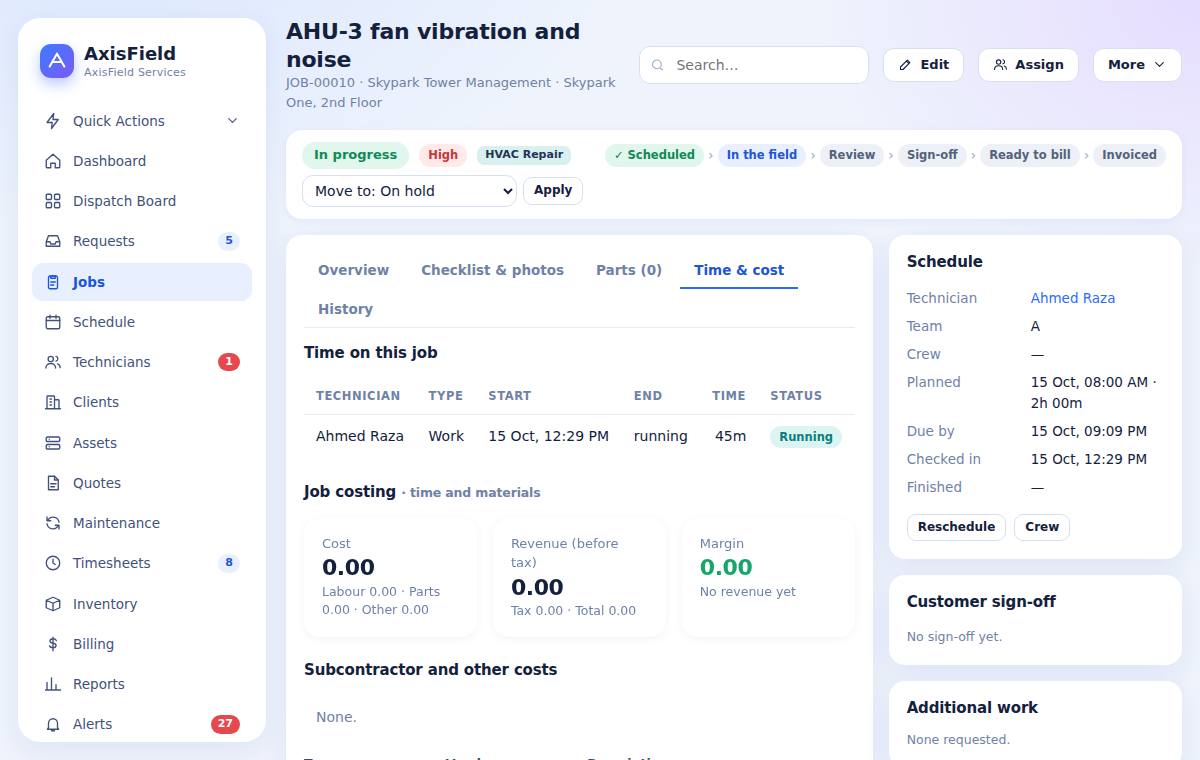
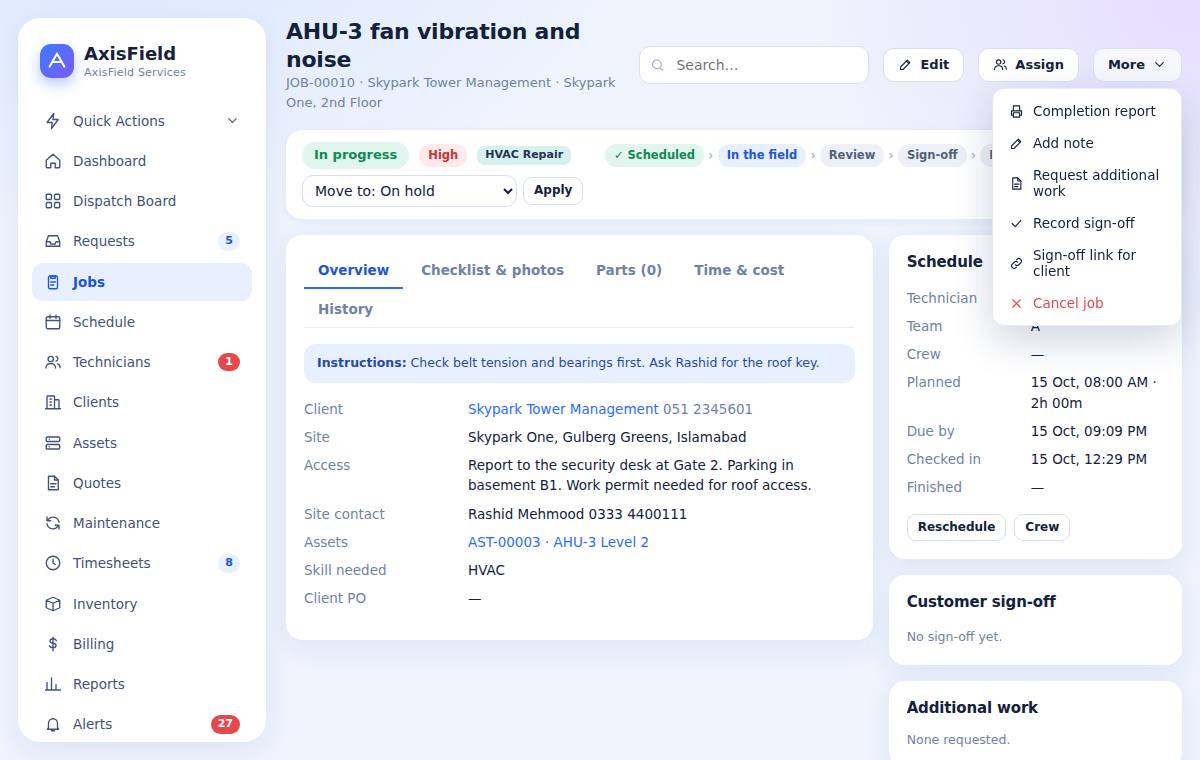
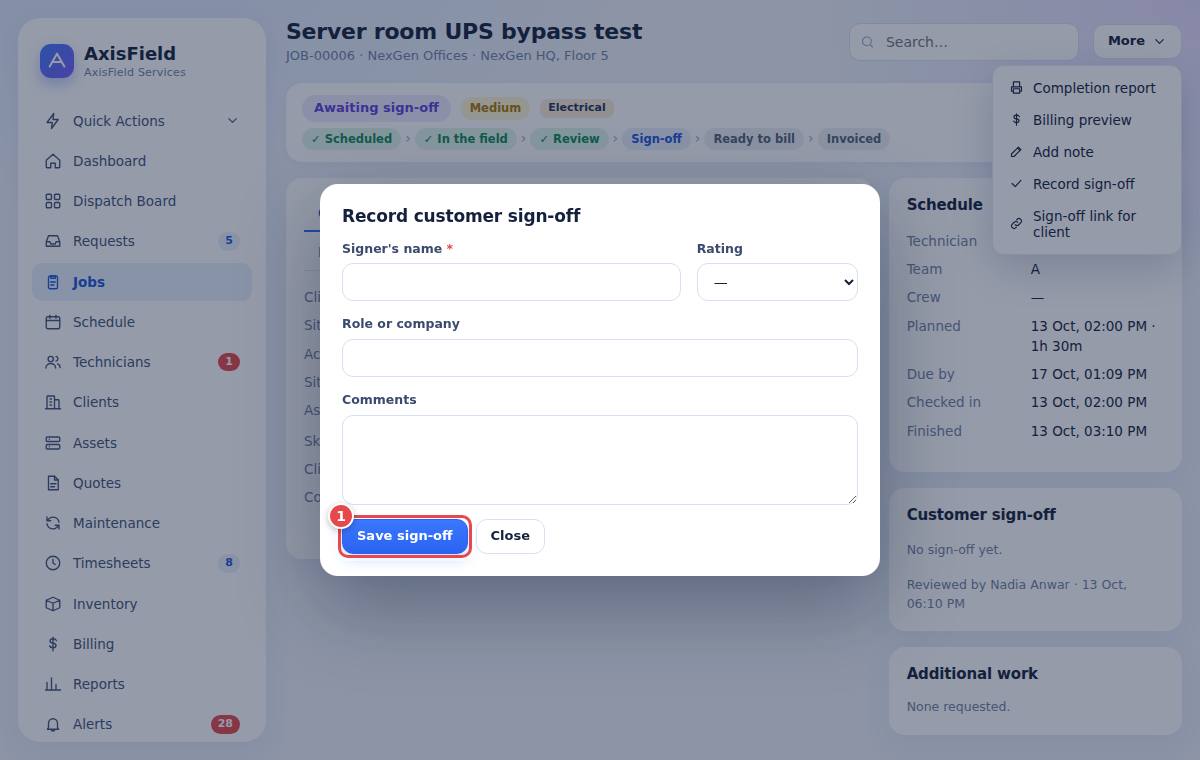
You can move the status from the box under the badges (for example Move to: On hold then Apply). The menu More (4) holds: completion report, add note, request additional work, record sign-off, sign-off link for the client, cancel job.
7.6 Additional work found on site (change authorization)
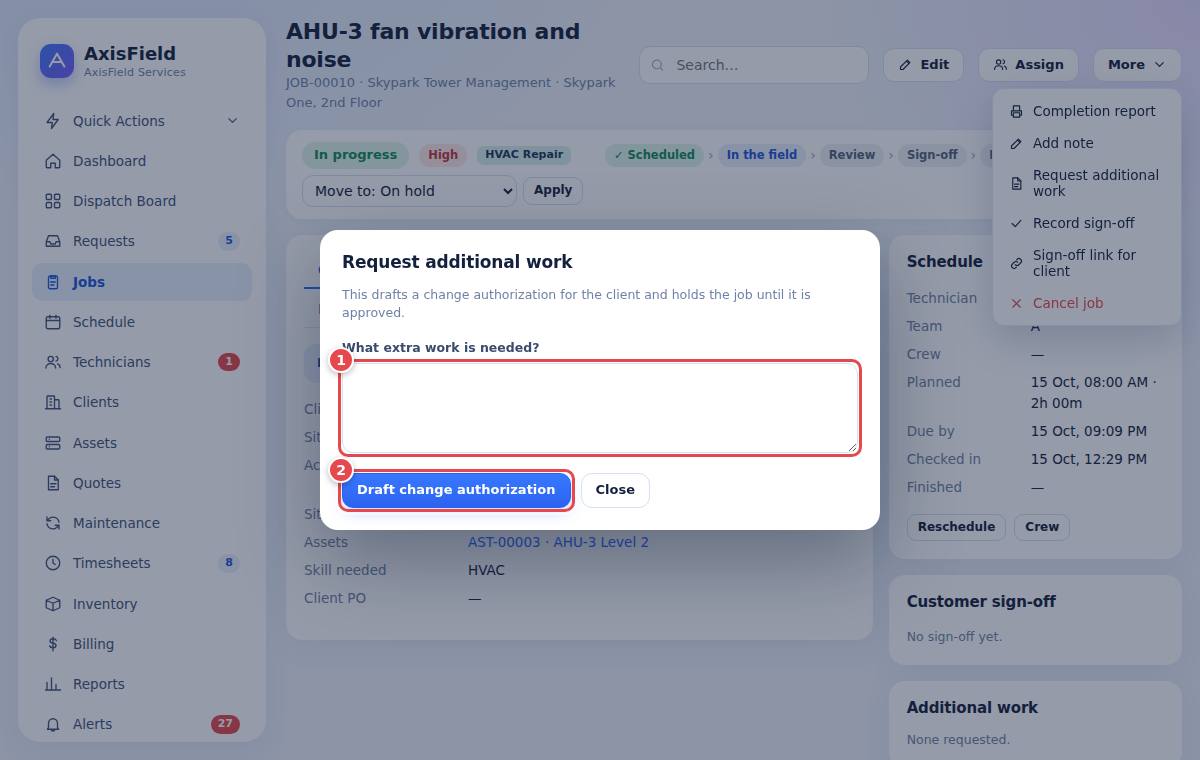
- The technician presses Extra work on the phone, or you open More, Request additional work (1) and describe the extra work.
- The job goes On hold and a draft change authorization quote is created. Press Draft change authorization (2).
- Open the quote, add lines and prices, and send it to the client (chapter 12).
- When the client approves (or declines), the job is taken off hold automatically and the technician can continue. Approved extra work is billed with the job.
7.7 Review, sign-off and report
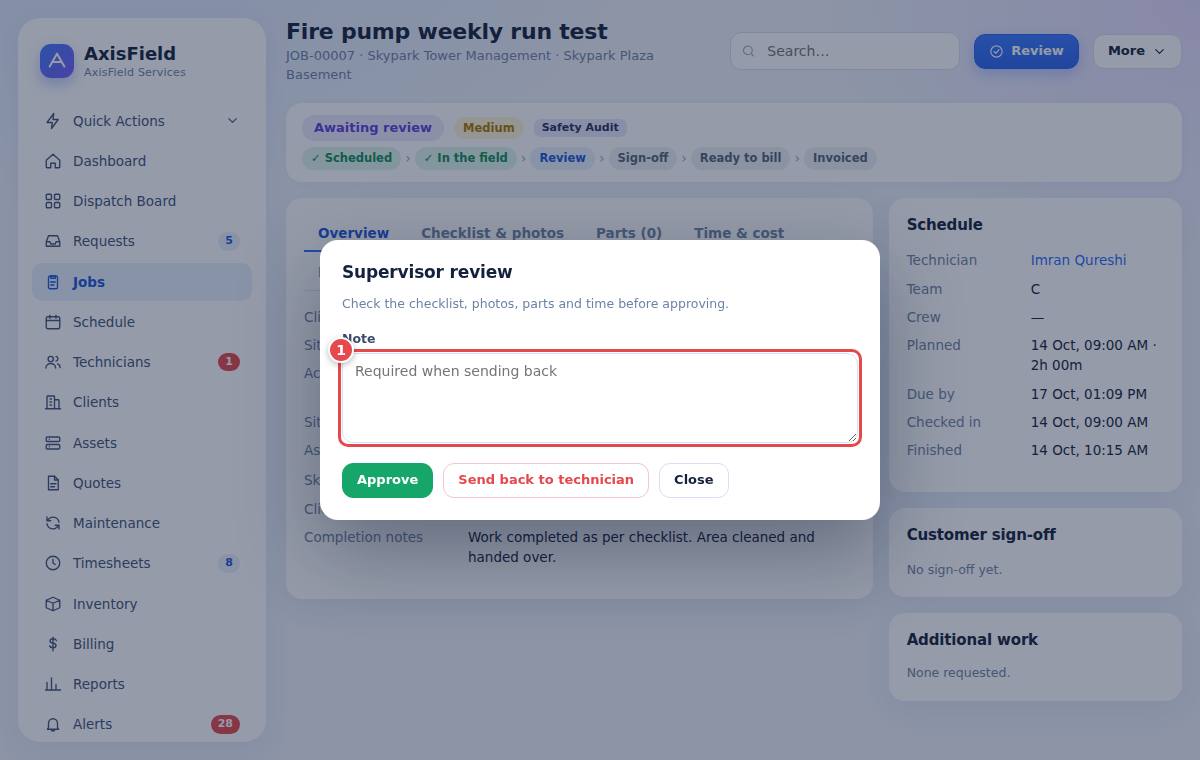
- When the technician presses Complete job the status becomes Awaiting review. A supervisor opens the job and presses Review.
- Choose Approve to accept the work, or Send back to technician with a note.
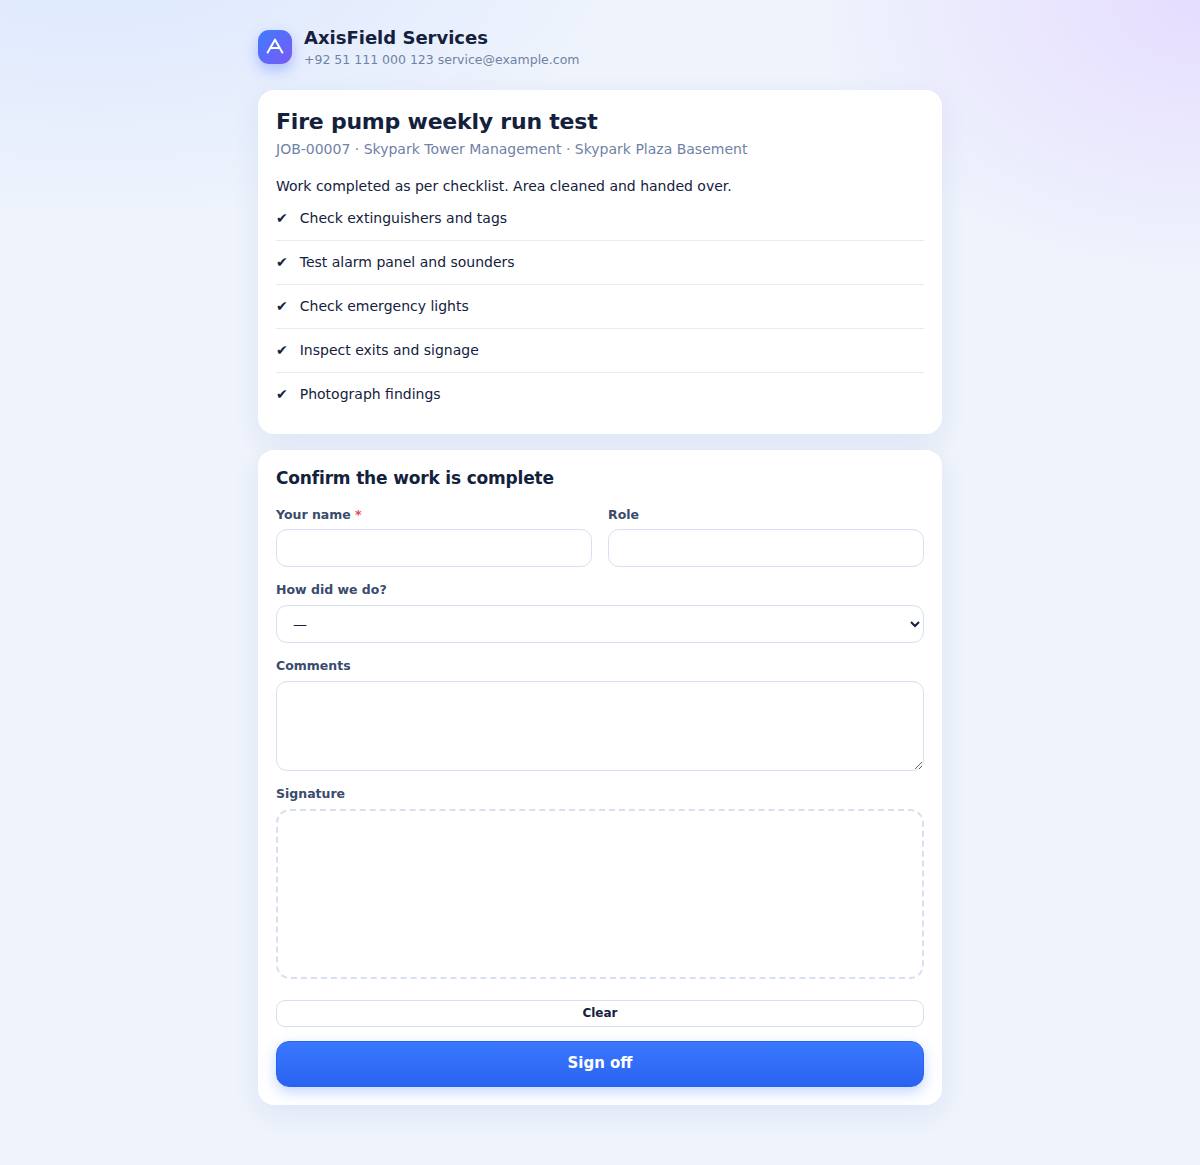
- For the client's sign-off use one of three ways: the technician takes the signature on the phone; you record it under More, Record sign-off (name, rating, comments); or you press Sign-off link for client and send the link by message. The client opens it on their phone and signs.
- After sign-off the job becomes Ready to bill.
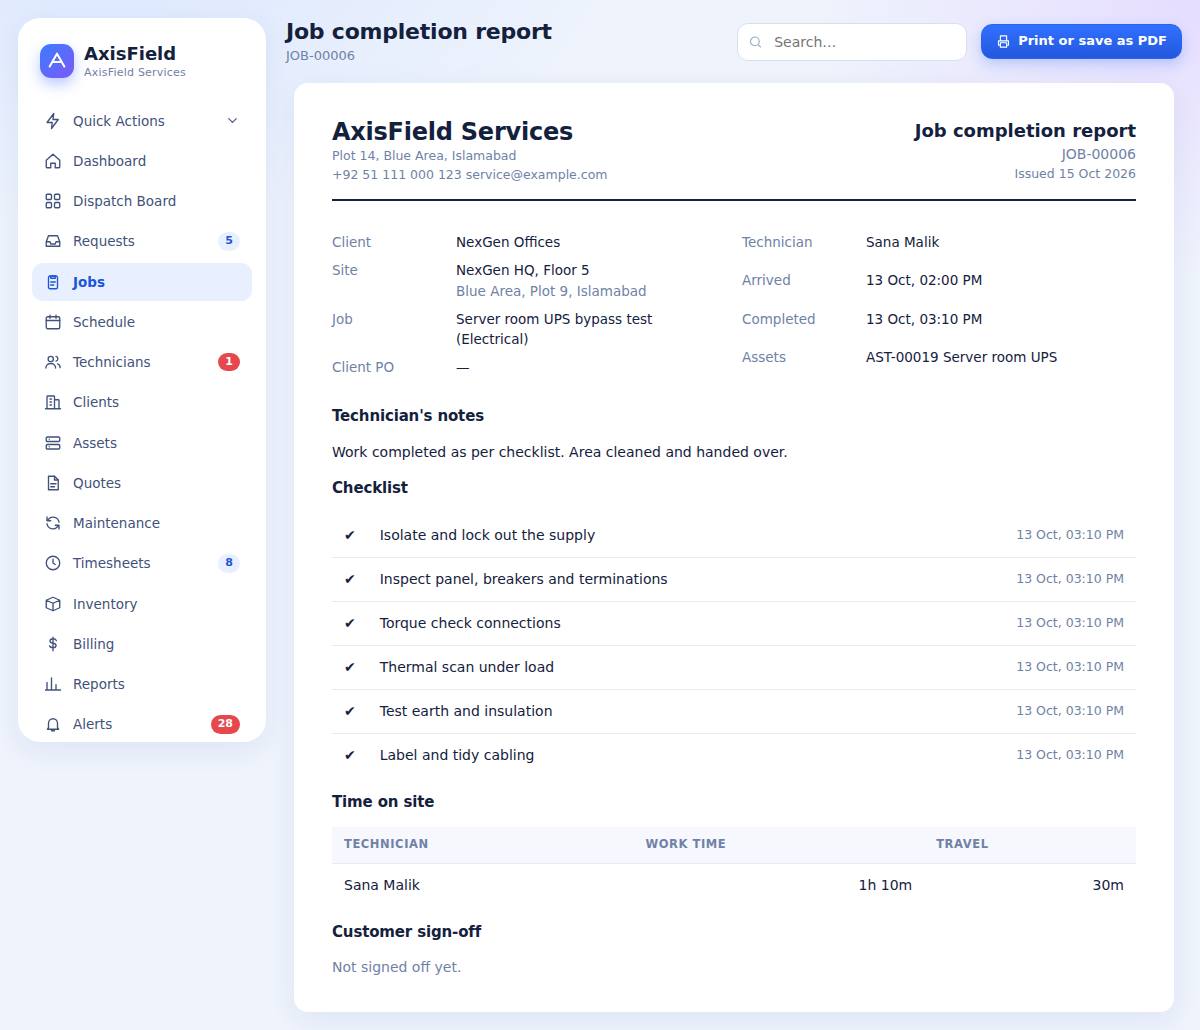
- Completion report (in More) is a printable page with the work done, parts, photos and signature. Use the browser's Print / Save as PDF.
7.8 Cancel a job
Open More, Cancel job and give a reason. A cancelled job stays in history.
8Dispatch board and schedule
DispatcherSupervisorAdministrator8.1 The dispatch board
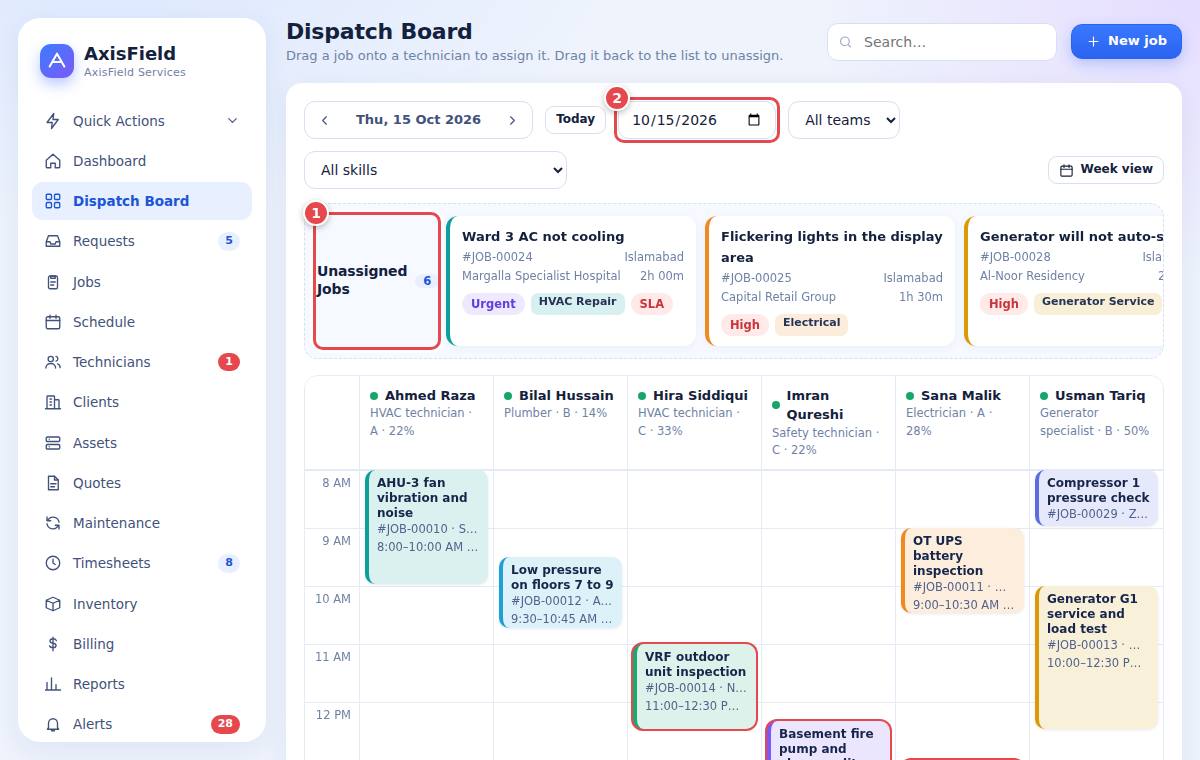
The board shows who is doing what today. The left panel lists Unassigned Jobs (1) with priority and SLA badges. The columns are your technicians with their jobs on a time line. A red line marks the current time.
- Pick the day (2) with the arrows or the date box. Today jumps back.
- Filter by team and skill to focus on one trade.
- Drag an unassigned job onto a technician's column at the time you want. The system checks skill, hours, leave and clashes.
- If there is a problem, a box lists the warnings and asks Assign anyway? Choose OK to go ahead, or Cancel and choose another slot.
- To move a job drag it to another time or technician. To unassign, drag it back to the left panel.
- Click a job to open it.
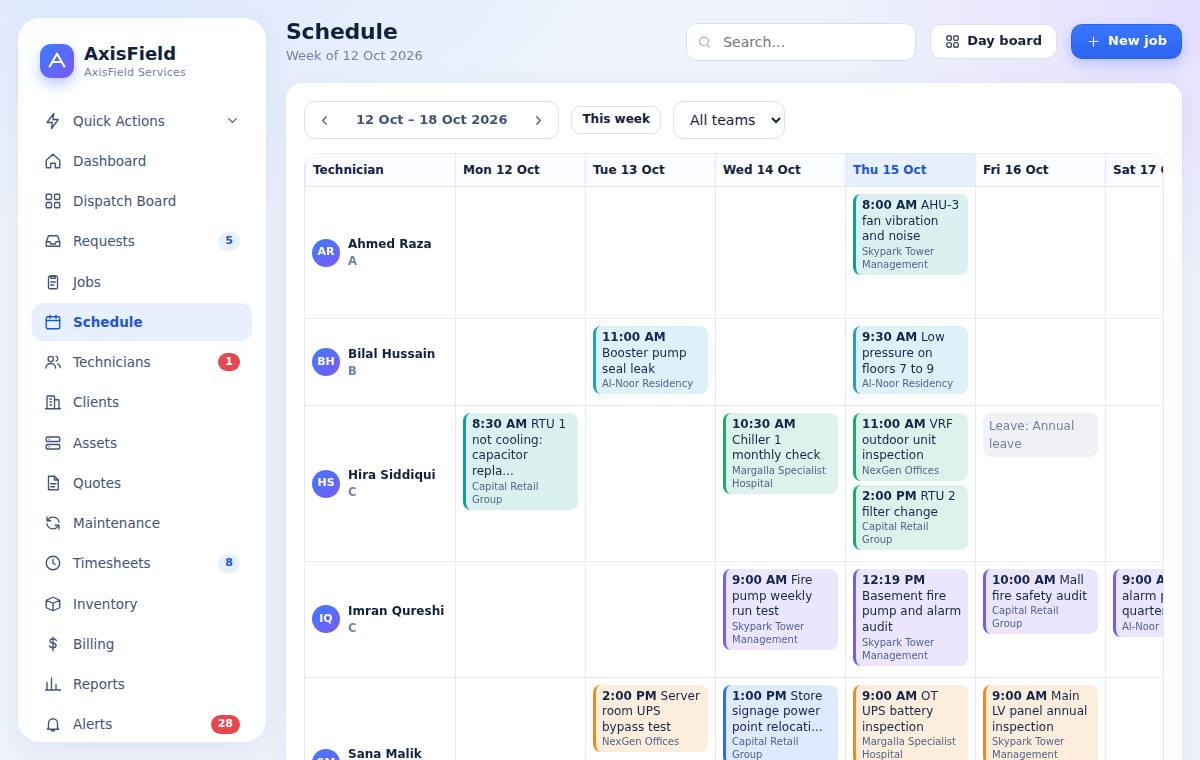
8.2 The schedule (calendar)
Schedule shows jobs on a calendar, by week or day, so you can see the load per technician and spot gaps. Use it to plan ahead; use the board for today's assignments.
8.3 Late check-ins and alerts
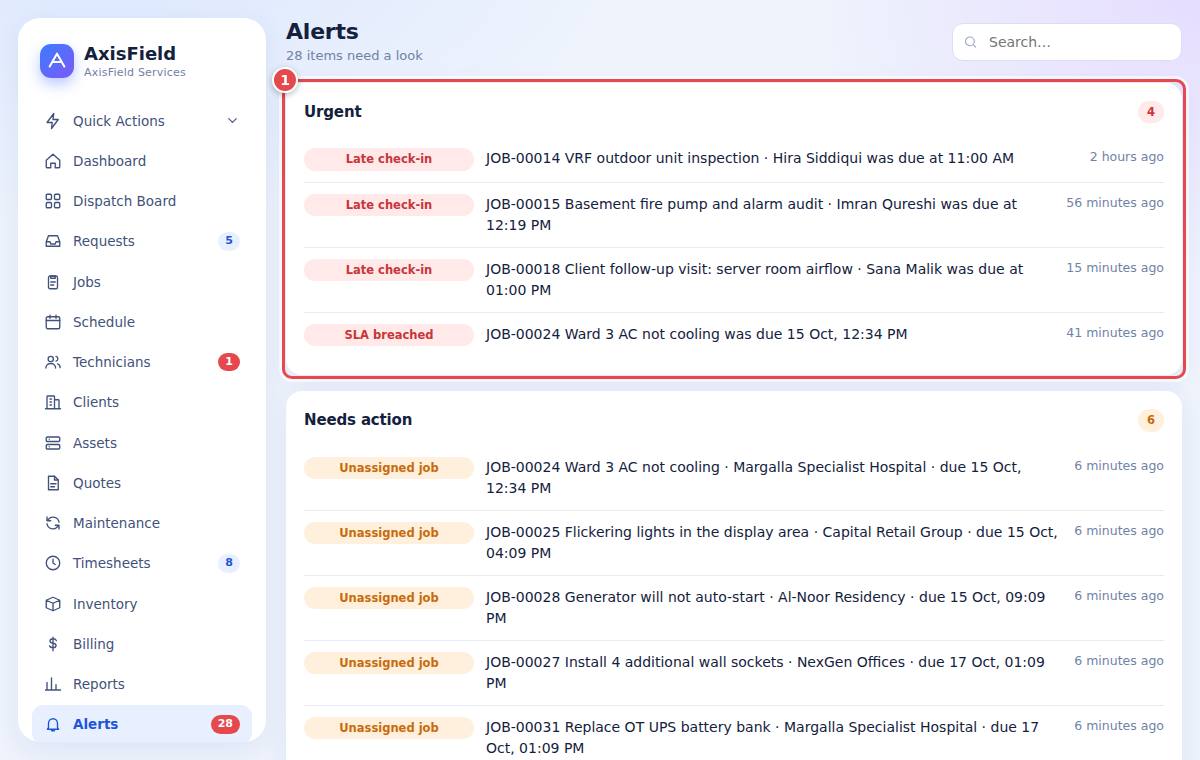
If a technician has not started (still Scheduled) after the planned start plus the grace time in Settings, the job shows as a late check-in on the dashboard and in Alerts. Call the technician or reassign the job.
9The technician mobile app
TechnicianThe technician app is a web app that works like a phone app. It keeps working without signal and sends your changes when the signal returns.
9.1 Install it on your phone
- Open the sign-in address your company gave you in Chrome (Android) or Safari (iPhone).
- Sign in with your email and password. After you sign in you land on Today.
- Android: tap the browser menu (three dots) and choose Add to Home screen or Install app. iPhone: tap the Share button and choose Add to Home Screen.
- Open it from the new icon. It opens full screen like any app.
/technician/join. You can sign in as soon as the office approves you (chapter 4).9.2 The Today screen
The blue box shows the job you are working on with a running timer (1) and buttons Open job and Take a break (2). Below you see your jobs for today and coming up, with time, client, priority and job type. The four icons at the bottom are Today, Jobs, Time and Me.
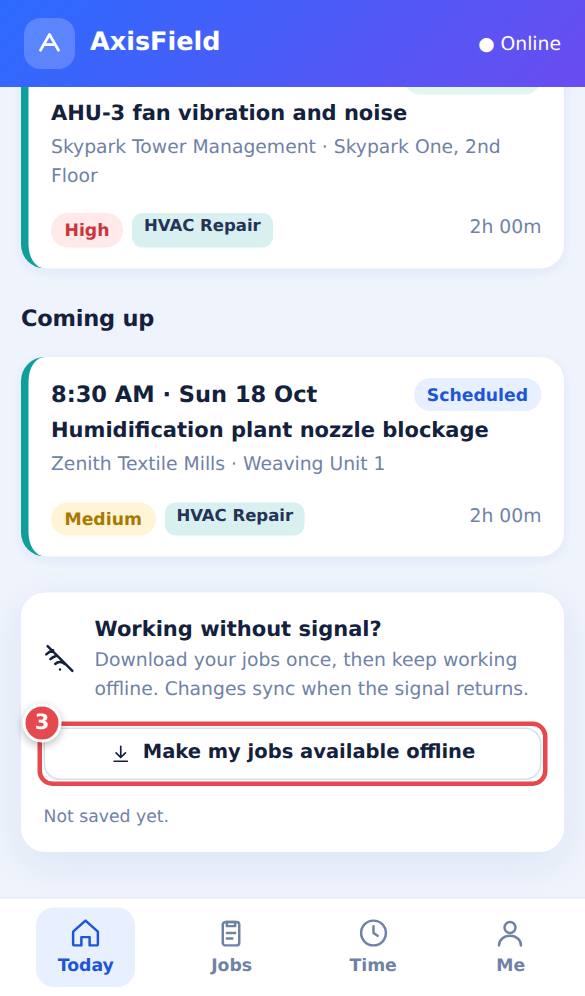
9.3 Before you go to a site with weak signal
- While you have signal, open Today and scroll to the bottom.
- Press Make my jobs available offline (1). The app saves your jobs so you can open them without signal.
- Work as normal. A bar shows Offline. N changes saved on this phone. When the signal returns the bar says Syncing and then disappears.
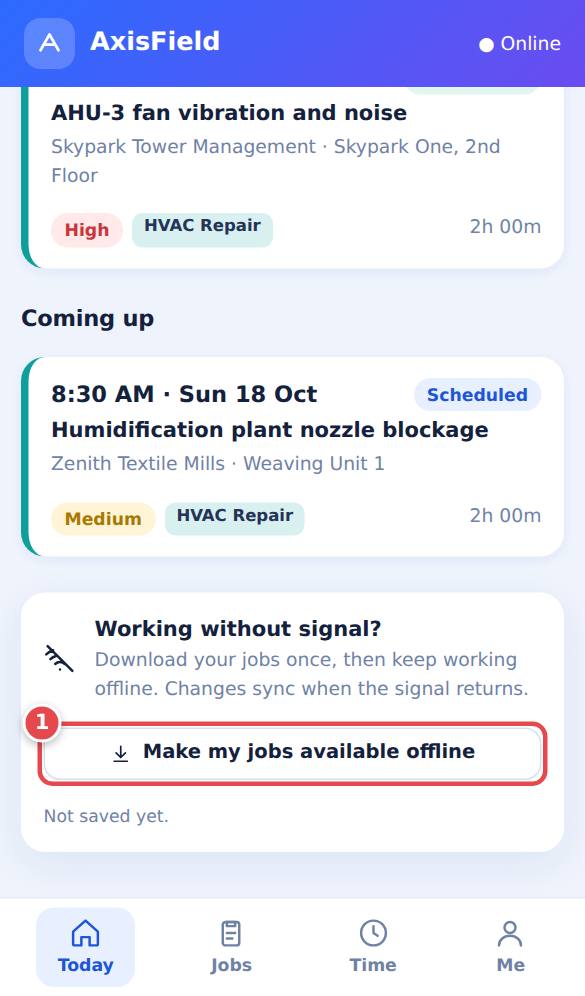
9.4 Working a job, step by step
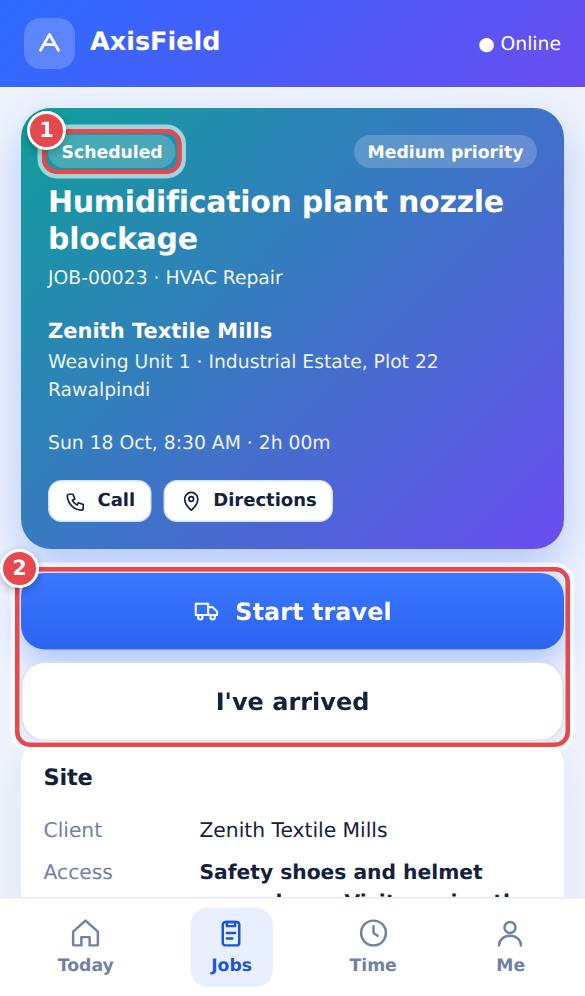
- Open Jobs (1) and tap a job. The top card shows the client, site, planned time and the buttons Call and Directions. If the customer shared their location the card also has a Client location link.
- Tap Start travel (2). The status becomes En route and travel time starts.
- When you arrive tap I've arrived. Then tap Start work. Work time starts.
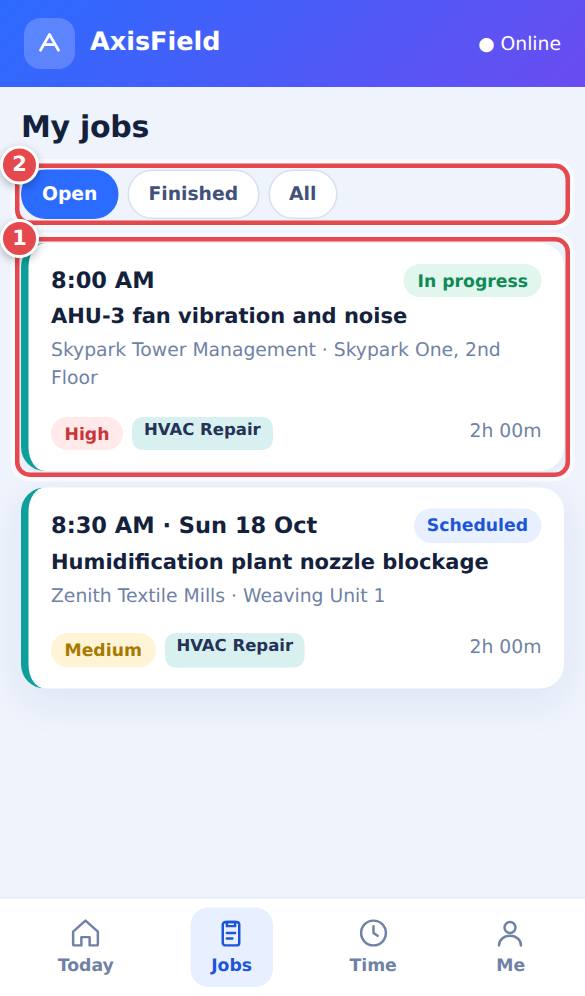
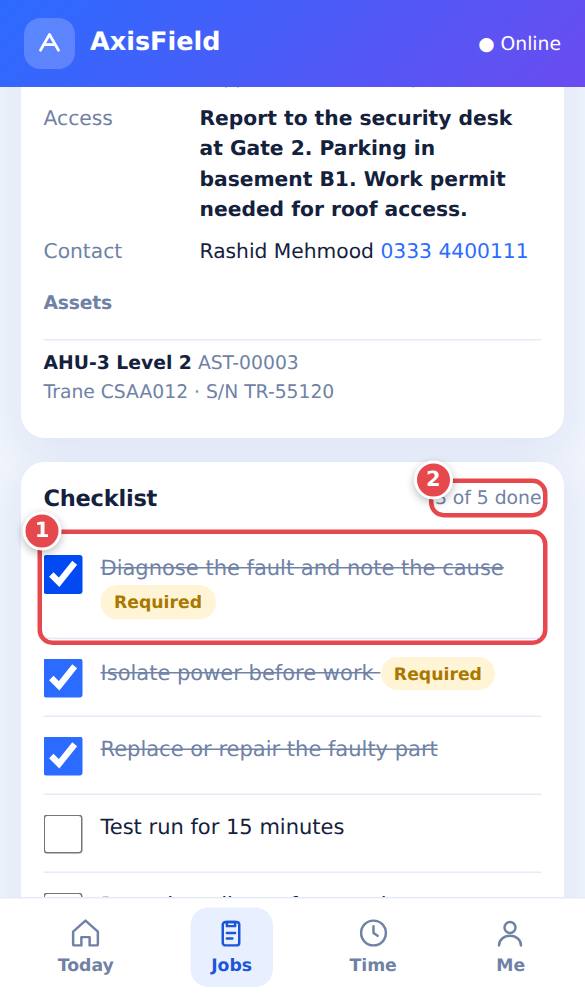
- Read The job, Instructions and Site (access, contact person, assets).
- Checklist: tick each step as you finish it (1). Required steps must be ticked before you can complete the job. The counter (2) shows progress.
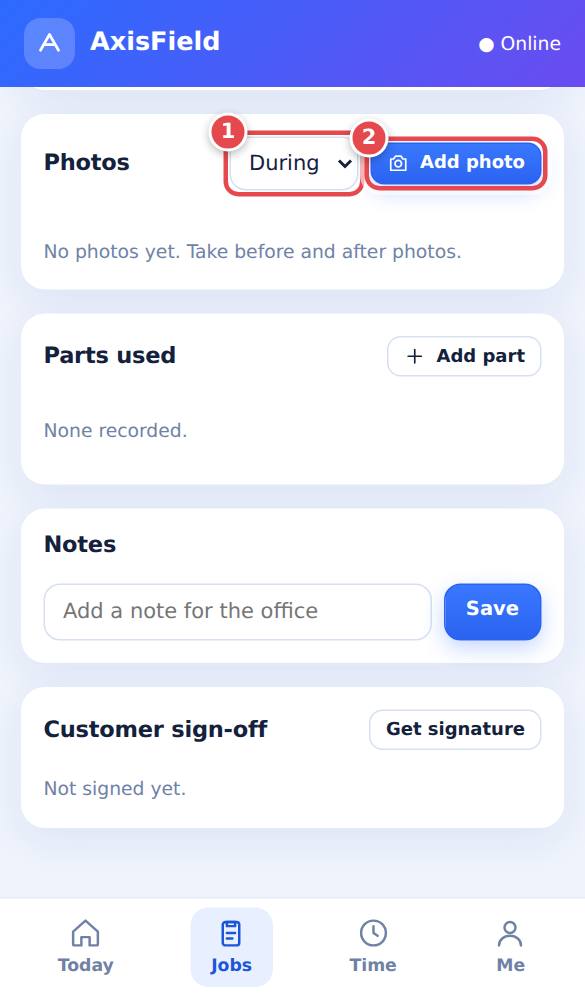
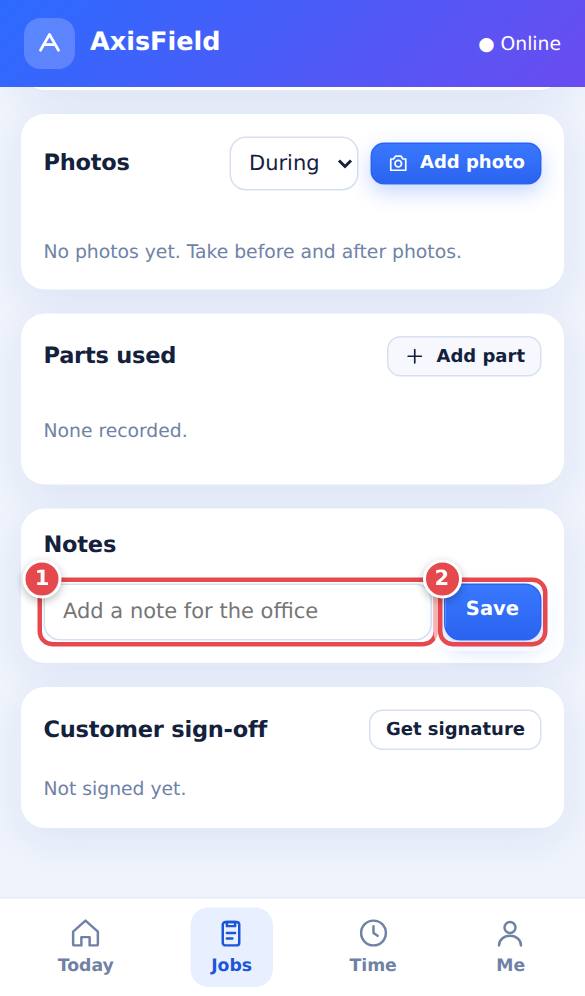
- Photos: choose Before, During or After and tap Add photo. Take the picture; it is shrunk to save data.
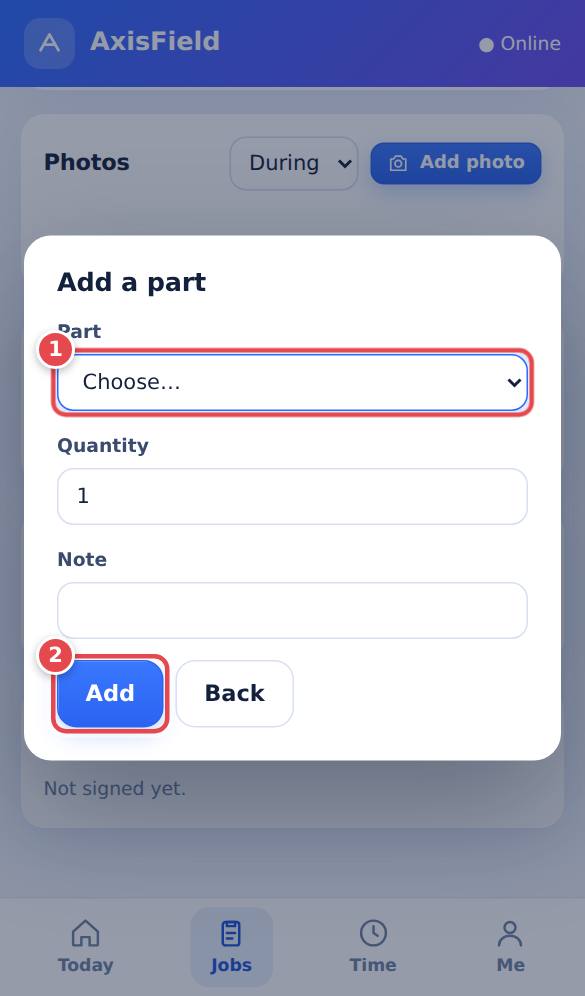
- Parts used: tap Add part, choose the part from your van stock, set the quantity and tap Add.
- Notes: type a note for the office and tap Save.
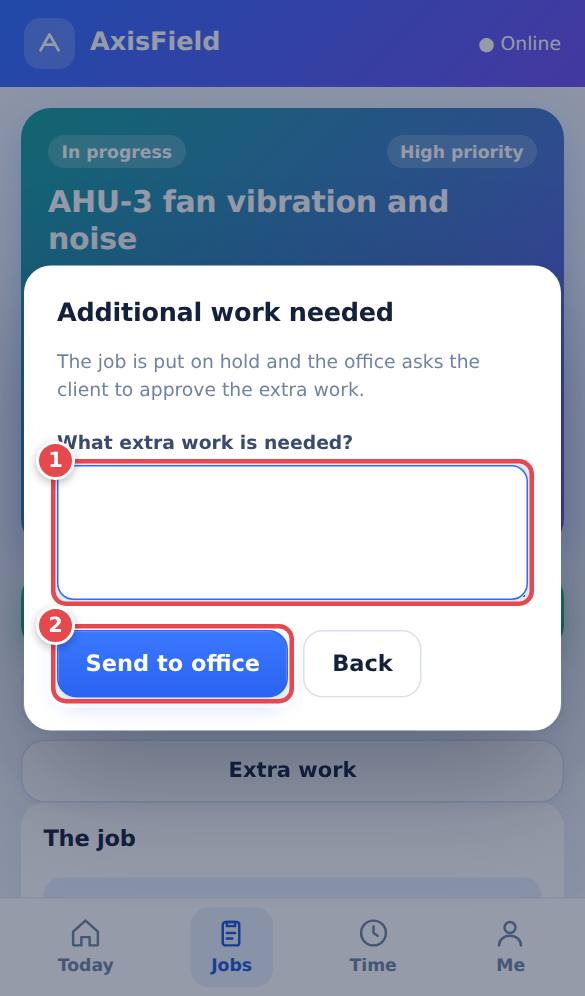
Extra work that was not planned
Tap Extra work, describe what is needed and send. The job goes On hold and the office asks the client to approve. When approved the job is released and you continue. While the job is on hold the app says it is waiting for the client.
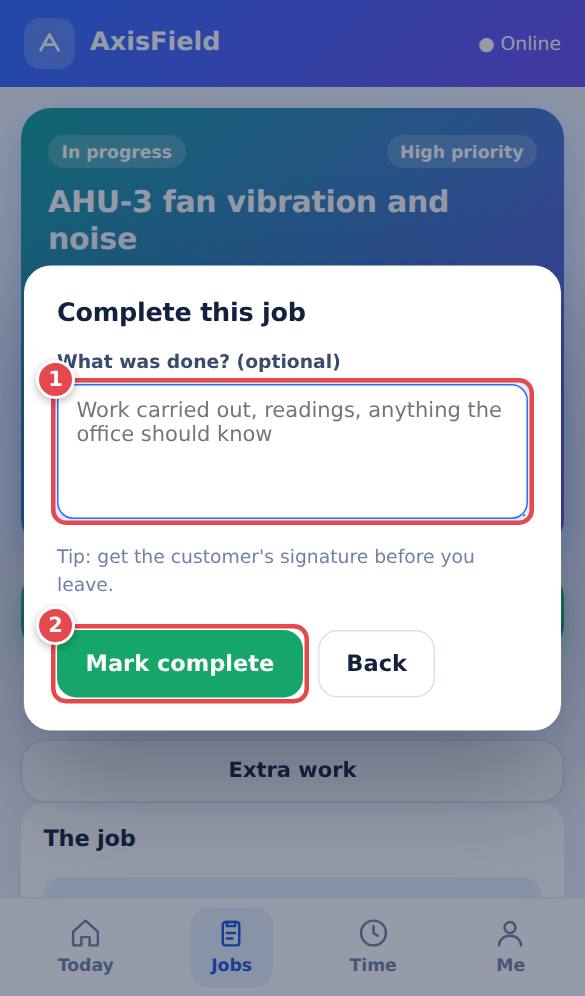
Finishing
- Tap Complete job. If a required step is not ticked the app warns you.
- Write what was done (1) and tap Mark complete (2).
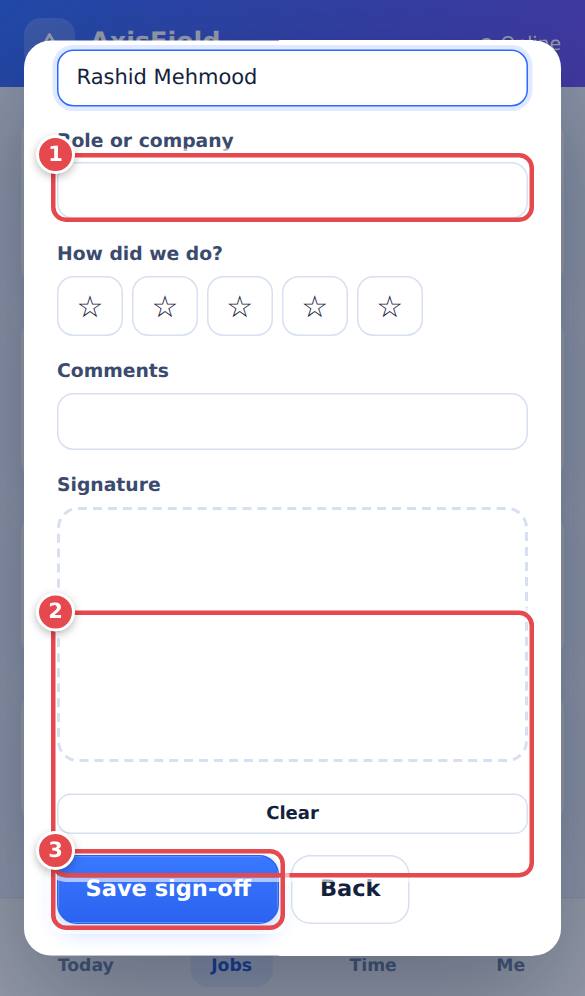
- Ask the client to sign: tap Get signature, let the client type their name, give stars and draw a signature with a finger (2), then Save sign-off (3).
- The job moves to Awaiting review. Your timer stops.
9.5 Breaks, time and your profile
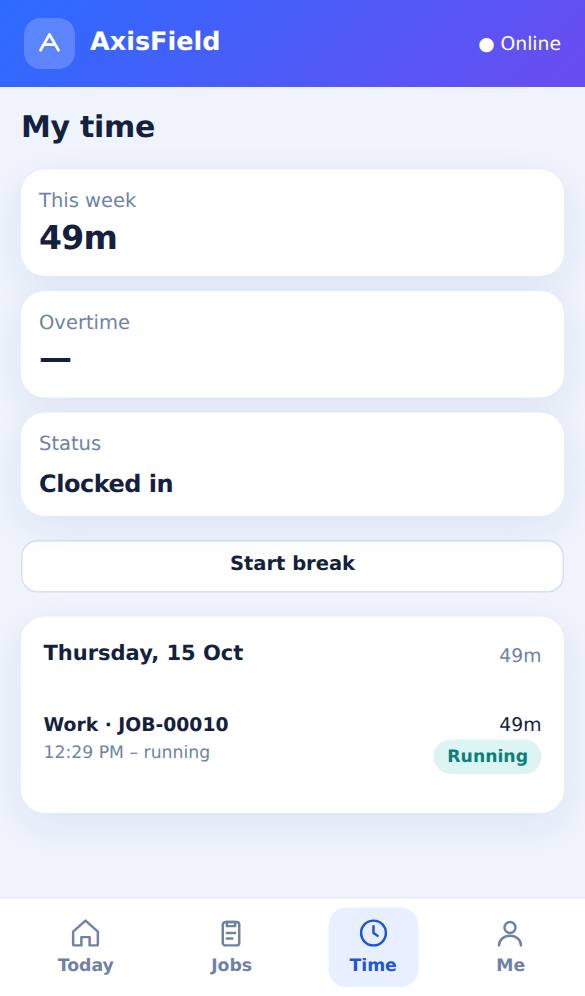
- Take a break on the Today screen pauses work time and records the break. Tap again to resume.
- Time lists your timesheet lines by day (work, travel, break, overtime) and their approval status. Lines are submitted when the job is completed and approved by a supervisor.
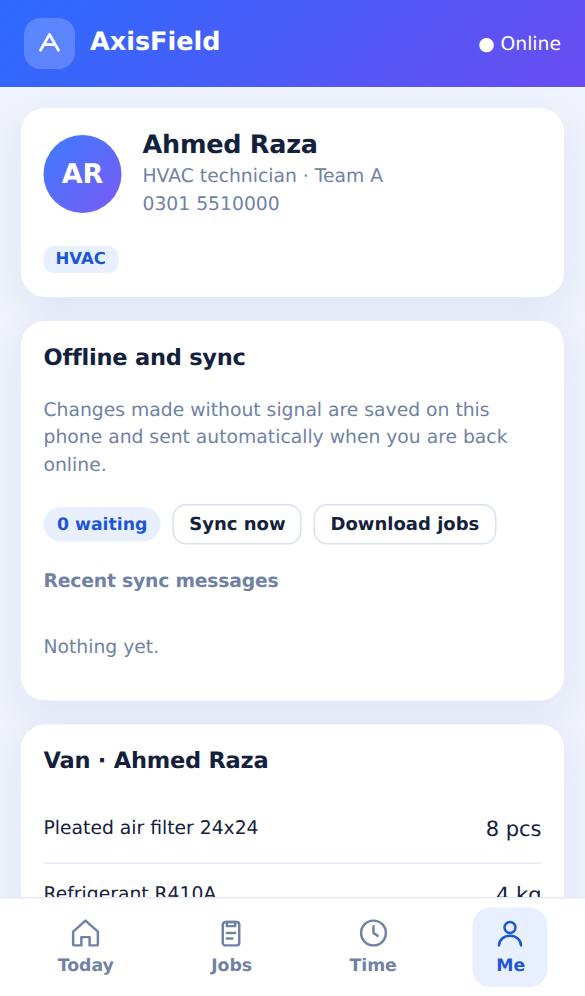
- Me shows your details, skills, today's summary and a sign-out button.
9.6 When something goes wrong
| Problem | What to do |
|---|---|
| "Your session expired" bar | Tap Sign in again. Your changes are kept on the phone and sent after you sign in. |
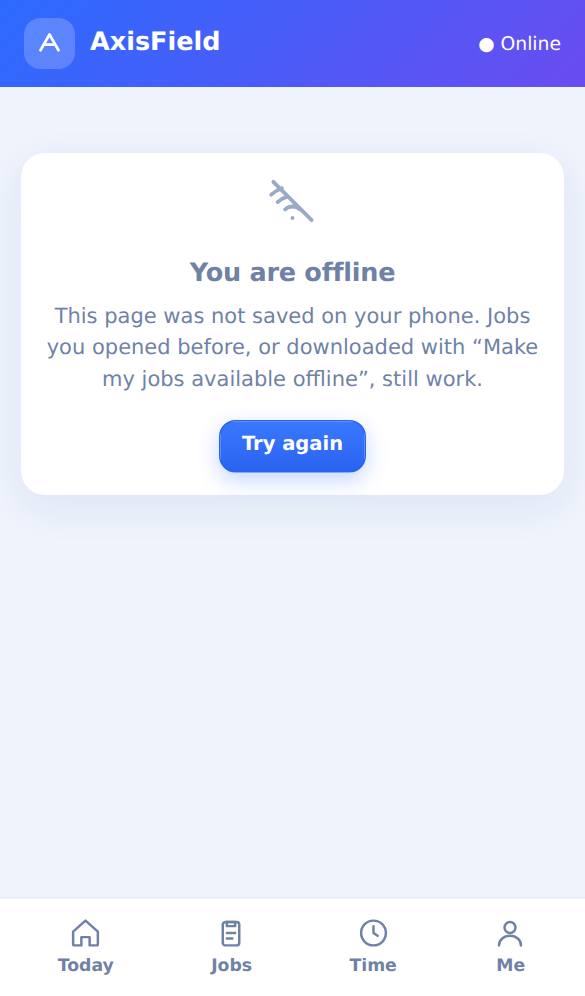
| A job opens as "Offline" page | That job was not saved. Next time use Make my jobs available offline while you have signal. |
| Photo does not upload | It stays in the outbox and sends automatically with signal. Keep the app installed. |
| You cannot change the status | Only the lead technician moves a job. Crew members can see the job. |
10Timesheets and overtime
SupervisorAdministratorTechnician10.1 How time is recorded
Nobody types hours. Timesheet lines are created from what the technician does on the phone:
| Technician action | Line created |
|---|---|
| Start travel → I've arrived | Travel |
| Start work → Complete job | Work |
| Take a break → resume | Break (not counted as work) |
Times come from the phone's clock (even when offline) and are stored in your company's time zone. When a job is completed its lines are submitted for approval.
10.2 Approve timesheets
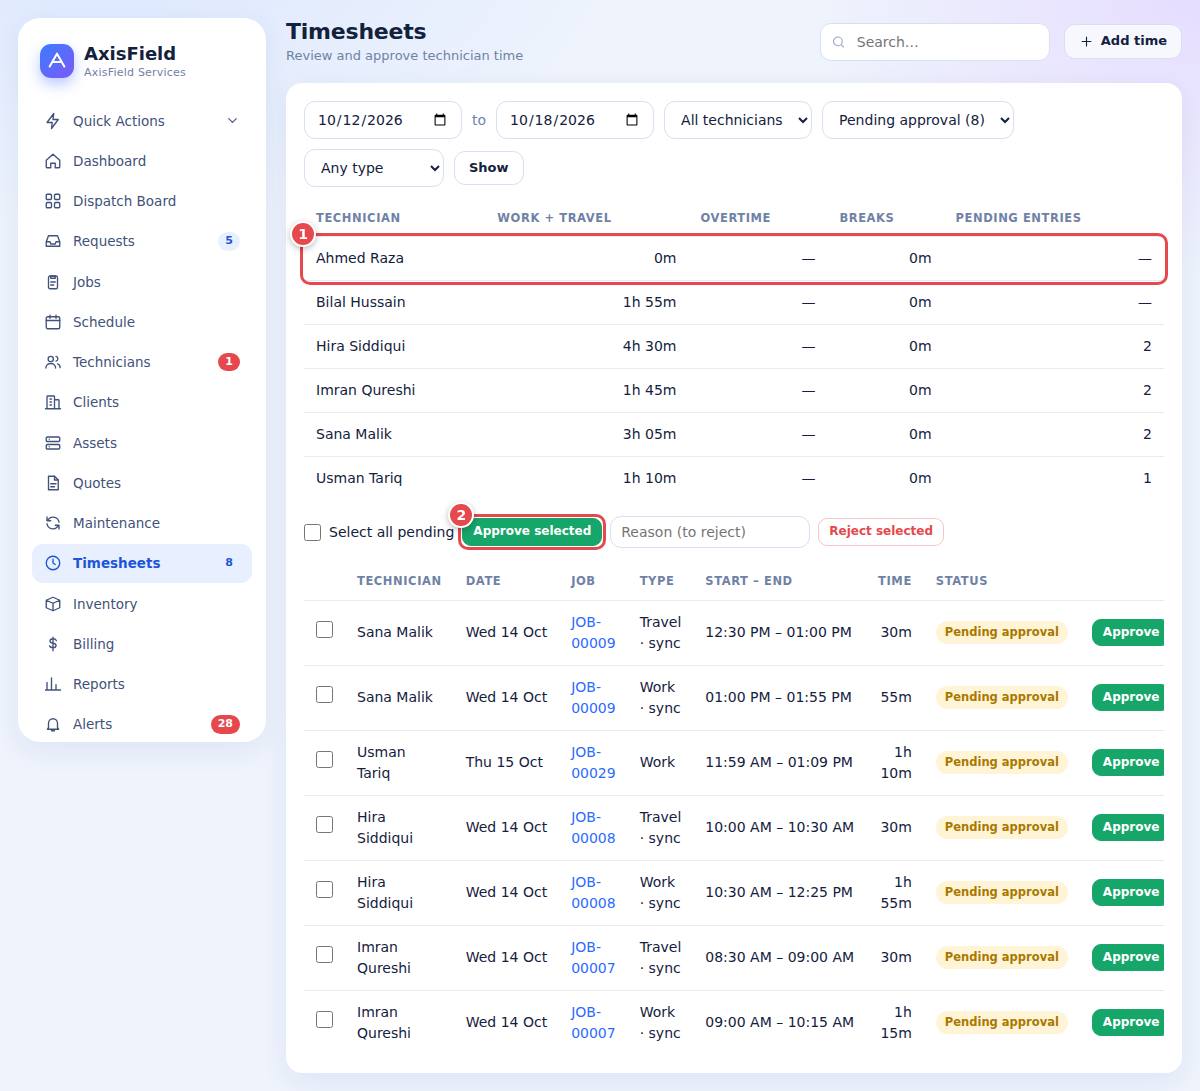
- Open Timesheets. The number in the menu tells you how many are waiting.
- Use the filters (date, technician, status). The summary at the top shows worked hours, overtime, breaks and pending lines per technician.
- Tick the lines you want (1) and press Approve selected (2) or Reject selected. You can also press Approve on a single line.
- If a technician forgot to record time, use Add and approve to add the missing line by hand.
- Approved lines feed job costing and payroll reports.
10.3 Overtime
Settings has Overtime after (hours per day) and the multiplier. For each technician and day, hours beyond the limit are marked overtime and costed at the multiplier (for example 1.5 times the hourly cost). Overtime shows in the timesheet summary and in the job cost.
11Inventory
DispatcherSupervisorAdministratorInventory tracks parts in warehouses and in each technician's vehicle, reserves them for jobs and records what was consumed.
11.1 Set up locations and parts
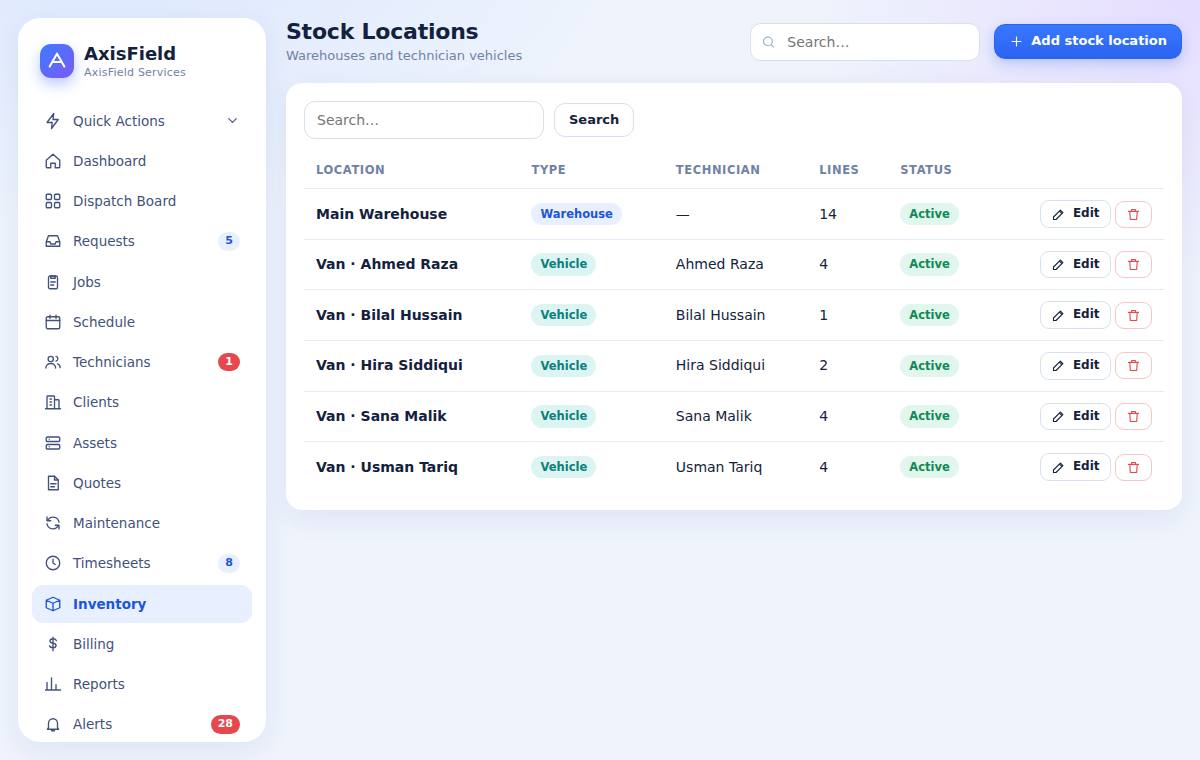
- Open Inventory, Locations and add your warehouse. Add a vehicle location for each van and link it to its technician.
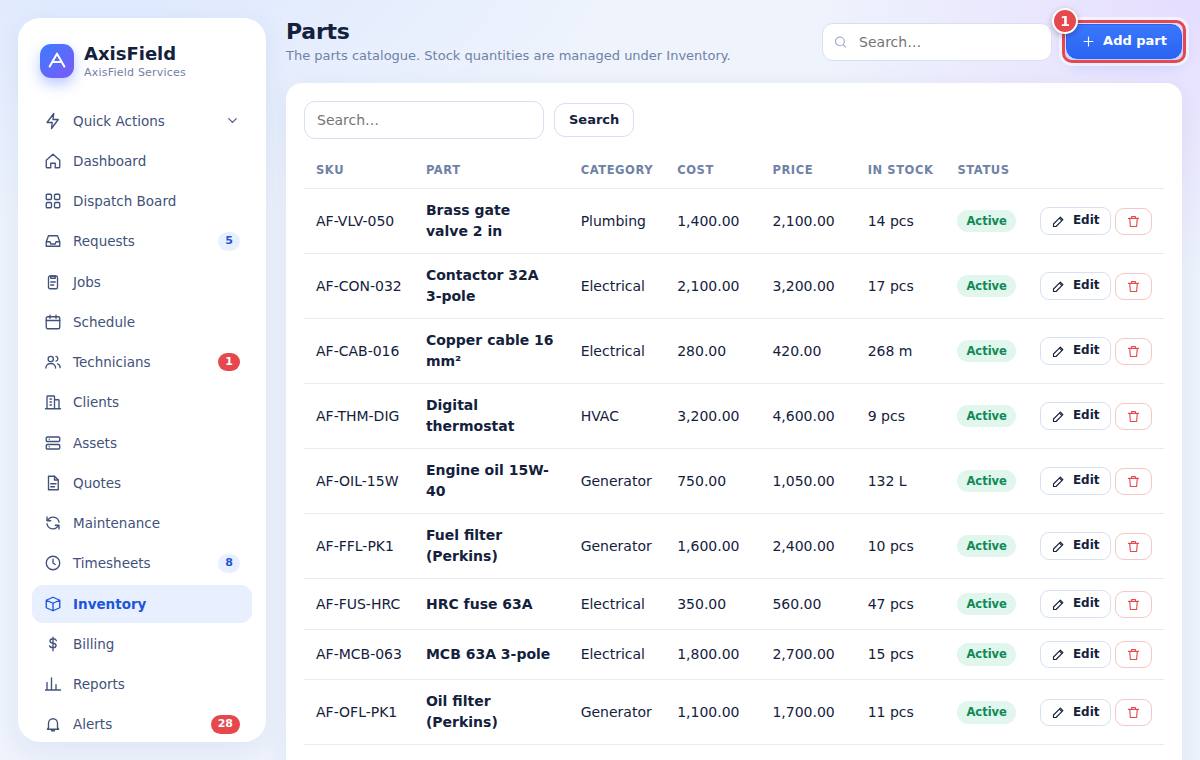
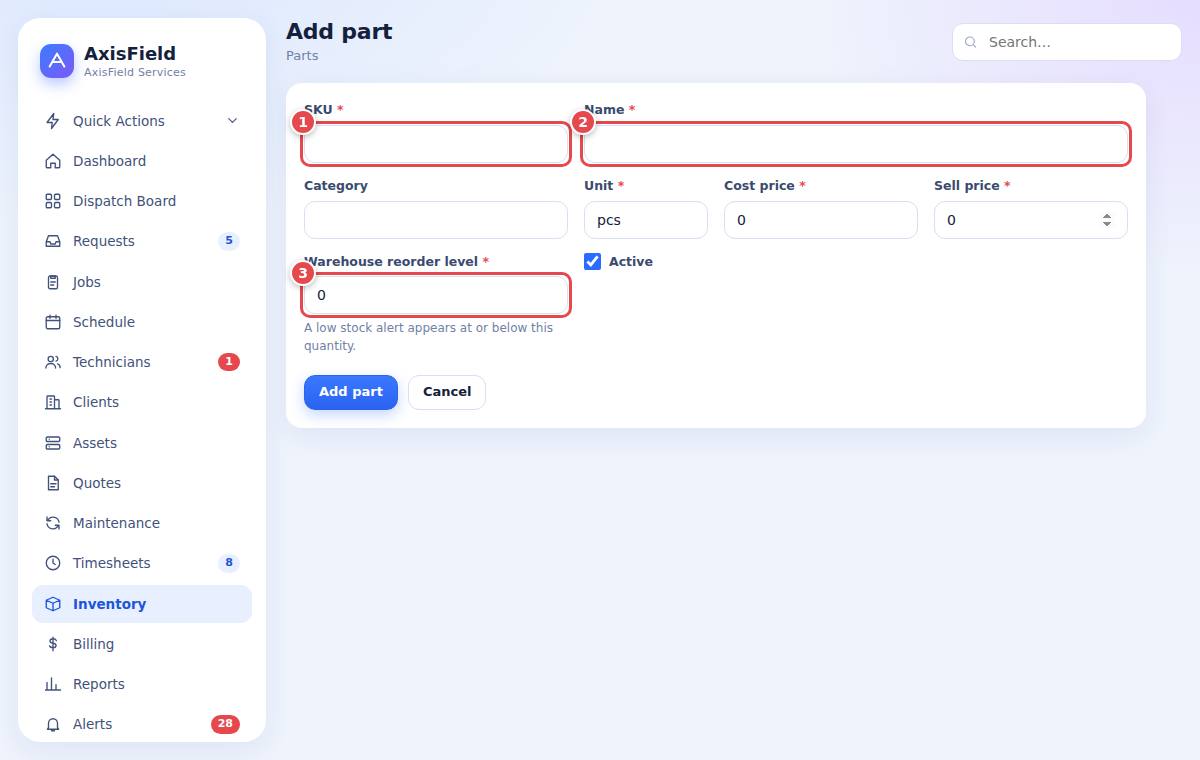
- Open Parts and press Add part. Type the SKU (1), name (2), unit, unit cost and sell price. Set the minimum (reorder level) and par (target level) used for replenishment (3).
11.2 See what you have
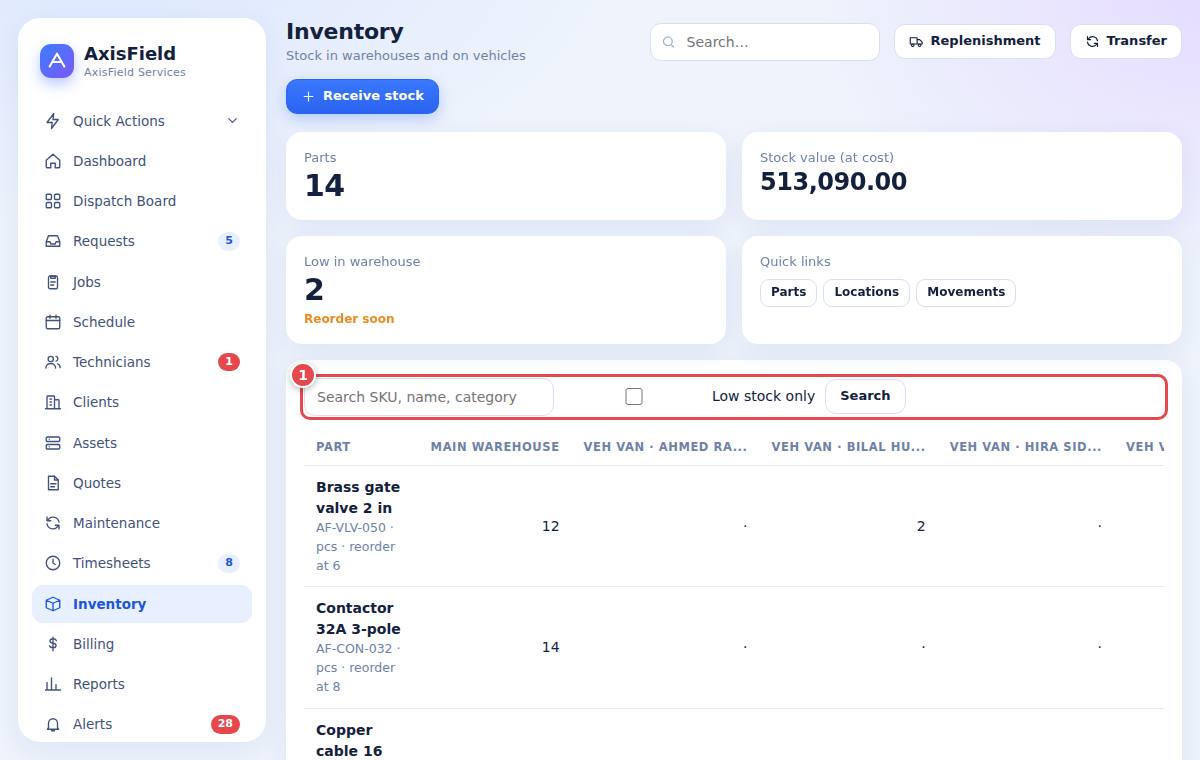
Inventory lists every part with quantity per location, what is reserved for open jobs and what is available. Low stock shows in colour. Adjust corrects a count after a stock-take (give a reason).
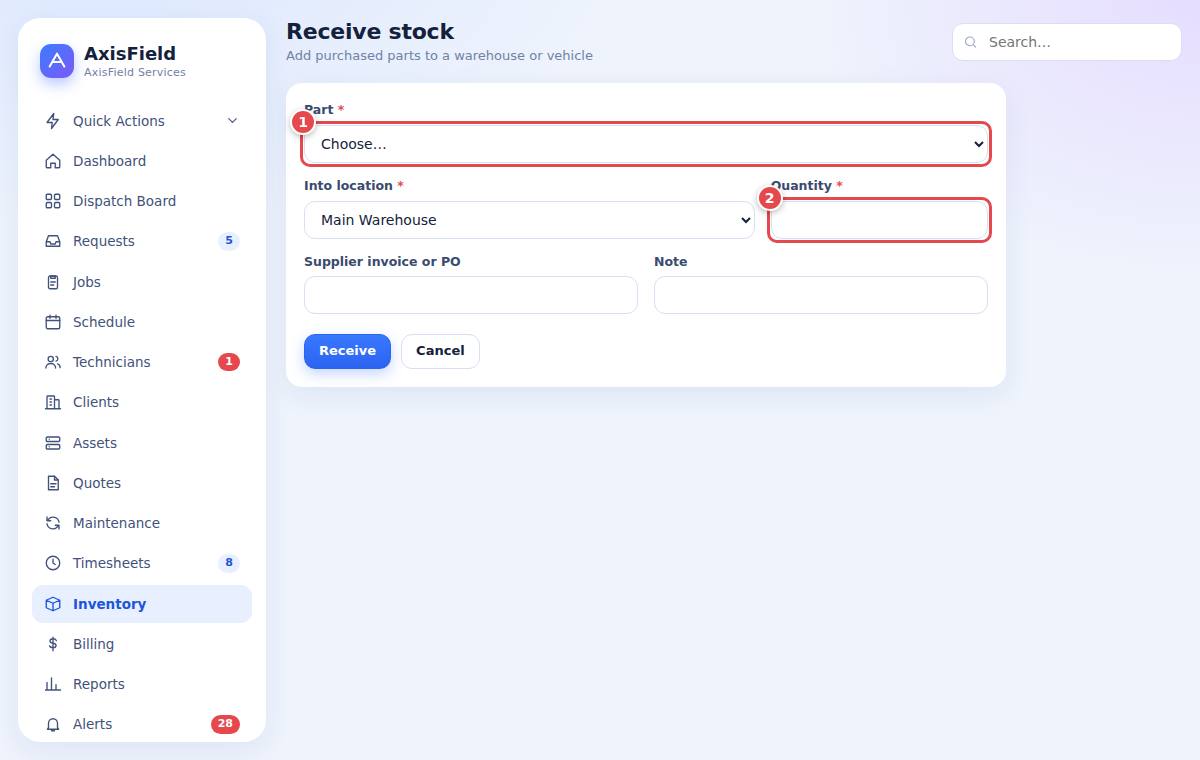
11.3 Receive stock
- Open Receive stock (Quick Actions or Inventory).
- Choose the location (1), the part and the quantity (2). Add a reference such as the supplier invoice.
- Save. The quantity goes up and a movement is logged.
11.4 Move stock to a van
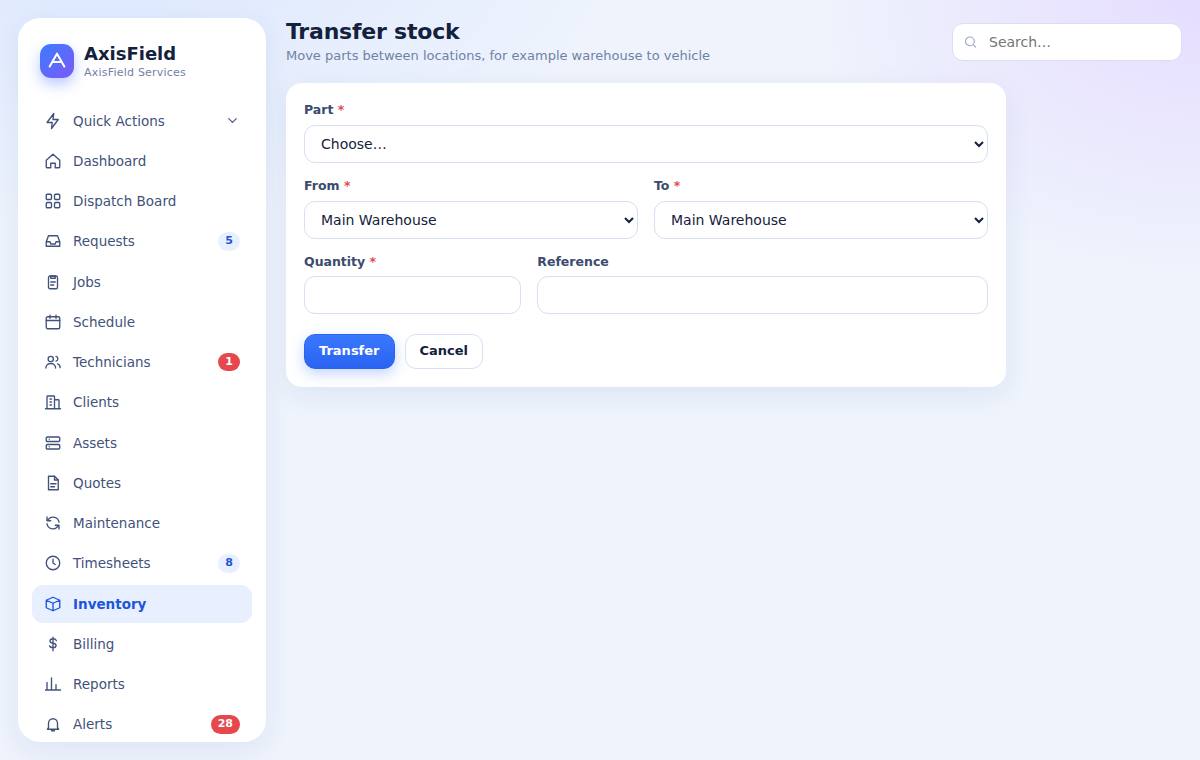
Use Transfer: choose where from, where to, the part and quantity. Parts used on a job are taken from the technician's vehicle, or from the first warehouse when there is no vehicle, so keep vans stocked.
11.5 Reservations and consumption
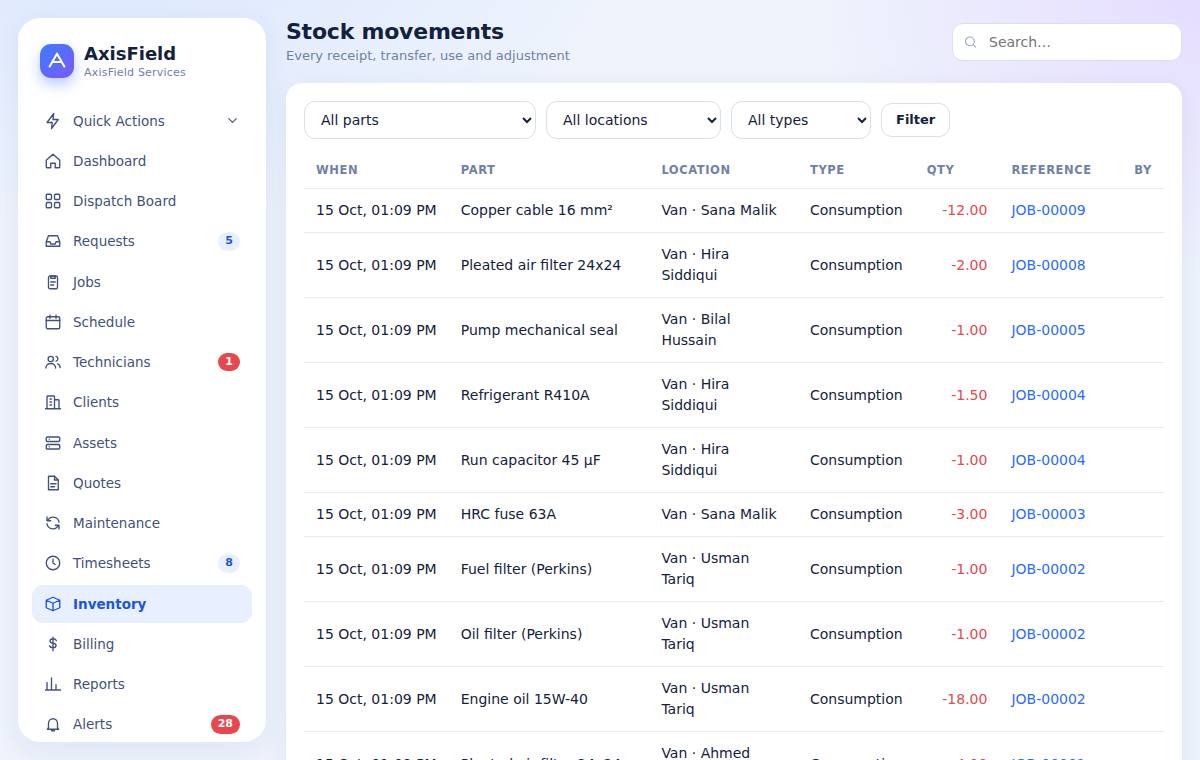
- When you add a part to a job's Parts tab you choose Reserve (set aside for the job) or Use (consumed now). Reserved quantities cannot be promised to another job.
- When the technician adds the part on the phone, the quantity is consumed from the vehicle and the cost goes on the job.
- Every change is listed under Movements.
11.6 Replenishment
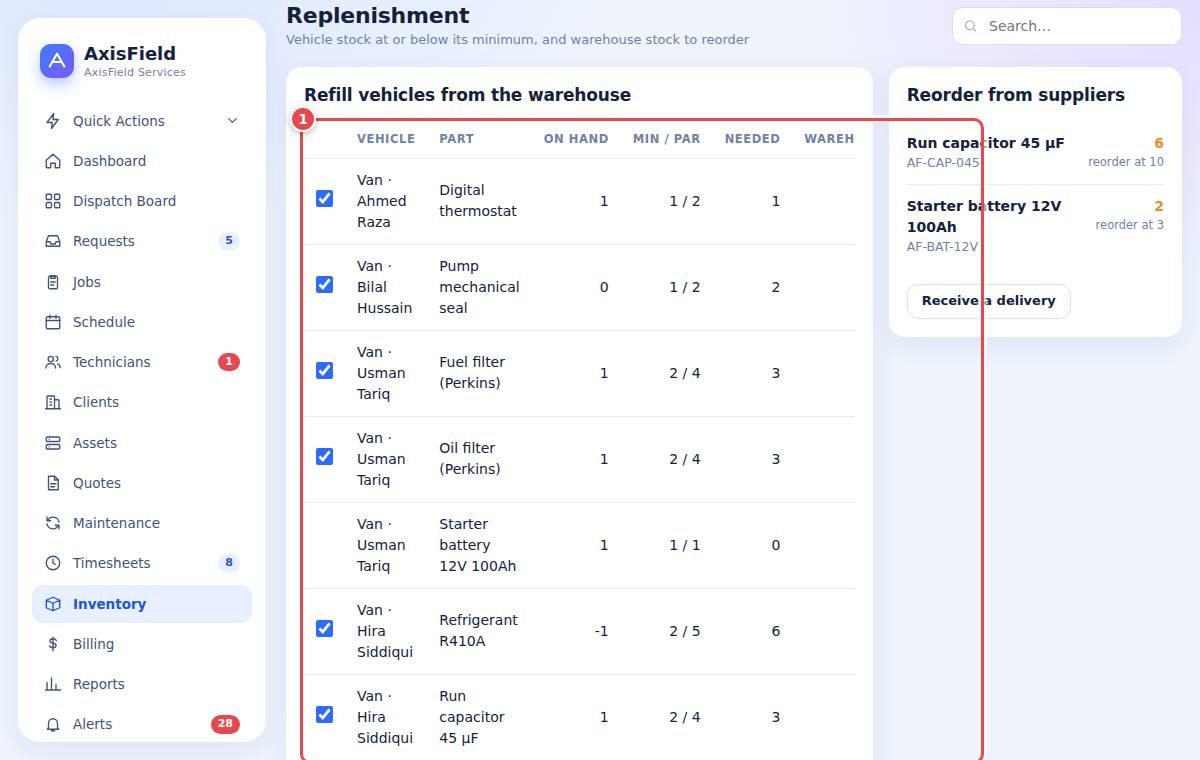
Replenishment has two lists. Refill vehicles from the warehouse shows vans below their minimum: tick the lines and press Transfer selected to move stock up to the par level. Reorder from suppliers shows warehouse stock below its minimum, to buy.
12Quotes and additional work
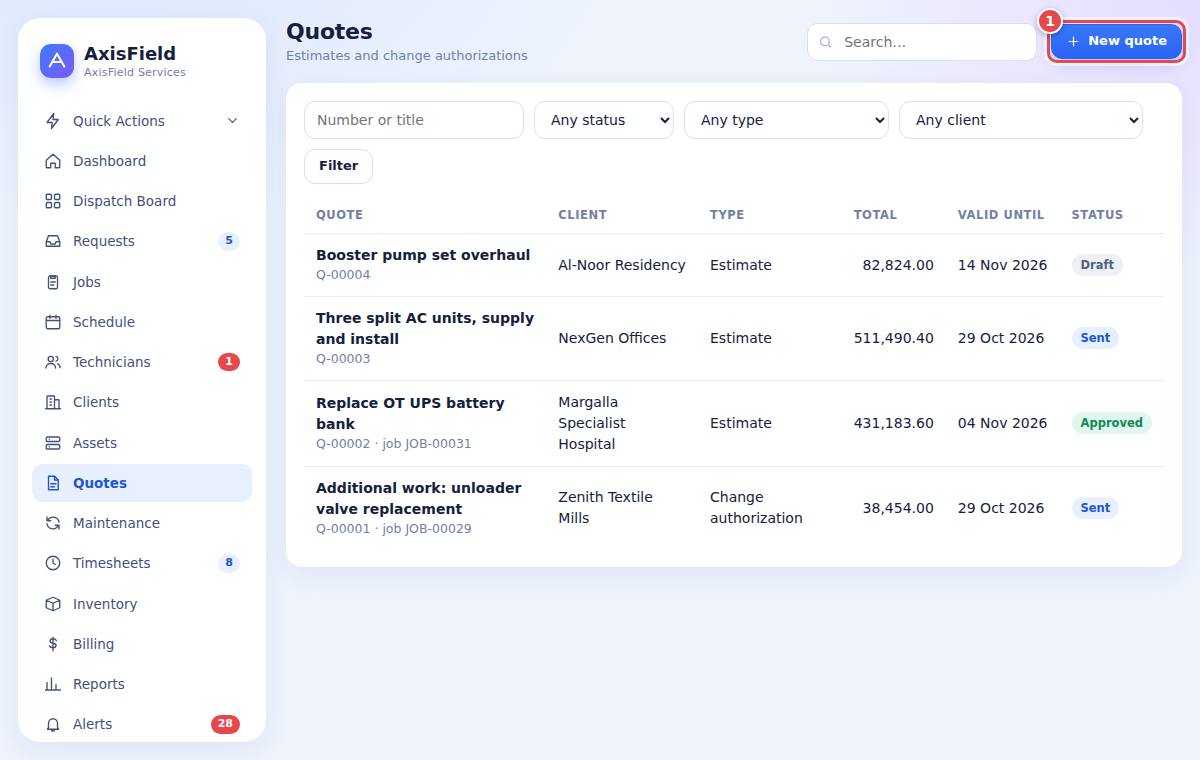
DispatcherSupervisorAdministratorClientQuotes (estimates) price work before it is done. They are also used for change authorizations, the extra work found on site.
12.1 Create a quote
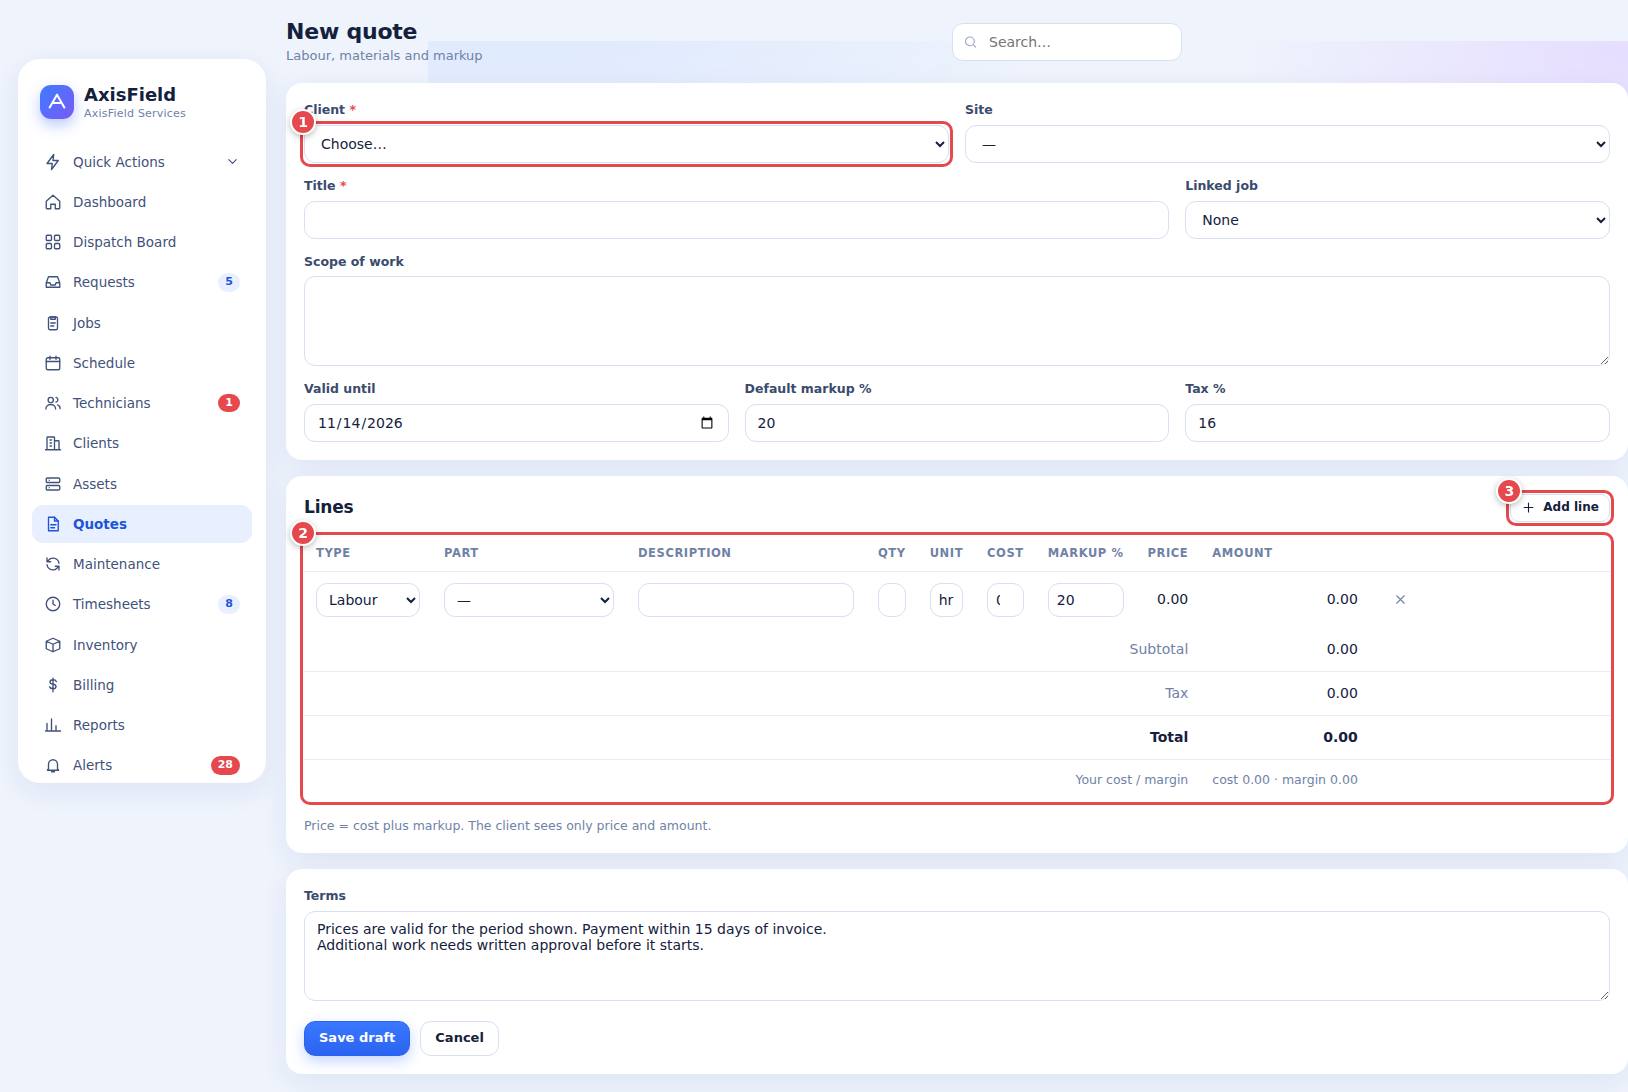
- Open Quotes and press New quote. Choose the client (1) and site, type a title and describe the scope of work.
- Set Valid until, the default markup % and Tax %. The terms are copied from Settings and can be edited.
- Add lines (2): choose the kind (labour, material or other), pick a part from stock or type a description, enter quantity and cost. The sell price is cost plus markup. Use Add line for more.
- Save as Draft. You can edit it freely while it is a draft.
12.2 Send it and record the decision
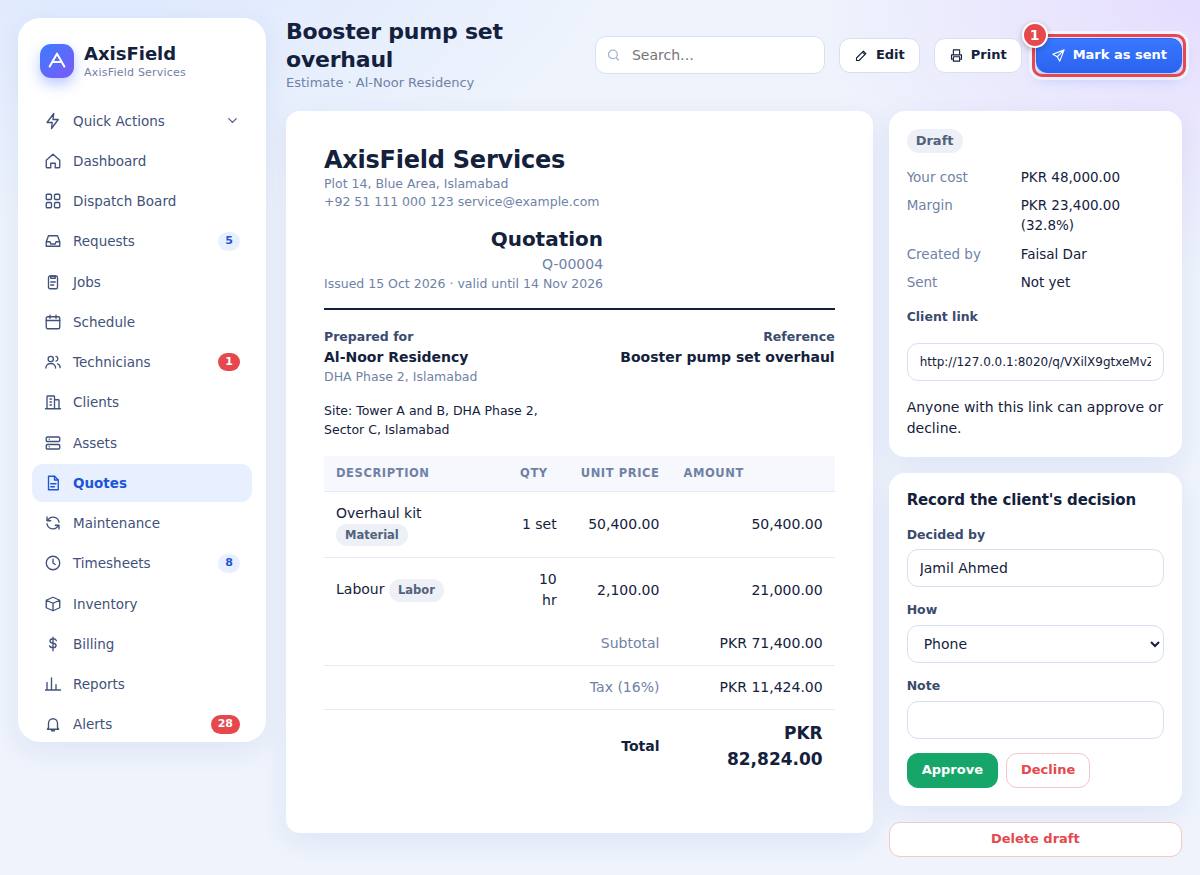
- Open the quote and check the totals. Press Mark as sent. A link to the client's quote page is shown: copy it and send it by email or WhatsApp. You can also press Print for a paper copy.
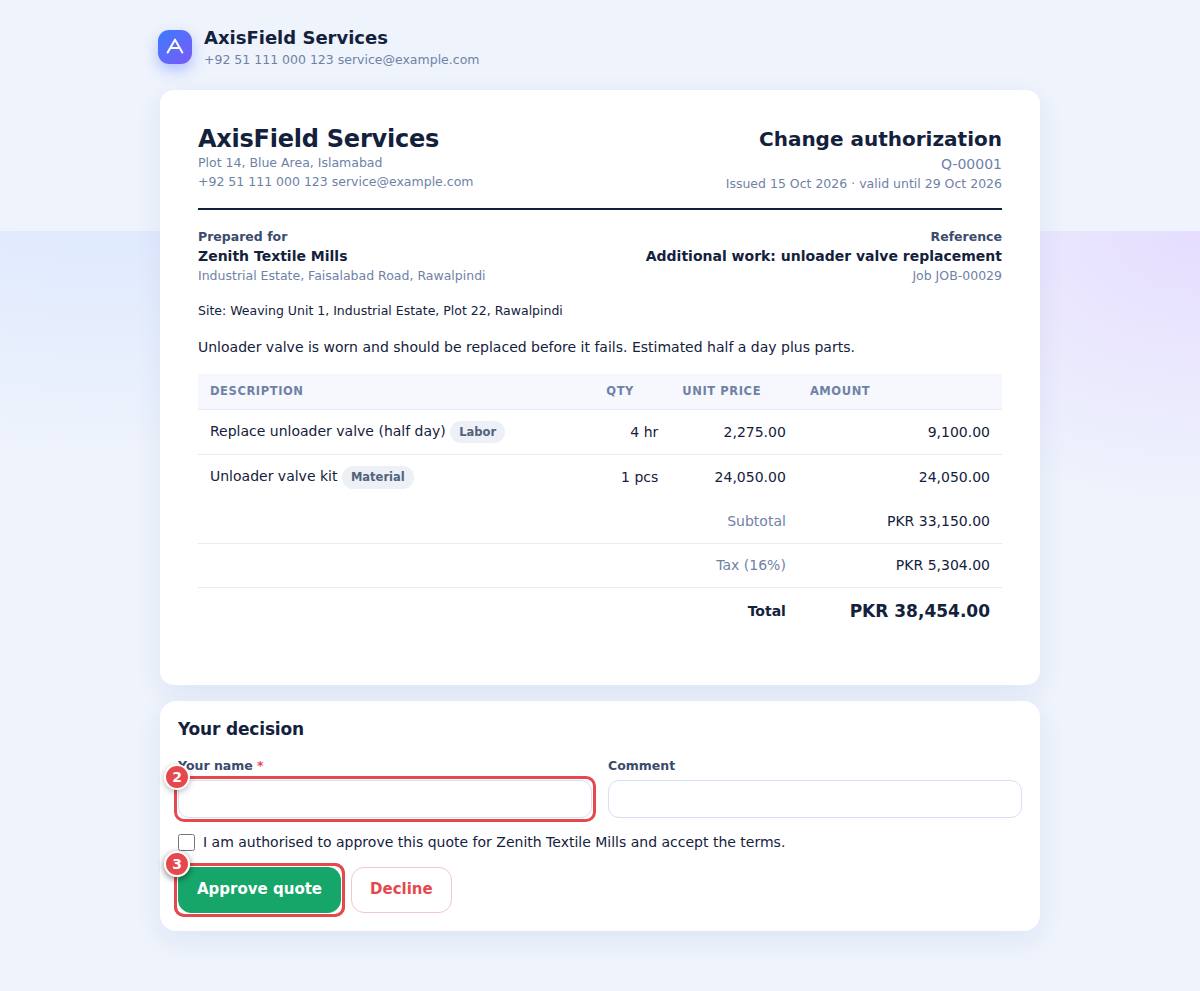
- The client opens the link, reads the quote and presses Approve (typing their name and ticking the agreement) or Decline. No account is needed.
- If the client answers by phone, record it yourself under Record the client's decision (Approve or Decline).
- After approval press Create work order to turn the quote into a job. The approved price becomes the job's fixed price.
13Maintenance contracts
DispatcherSupervisorAdministratorA maintenance contract (planned maintenance) creates the recurring visits for you, so servicing is never forgotten.
13.1 Create a contract
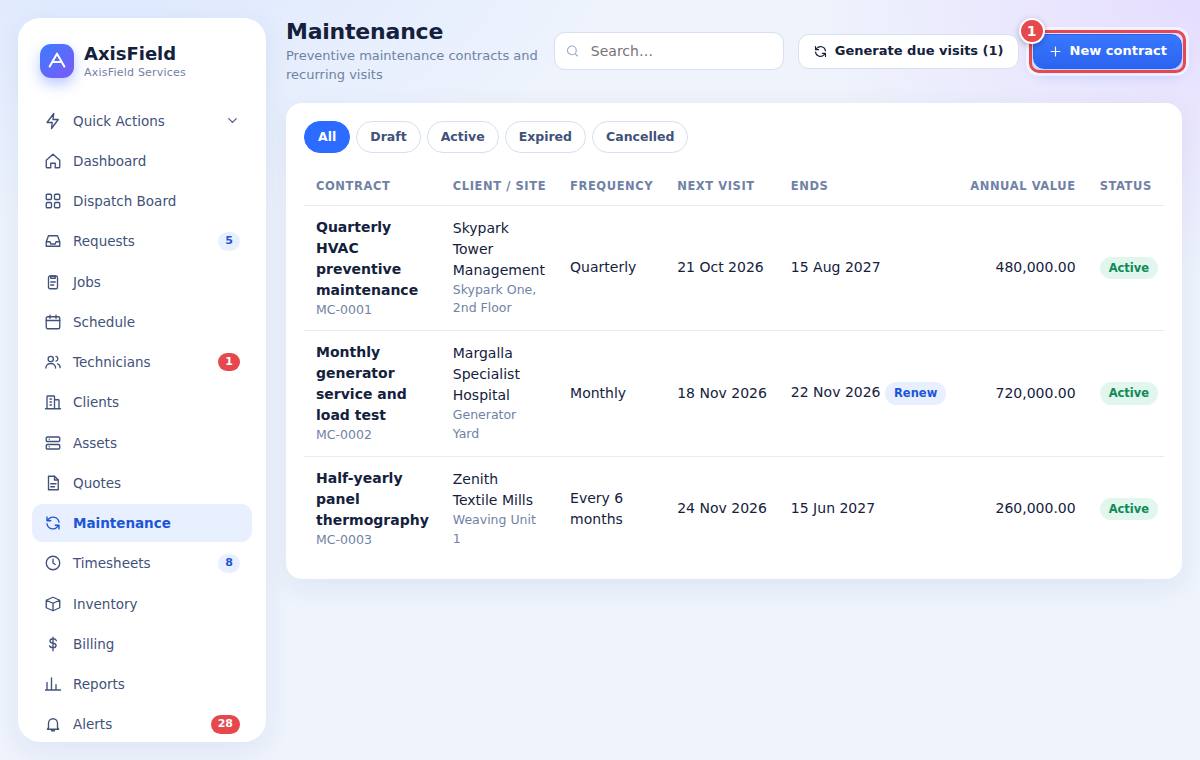
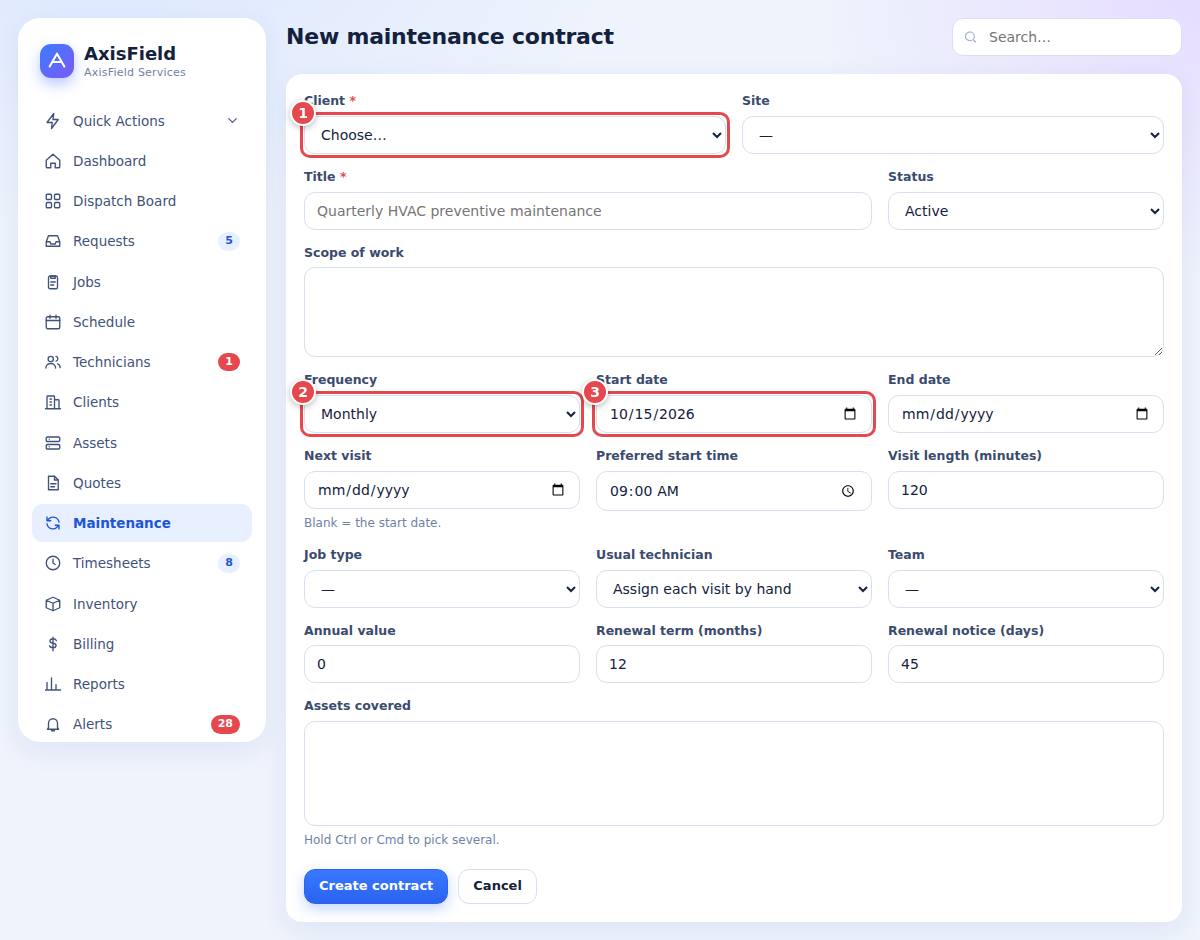
- Open Maintenance and press New contract. Choose the client (1) and site and write a title and the scope of work.
- Choose the frequency (2): weekly, every 2 weeks, monthly, quarterly, every 6 months or annual, and the start date (3) and optional end date. The next visit is set from the start date.
- Choose the job type, preferred start time, visit length, the usual technician or team, and tick the assets covered.
- Enter the annual value, renewal term in months and renewal notice days. Save.
13.2 How visits are created
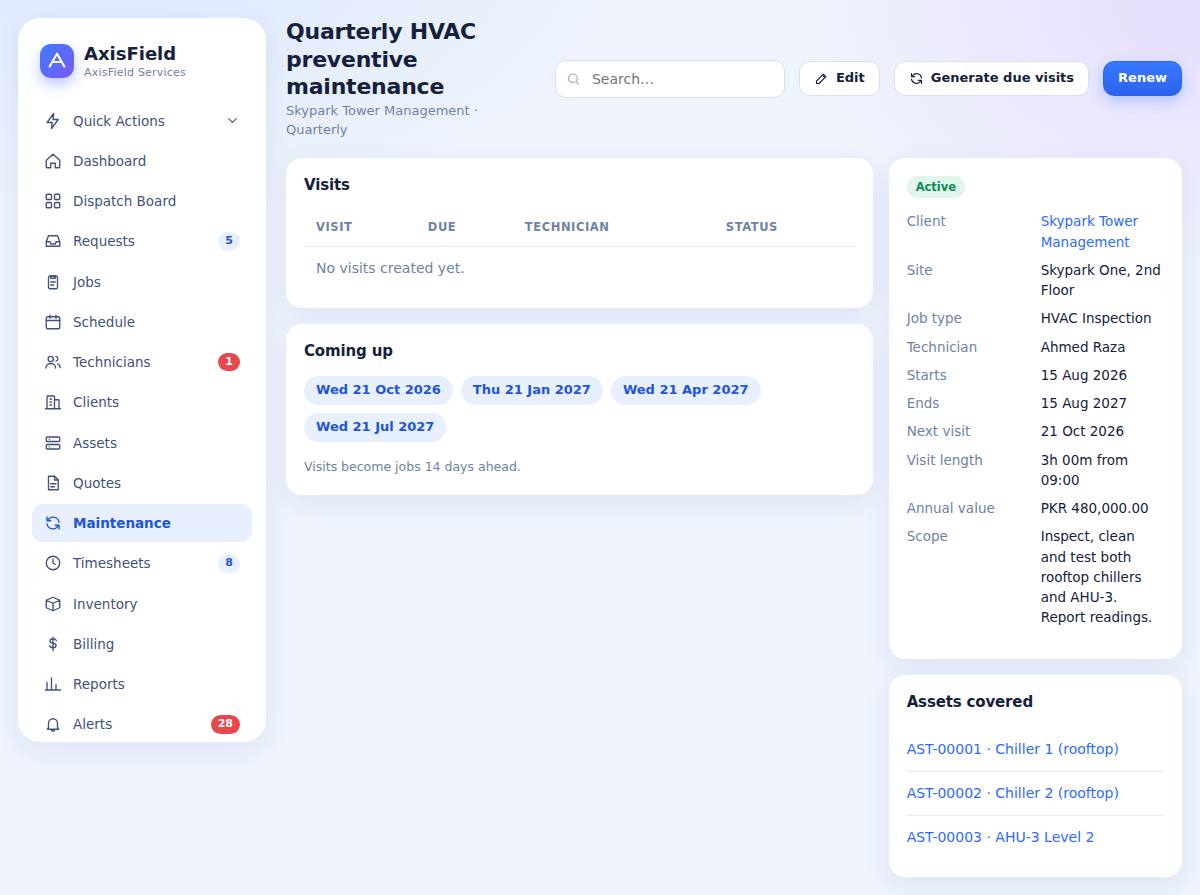
- Every night at 02:00 (company time) the system creates a work order for each active contract whose next visit is within the days ahead set in Settings. The job copies the checklist, client, site, assets and usual technician and moves the contract's next visit date forward. The same visit is never created twice.
- To create visits now, press Generate due visits on the list or on one contract.
- The contract page shows Visits done, Coming up and the Assets covered.
13.3 Renewals
When the end date is near (within the renewal notice days) the contract is flagged renewal due on reports and alerts. Press Renew to extend it by the renewal term. A contract past its end date is marked expired and stops creating visits.
14Costing, billing and reports
SupervisorAdministrator14.1 How a job is costed
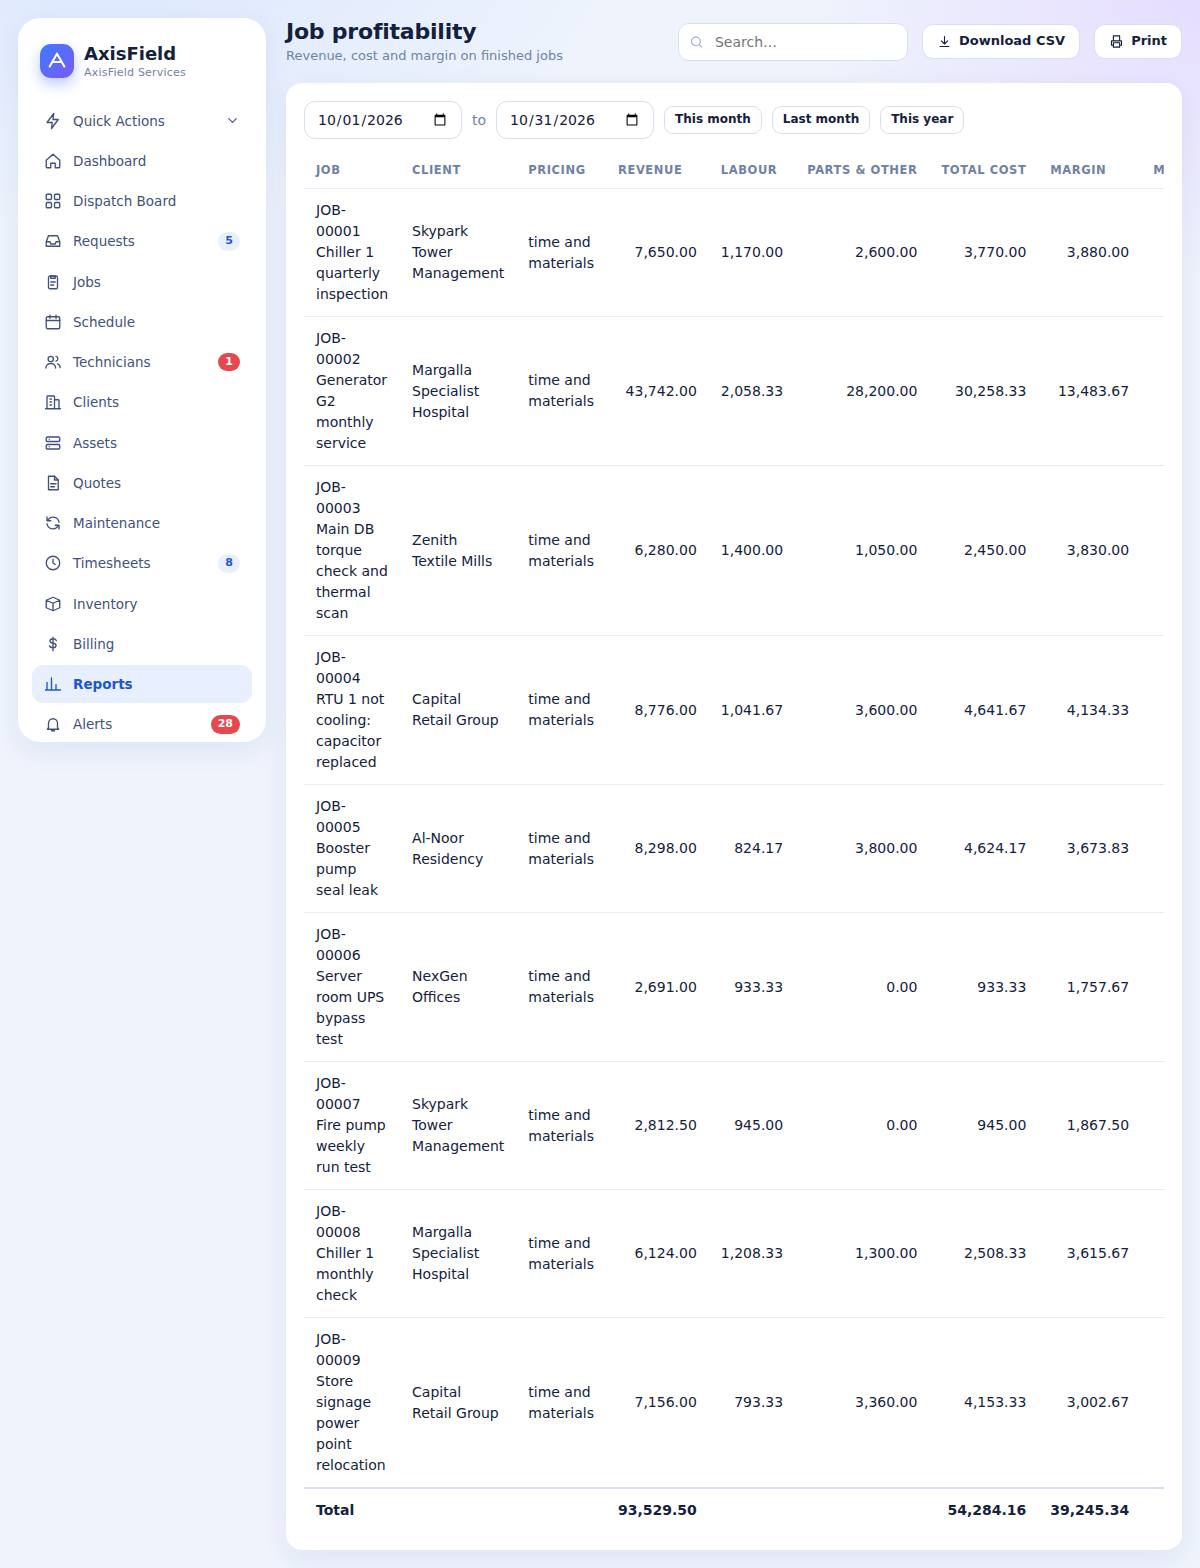
| Part of the job | How it is worked out |
|---|---|
| Labour cost | Approved timesheet hours × the technician's hourly cost. Hours beyond the daily limit use the overtime multiplier. |
| Parts | Quantity used × part cost. Selling price adds the markup. |
| Other costs | Subcontractors, travel, permits and anything added under Time & cost, Add cost. Tick Bill to client to charge it (a markup applies). |
| Revenue | Fixed price when the job has an approved quote; otherwise time and materials (billable hours × labour rate + parts + billable costs). Approved change authorizations are always added. |
| Margin | Revenue minus total cost. |
14.2 Billing hand-over
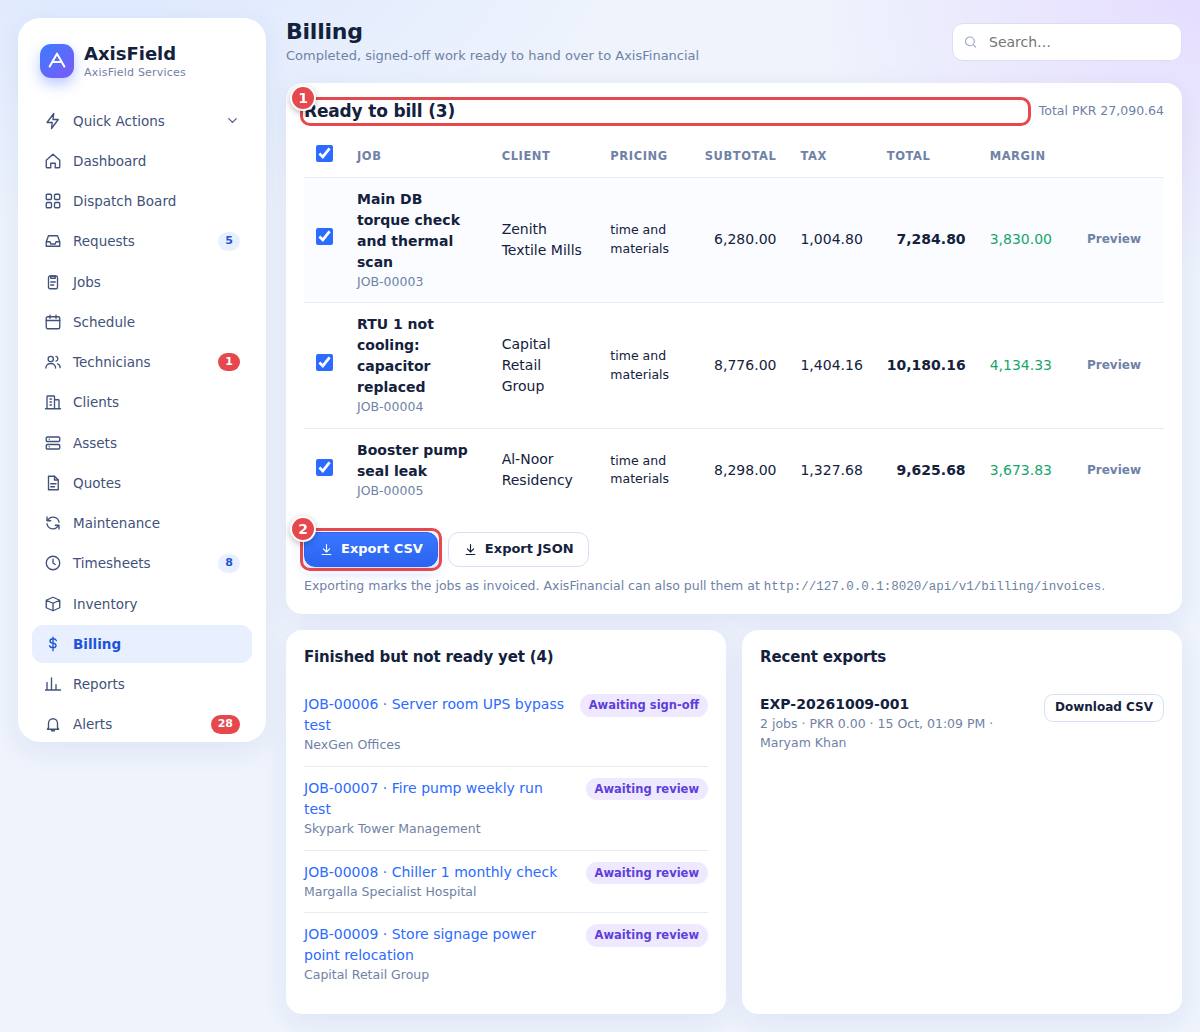
- Open Billing. Ready to bill (1) lists jobs that are signed off. Finished but not ready yet shows what is still missing (review, sign-off, timesheets).
- Press Preview to see the invoice lines for one job.
- Press the CSV or JSON export button. All ready jobs are exported as one batch, marked Invoiced and listed under Recent exports (2), where you can download the batch again.
- Import the file into your accounting system. Or let your accounting system pull the batch by itself (next section).
14.3 Connecting your accounts (API)
For AxisFinancial or another accounting system. Authenticate with the Bearer token shown in Settings (AxisFinancial API token).
| Call | Purpose |
|---|---|
GET /api/v1/billing/invoices | Returns jobs ready to invoice (JSON). |
POST /api/v1/billing/acknowledge | Confirms the jobs were received, marking them invoiced. |
Use Generate new token in Settings if a token is lost. The old one stops working at once.
14.4 Reports
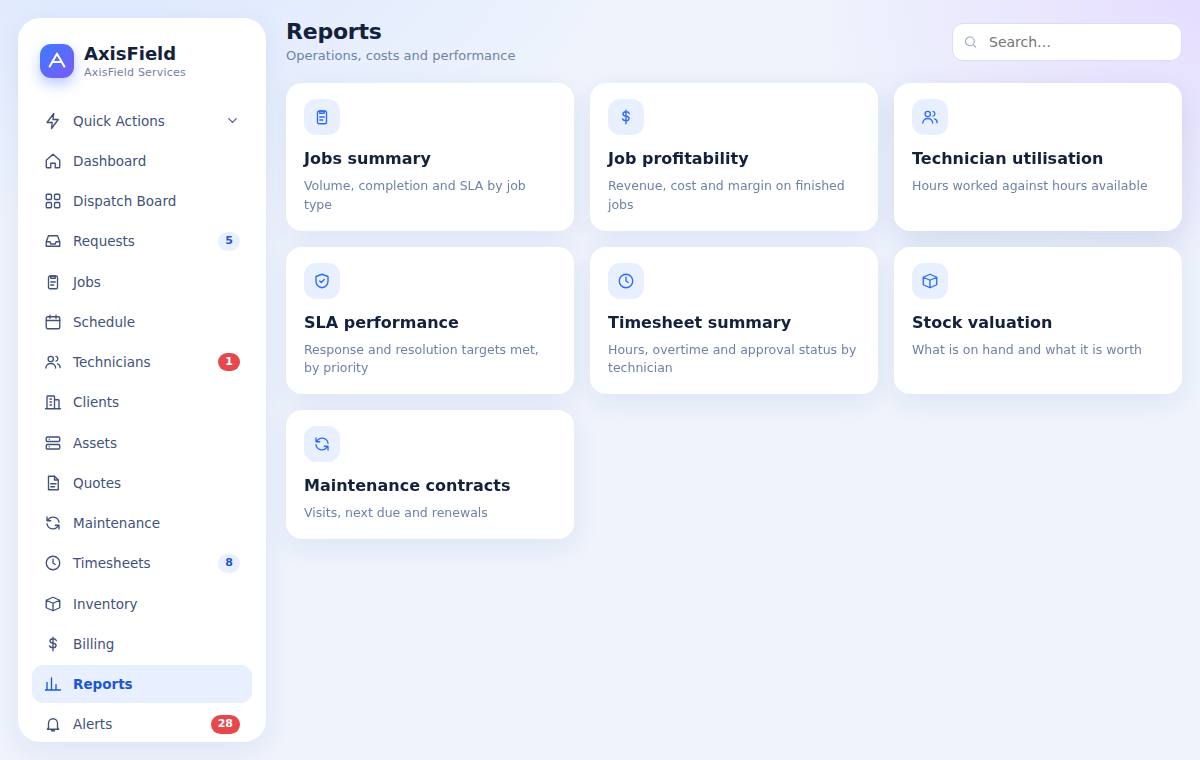
Open Reports for these views. Every report can be filtered by date and downloaded as CSV:
| Report | Shows |
|---|---|
| Jobs summary | Volume, completion and SLA by job type |
| Job profitability | Revenue, cost and margin on finished jobs |
| Technician utilisation | Hours worked against hours available |
| SLA performance | Response and resolution targets met |
| Timesheet summary | Hours, overtime and approval status |
| Stock valuation | What is on hand and what it is worth |
| Maintenance contracts | Visits, next due, renewals |
14.5 Alerts
Alerts collects what needs attention: late check-ins, SLA breaches, requests not answered, jobs waiting for review, timesheets to approve, low stock and renewals. The red number in the menu is the total.
15The client portal
ClientOffice staff (to help clients)The client portal lets your clients see their own work without phoning you. Clients only ever see their own data.
15.1 Get an account
There are two ways:
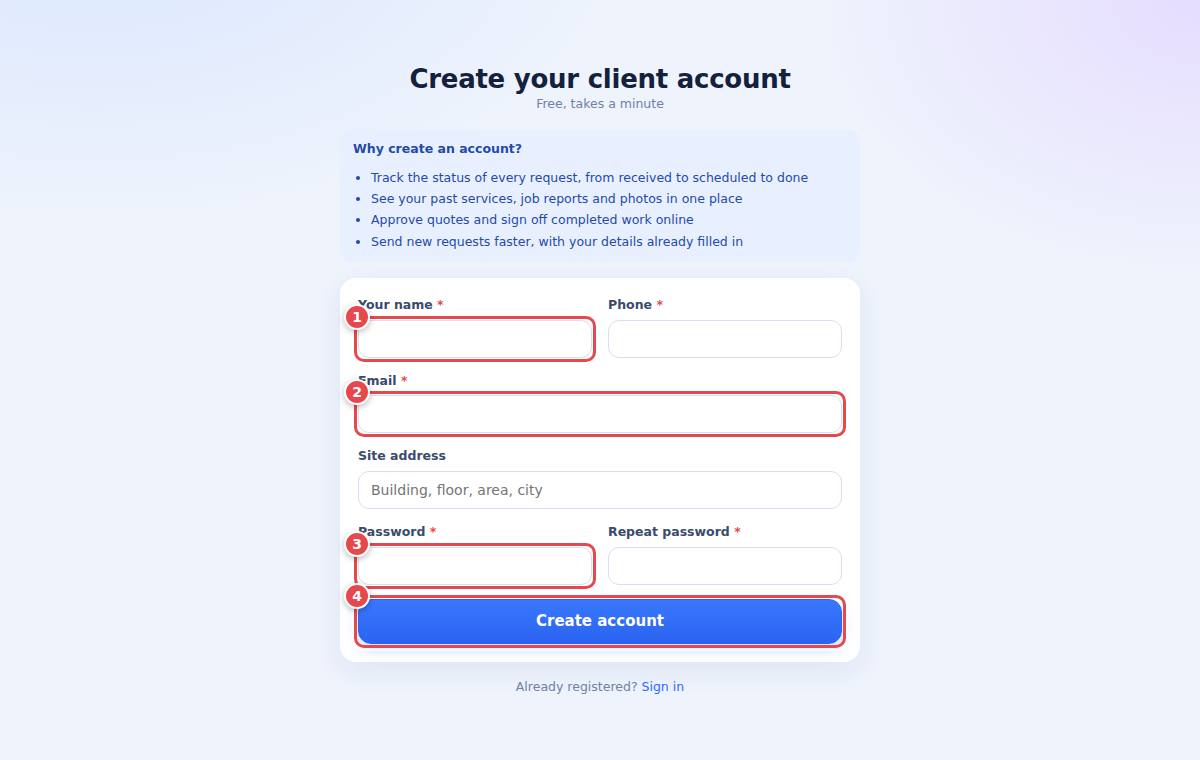
- Register yourself. Open
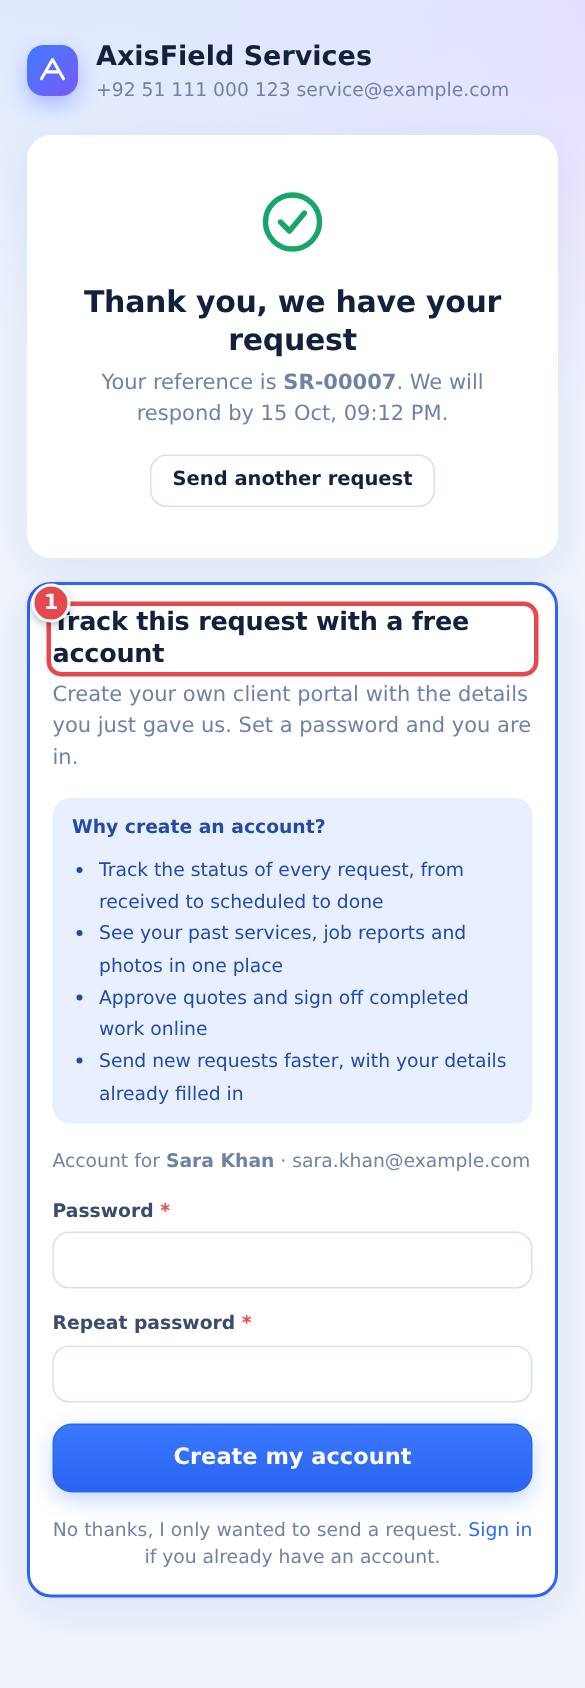
/register(or press Create account on the company page). Type your name, phone, email, short address and a password, then Create account. You are signed in at once. - After sending a request. The "thank you" page offers Track this request with a free account. Set a password and you are in; the request you just sent is linked to your account.
- Created by the office. Your service company can create the login for you and give you a temporary password.
15.2 The portal home
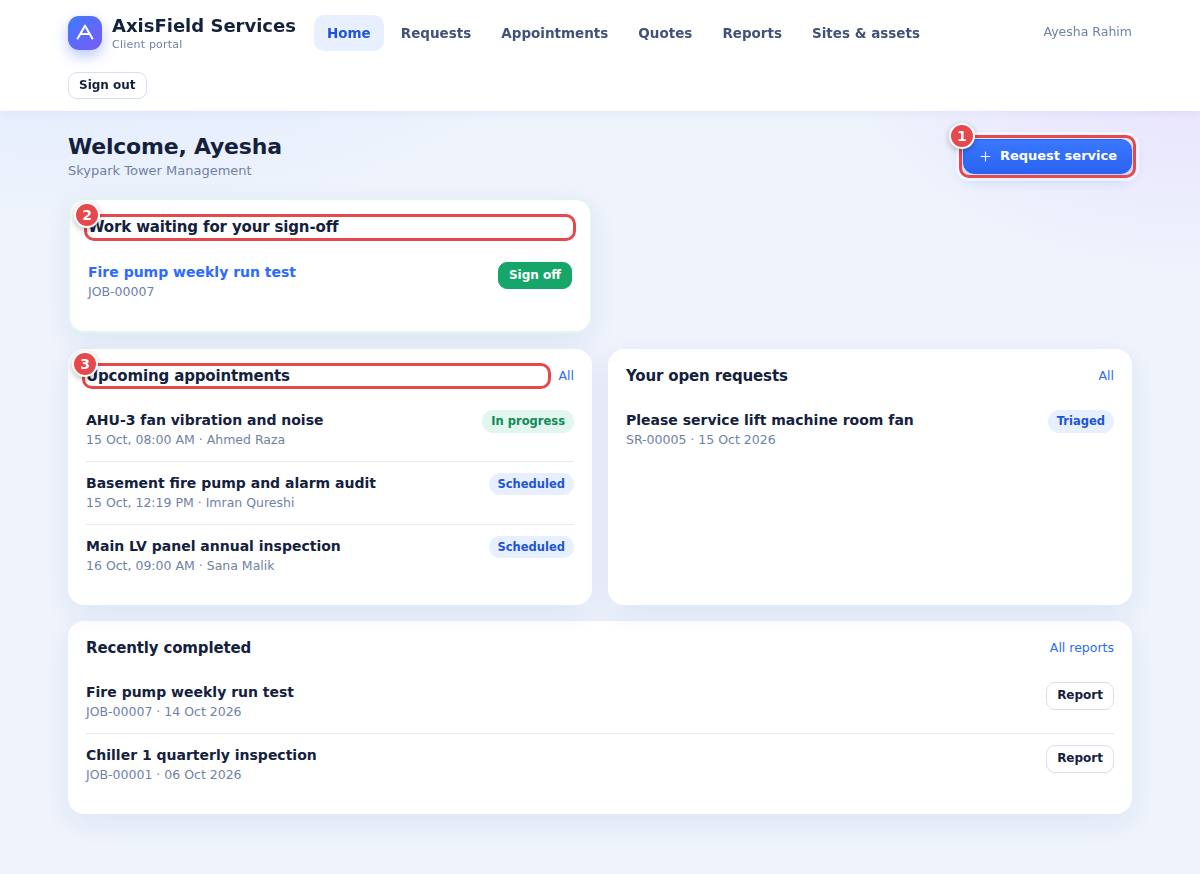
The home page shows Request service (1), jobs waiting for your sign-off (2), your upcoming appointments (3), open requests and recently completed jobs. The top menu has Home, Requests, Appointments, Quotes, Reports and Sites & assets.
15.3 Send a request
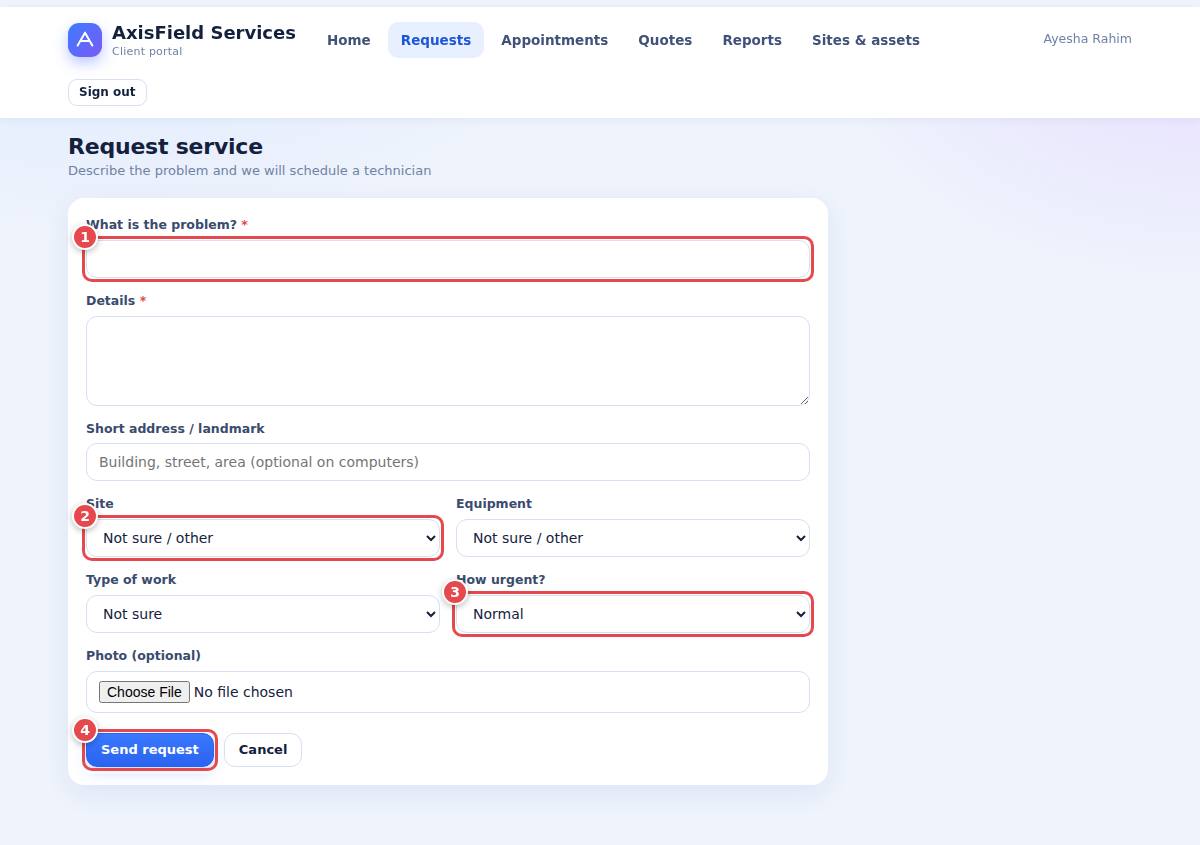
- Press Request service. Type what is wrong (1) and details. Choose the site (2) and equipment, the type of work and how urgent it is (3). Add a photo if it helps.
- On a phone, a box asks to share your current location. Tap Use my location, allow it, and check the short address it fills in.
- Press Send request (4). You get a reference number such as SR-00012 and can follow it under Requests.
15.4 Follow your work
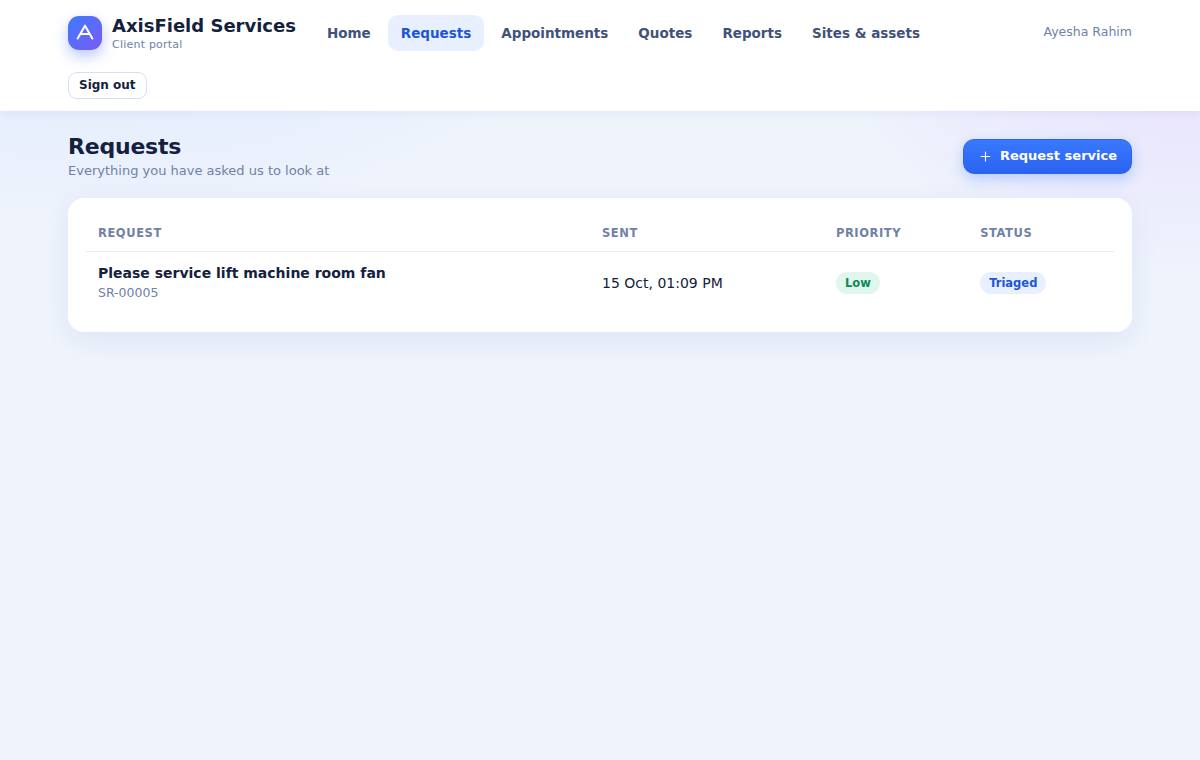
- Requests: status from New to Triaged to Converted (a job was created) with the planned technician and time.
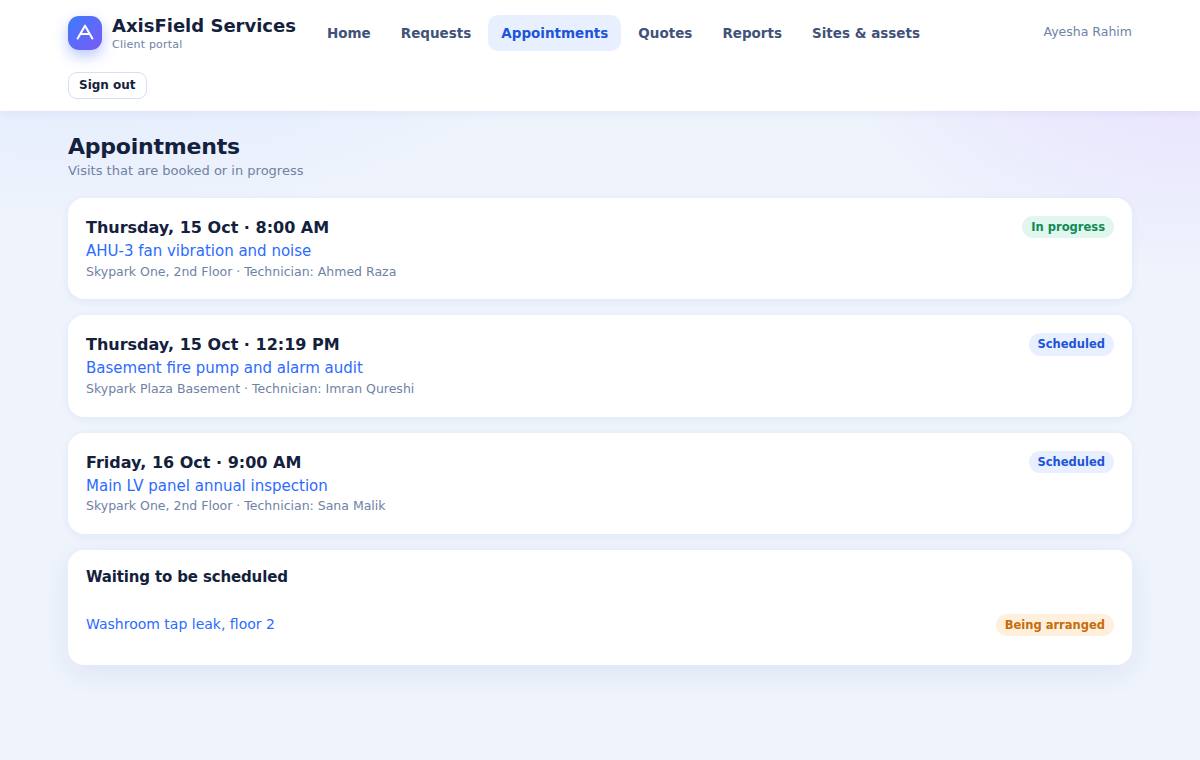
- Appointments: upcoming visits with date, time and technician name.
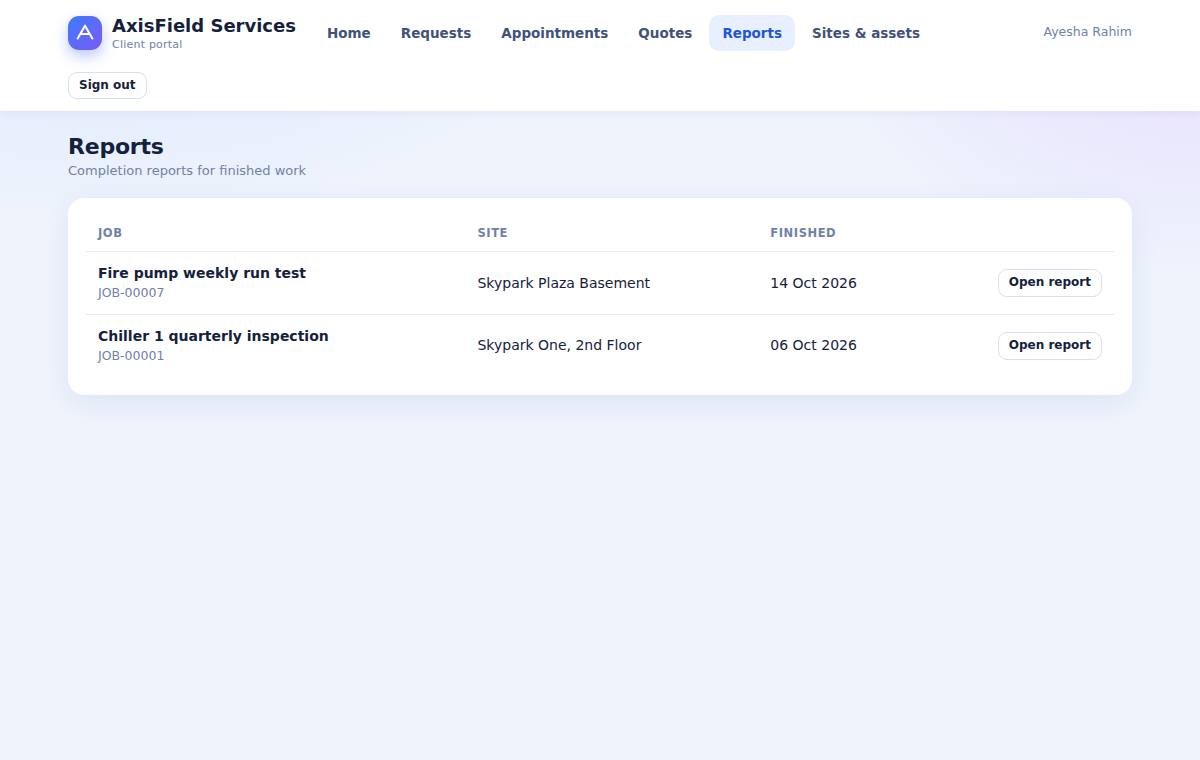
- Reports: completion reports of finished jobs with photos and signature, to print or save as PDF.
- Sites & assets: your sites and equipment.
15.5 Approve quotes and sign off work
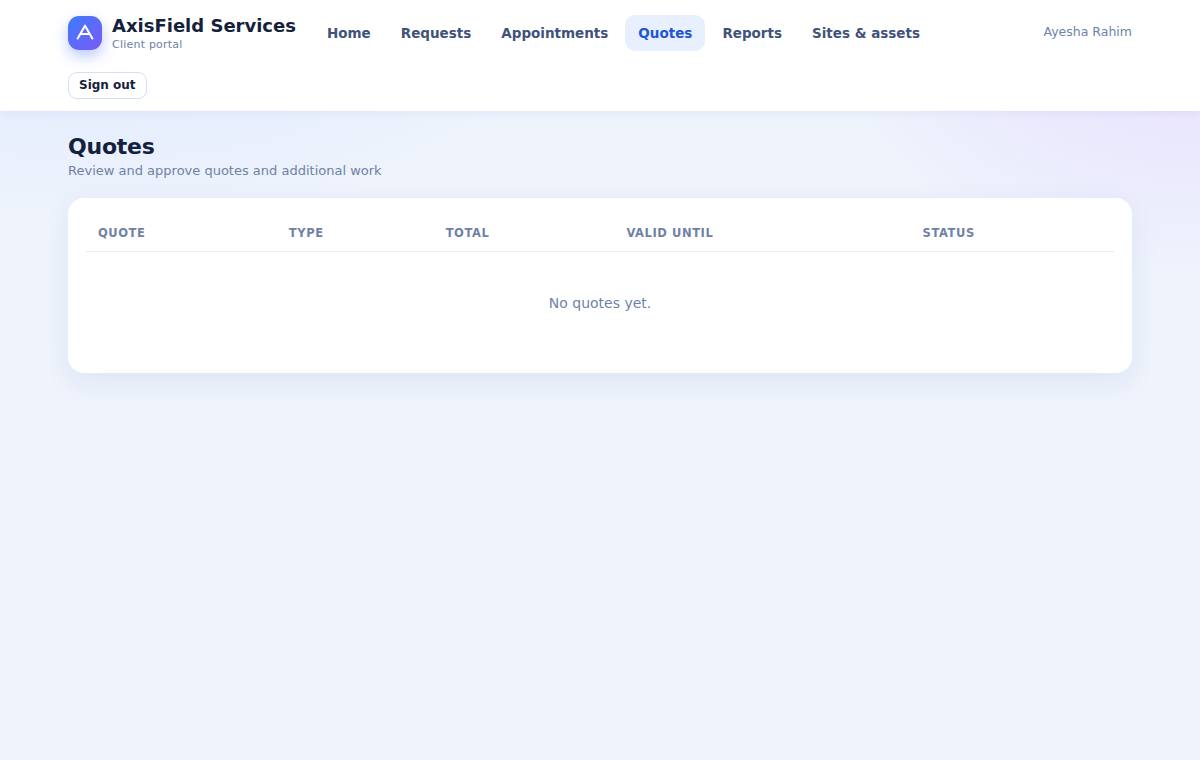
- Open Quotes, read the quote and press Approve or Decline. Approving needs your name and ticking the agreement. Extra work asked for by the technician arrives here as a quote too.
- When a job is finished a Sign off button appears on your home page. Open it, check the work, type your name, give stars and press Sign off.
16Troubleshooting and FAQ
Everyone| Question or problem | Answer |
|---|---|
| I cannot sign in. | Check the email and password. After six wrong tries wait a minute. If you are a technician who applied, the office must approve you first. Ask an administrator to reset your password or check that Can sign in is ticked. |
| A job does not appear on the technician's phone. | The job must be assigned to that technician (or have them in the crew). Ask them to open Today while online to refresh. |
| The technician cannot press "Complete job". | Required checklist steps are not ticked, or they are not the lead technician. |
| Times look five hours wrong. | Check the company time zone in Settings. |
| Dispatch says a technician "does not have the skill". | Add the skill to the technician, change the job type's required skill, or assign anyway. |
| Maintenance visits are not created. | Check the contract is Active, the next visit date, the days-ahead setting, and that the server cron is running. Press Generate due visits to create them now. |
| The client did not receive the quote. | The system gives you the link; you send it. Press Mark as sent and copy the link from the message. |
| The location button does not appear on the request form. | It is shown only on phones, and the site must use HTTPS. If the phone blocks location for the browser, allow it in the browser's site settings or just type the address. |
| Can the system track technicians by GPS? | No. The only location captured is the one a customer chooses to share once with a request. |
| Can a client see another client's jobs? | No. Clients only see records linked to their own client account. |
| How do I get my data out? | Reports have CSV download; Billing exports CSV or JSON; job reports print or save as PDF. |
17Appendix
Reference17.1 Public addresses at a glance
| Address | Purpose | Sign-in needed |
|---|---|---|
/login | Sign in (all roles) | No |
/request | Send a service request | No |
/register | Client registration | No |
/technician/join | Technician application | No |
/q/<token> | Client quote page (sent by you) | No, link only |
/signoff/<job>?signature=… | Client sign-off link | No, signed link, valid 7 days |
/tech | Technician app | Technician |
/portal | Client portal | Client |
/manual | This manual | No |
17.2 Email intake
Point your email provider's inbound webhook (Mailgun, Postmark, SendGrid or your own script) to POST /api/intake/email with the header X-Intake-Token: <your token> and fields such as from, subject and text. A service request is created and matched to a client by email address.
17.3 Words used in AxisField
| Term | Meaning |
|---|---|
| SLA | Service level agreement: the promised response and resolution times for a priority. |
| Work order / Job | One piece of work with a technician, checklist, parts, time and cost. |
| Change authorization | A quote for extra work found on site that the client must approve. |
| Lead / Crew | The main technician on a job, and extra technicians helping. |
| Par level | The quantity you want to keep in a van or warehouse. |
| PM | Planned maintenance: visits created by a maintenance contract. |
| Fixed price / T&M | Billing from an approved quote / from actual time and materials. |
17.4 Demo accounts
A demo installation is loaded with sample data. The password for all is password: admin@axisfield.test, dispatcher@axisfield.test, supervisor@axisfield.test, tech@axisfield.test (technician app), client@axisfield.test (portal). Remove demo data before real use.
17.5 Good habits
- Triage new requests within the SLA time shown on each request.
- Always give technicians clear instructions and the right job type so the checklist is correct.
- Review and sign off jobs the same day, so billing is never waiting.
- Keep vans stocked and check Replenishment weekly.
- Approve timesheets daily so overtime and costs stay accurate.